Showing posts with label shamrock card. Show all posts

Thursday, March 10, 2022

Shamrock Studded Easel Card


Shaped holiday card and decoration includes center panel 
with holes cut to position 97 small studs for 
a fun textured card front. 
Scalloped base layer adds a delicate flair. 
Add-on easel base is a half-height bi-fold panel with 
“back” bottom straight edge to assist the card 
to stand upright for display. 
Inside, place the plaque with tiny shamrock accent 
to include a written or stamped sentiment.  
Shaped card measures approx. 5.” tall x 5.” wide 
when assembled. 

ASSEMBLY: 1. Identify and cut the shapes:
left to right -- card base, studded front,
folding easel base to glue to base lower backside
NOT SHOWN: inside sentiment tag, accent shamrock
2. Position studded shamrock on front of scalloped
card base, centered, with offset scalloped margin
all around, and glue in place.
3. Working quickly, fold the easel shape. 
Orient the straight-bottom panel
to the outside, then align the opposite half behind 
the shamrock card base with scalloped edges
aligned, and glue in place.
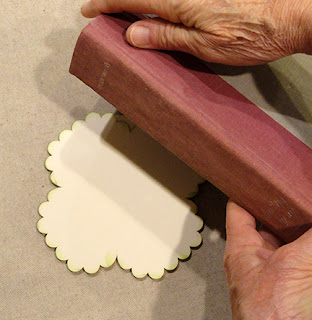
4. Place the glued-up assembly on a flat surface
then place a heavy flat weight onto the top of it,
then allow the stack to be pressed until thoroughly dried,
which may require several hours or over night.
5. Position and attach individual studs into (or over)
the position circle cutouts.
6. Position the shamrock accent over the matching
cut edges at upper left corner of sentiment tag
and glue in place.
7. Position and attach the sentiment tag assembly
either behind the lower portion of studded front clover
as shown here, -OR- in opposite face of easel stand
inside. 
Here is the completed easel card.

Sunday, March 10, 2019

Twisted Blossom Quilt Block Card

This traditional quilt patchwork block looks a little like 
a four-leaf clover, but can be “pieced” together 
in a color scheme of your choice. 
Composed on a background square with four quarter “petals” 
that have overlays joined to base patch shapes, 
plus center square overlay. 
Mix and match favorite paper and card stock prints 
for fun pattern play. 
Contrast offset card base layers create a narrow borders. 
Measures approx. 6x6 square when folded.

ASSEMBLY: 1. Identify and cut the shapes:
A card front base   B offset card front middle layer
C main card base
D "contrast" background triangles
E center triangles squares base background
F center patchwork triangles
G color #1 patchwork petal base shape with
 left & right curved overlay patches (2 sets)
H color #2 patchwork petal base shape with  
left & right curved overlay patches (2 sets)
2. Prepare the petal units by positioning the left
and right curved edge patches onto corresponding
areas of the petal base.
Prepare 2 of color #1 and 2 of color #2.
3, Locate the center guide marks on the card front.
Position the first petal unit at one corner location
so that the interior cutout shape of base lines up
with the same shape window in the petal unit,
with the center point aligned at center guide mark
cross hairs, and glue in place.
4. Position the second petal unit (from color #2)
in the next corner, align and glue in place.
5. Repeat to position the final two petal units
in alternating color arrangement.
6. Prepare the center triangle patchwork by
first locating the guide marks at the center of
each side edge.
Position the four triangle patches with the square
corners at the center, and the narrow edges at
the guide marks at side edges, and glue each in place.
7. Position the center patchwork unit over
the middle petal unit points so that the points of
the square match up with the window inner corners,
and glue in place.
8. Center the front panel assembly onto the contrast
card front with even margin all around.
9. Fit each background triangle into the recessed
window of the front assembly layers,
and glue in place. 
NOTE: you may wish to position the triangles into
the windows of the main background shape
before or any time prior to step 9, and use
small pieces of cello tape on backside
to hold them in place until step 9 when they
can be glued into place.
10. Prepare the main card base by bending back
on the center perforation line.
11. Center the card assembly onto the front of
the main card base with even margin all around,
and attach in place.

Wednesday, March 8, 2017

Shamrock Scalloped Stitched Card


Arrange a bucket full of fun green prints 
around a central shamrock. 
Needle holes on shamrock match up with base 
for arranging the smaller shapes. 
Position shamrock on silhouette with holes lined up, 
then stitch around.
Ribbon slots on silhouette shape allow for bow addition 
(alternative shapes provided for non-ribbon option). 
Mount assembled silhouette on offset card base front.
Back card includes perforation near top to allow it
to bend back to reveal sentiment space.
Optional signing plaque included.
Measures approx. 7" wide x 5.6" tall.

ASSEMBLY: 1. Identify and cut the shapes:
A card base front   B card base back (perforated)
C shamrock decor shape with needle holes
D shamrock assemble base with needle holes
E scallop patches 1-16
2. Position and attach the shamrock on top of
the assembly base, taking care to line up
the stem cut edges, ribbon slot edges,
and needle holes. It may be helpful . . .
. . . to use a tool such as this blunt tapestry needle
inserted in strategic hole locations (bottom, top,
sides, etc.) to help line up the stitching holes
of both layers during the final gluing stage.
3. Prepare to complete the hand stitching by
threading a 28" length of "thread" on the finest
blunt tapestry-style needle that selected stitching
media will accept. For the model, DMC no. 5
perle cotton was used. Also consider other
soft twine or 6-ply embroidery floss, etc.
4. Position the tail end above the center holes
near the stem end, and attach in place with
a small piece of cellophane tape.
5. Insert the needle into the center-most hole
on one side of the stem area
(NOTE that in this image, the base is inverted).
Push needle through and pull thread through
fully to the front, leaving no slack
(here and throughout).
6. Continue the stitching sequence by inserting
the needle in the next adjacent hole as you move
(in this case) clockwise around the shamrock.
Push needle through completely and pull
thread through.
7. Continue stitching, up and down in the same
fashion around the shamrock . . . 
. . . noting that there is a "cross-wise" stitch
that makes the transition from one "lobe" to the next.
Complete the stitching, and push the needle
through to the backside for the final time.
8. Trim excess leaving a 1" tail.
Anchor the tail in place with a small piece
of cello tape.
9. Position scallop patch no. 1 next to the stem
as shown . . .
. . . "snugging" it into the edge of the shamrock
with outer curved cut edges of each matching up,
as well as the ribbon slot edges indicated here.
10. Continue to position and attach the scallop
patches in order, following the same procedure:
position, snug in to abut the adjacent edges,
while lining up the outer curved cut edges.
Here you can see the completed scallop assembly.
11. Thread a 12-15" length of soft ribbon through
the slots, adjust for even sides, then tie knot and bow.
12. Position and attach the scallop shamrock
assembly onto the card base front, leaving
an equal margin around the outer edges.
13. Prepare the card base back by bending
forward at the perforation line.
14. Attach the upper portion backside 
(above perforation) to the corresponding
backside of the card base front, matching edges.
15. Position the sentiment panel, if desired.
Here is the completed card. Celebrate!