Showing posts with label snowflake ornament. Show all posts

Wednesday, January 3, 2024

Snowflake Ornament with Year Date


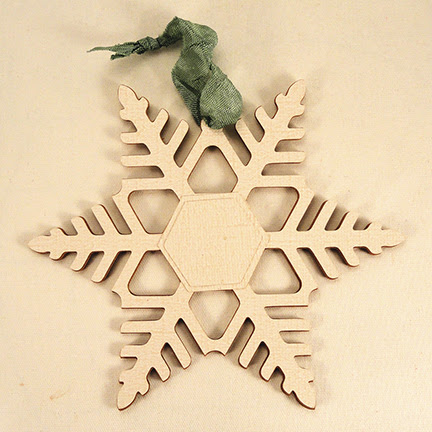
Six-pointed classic snowflake has multiple layers 
glued together to be thick and sturdy like 
a balsa cut out. Hang hole at center top can be threaded 
with twine or narrow ribbon. 
Center hexagon overlay with cut out windows 
that can be filled with separate contrast numerals 
to mark a memorable “first” Christmas for couple or baby, 
the New Year, or winter season. 
Model shows 2024, with other year overlays 2022-2028 
also included in the file. 
Alternately, create a simpler ornament with 
no center dated overlay. 
Snowflake measures approx. 5” wide x 4.3” tall when fully assembled. 

ASSEMBLY: 1. Identify and cut the shapes:
A interior snowflake shapes 6-8 for thickness
B & C contrast front and back snowflake shapes
to layer
D date overlay hexagon plus numeral cut outs
(be sure to collect the interior shapes - see next image)
E opt. plain outer and inner hexagon overlays
in place of dated hexagon, or for backside
As the date hexagon is cut and removed from mat,
be sure to collect and retain the interior shapes 
from '0', '4', '6' or '8'.
2. Layer each of the interior snowflake shapes . . .
. . . and front, back snowflake shapes and glue together,
one by one, taking great care to align all cut edges.
Watch for the top position hang hole and match
all shapes using that as a bearing.
Immediately press the stacked shape under a heavy
flat weight such as this thick book, possibly with something
else heavy placed on top for more weight.
Leave weight(s) in place for several hours or over night
to help prevent warping or curling of the liquid glued up stack.
(NOTE this image shows the date hexagon in place;
it is recommended to press the snowflake stack alone
before adding the hexagon [then potentially replacing
flat weights for a period of time] so that the stack is
as flat as it can be for even pressing.)
3. Position the date cut out hexagon onto the front
of the snowflake, matching cut edges, and orienting
the date appropriately below the hang hole at
top center. Next . . .
. . . position the numerals into the windows
and glue in place, then finally . . .
. . . position and attach the interior shapes within
the numeral openings.
Here is the completed ornament.
4. Cut, thread, and knot a hang loop through hole.
5. As option alternative to date hexagon,
center the plain smaller hexagon on top of
the full size hexagon and glue together.
Then center and glue onto front and/or back.

Friday, January 15, 2021

Snowflake 3D Ornament Jack Ctr

Magical and dimensional, this snowflake ornament 
adds sparkle to winter, Christmas or themed decor. 
(The center "crown" sort of detail evokes the ball-tipped
vintage children's toy called "jacks and ball".
Cut 7 or 8 layers of the few shapes, align carefully 
and glue together to create thickened components 
resembling thin Baltic birch wood. 
(Use a flat weight to press the shapes while they dry.) 
Fit components together and glue, add hanging 
ribbon or twine. Finished snowflake measures 
approx. 4.7” tall x 3.4” deep. 

ASSEMBLY: 1. Identify and cut the shapes:
NOTE: each component has 7-8 layers so that when glued
together in a stack and pressed flat with a weight,
they resemble Baltic Birch laser cut shapes.
*Use D test slot and rectangles to determine how many
layers of the papers selected will be needed to fit
snugly into the slot during final assembly.
A whole main snowflake shape
B center double-tipped arm
C single tip arms (6 sets, composed of 1-2 top
layers with straight base, 4 center layers with
center nib base edge, 1-2 top layers with straight base;
see step 3 for details)
*D test slot with 7-8 test rectangles to simulate layers
to determine layer quantity needed for components
2. Stack the test rectangles, then . . . 
. . . insert them into the test slot. They should fit snugly
but still be able to slide through.
3. Single tip components will be composed of 1-2 top
layers with straight base, 4 center layers with
center nib base edge, 1-2 top layers with straight base.
4. Apply adhesive to one surface to be joined, then
layer the first two shapes and precisely align ALL cut
edges. Press thoroughly with fingertips or tools (without
shifting alignment). Continue to add the other shapes in 
sequence until all are stacked and joined, working quickly.
Immediately press the stack under a flat heavy object
such as this book, or wood plank, or covered free weight,
etc. Allow to dry thoroughly - usually several hours.
Pressing in this way helps avoid warping or curling
possible when liquid adhesive is used.
5. Continue the stacking and joining step for each
of the other components.
All components are shown here in finished stacks.
6. Begin the assembly by inserting the side edge
of the double-tipped center shape into the vertical
slot (with hang hole at top) of the whole snowflake . . .
. . . pausing near half way to apply clear quick-grab
glue up the center spine where slot will be positioned.
(Fabri-Tack adhesive used here.)
Push the center arm fully into position so that it
is centered in the slot side to side and also
top to bottom. Hold in place until glue is cured and strong.
7. Place the first of the four single tip arms in similar
manner, inserting the side edge into the slot of one
of the main snowflake arms, pausing to apply glue at
centerline, then pushing fully into place so that slot edges
align at arm center, also assisting the base edge nib
to slot into the double tip arm's center slot.
8. Continue to position, add adhesive, then slide
fully into place the remaining 3 arms.
Here is the completed snowflake with all arms in place.
9. Add clear sparkle glitter (spray adhesive applied
to snowflake surfaces first) as desired.
10. Thread hang ribbon (and bead, as desired)
through top hang hole to finish the ornament.

Sunday, January 13, 2019

Snowflake 3D Crystal Layered Ornament

Origami look-alike hexagon star ornament features 
main and secondary points, made dimensional 
with built-up layering. 
Center includes punch hole that assists with alignment, 
for a mini brad stem, or stud, on front and back. 
Petal shaped back adds interest to the reverse side. 
Or, prepare a duplicate set of shapes 
to repeat front dimension-ality on back. 
Measures approx. 4.5" tall x 4" wide. 

ASSEMBLY: 1. Identify and cut the shapes:
A. star base shape (4)
B star "points" shapes (6 sets of 4 each)
C backside (optional) petal shape (4)
D hexagon base (4)
E hexagon triangles (6 sets of 4 each)
F crystal points base units (5 sets of 4 each)
G top crystal point base (1 set of 4)
H crystal side overlays (6 sets of
4 left and 6 sets of 4 right)
2. Layer and attach the crystal point sets into stacks of 4,
taking care to line up all edges as precisely as
possible. (Top point shape shown here.)
Place each of the stacked shaped under a flat weight
such as the re-purposed fabric-covered weight 
machine bar shown here, to help keep it flat
during the drying process, and to help avoid
warping and curling of the shape.
(Do this for each of the glued-up stacks  and
assembled layers throughout.)
3. Layer and attach the main hexagon base shapes
in a similar manner, also the main star shapes
petal shapes, triangles, point overlays, etc.
4. Position a star point delta shape at each
inward angle of the stack, aligning edges
as precisely as possible, and glue in place.
5. Position the opt. back petal shape on the backside
of the star assembly, centered, and glue in place.
6. Position each of the hex triangle points stacks
centered at a straight outer edge of the hex base,
and glue in place.
7. Position both left and right stacks on each
of the crystal point stacks, along the long
lower side edges.
8. Note the corner guide marks on the face
of the star base. Use these to position . . . 
. . . the hexagon assembly, then glue in place.
9. Note the guide marks on the hex triangle face,
then use these to center each crystal point unit
on top of the hexagon assembly, centered
between each star point. Apply glue only to
surface(s) that touch, then attach in place.
10. Place a mini brad through the center opening
on front and glue in place.
(If the opt. petals shape was also attached on back,
the depth of the ornament layers will allow a second
mini brad to fit in to backside opening.
Short prongs will remain hidden inside 
the opening "tunnel".
11. Attach a length of soft ribbon or twine through
top hang hole to complete the ornament.

Wednesday, January 2, 2019

Snowflake Slot Form Swirls 3D Ornament


Dimensional snowflake hanging ornament has swirly arms. 
Composed of six-point base with converging slots that hold 
center "double" arm and four shorter arm cross pieces, 
all made thick by layering multiple (8 or more) 
identical cut shapes to resemble die-cut wood. T
op punch hole included for hanging ribbon - 
add a 1/2" diam. painted wood bead for extra accent. 
Measures approx. 4.3" wide x 5.6" tall x 1.75" deep. 
Slot guide included to help determine 
how many build-up layers should be cut.


ASSEMBLY: 1. Identify and cut the shapes:
(NOTE: slight modifications may have been
made in shape during the 
* test then cut quantity to create thickness 
that fits in slot; see Step 2
A whole snowflake 'body' cut 8*
B whole center arm shape cut 8*
C diagonal half arm: cut 4 sets of 2 for front layer,
2 for back layer, 4* with nib for center layers
D slot for layers thickness measuring guide
2. To test the quantity of layers that will be best
for this snowflake, layer the suggested quantity -
eight (including contrast front and back layers
for the model being constructed in this tutorial) -
then layer (but DON'T glue) them.
With even edges, fit the end of the layered shape
into the cut slot of the measuring guide.
If it is somewhat snug, the 8 quantity will be best.
If too snug, remove one interior layer, and re-test.
If not snug enough, add an additional layer
and re-test.
Once the best thickness quantity is determined,
cut all the shapes needed.
3. Layer and glue together (use lightest coating
of liquid glue that will achieve good connection
of layers) the stacks for each shape:
1 whole main, 1 whole center arm,
*4 half diagonal arms.
(*see step 4)
Take care while gluing up that all edges are aligned
and matched up as precisely as possible.
Pay particular attention to the slot openings
edge match.
NOTE: it may be good practice to layer and glue up
the shapes a portion at a time, such as half,
then press and let dry, then proceed to stack
any remaining shapes and glue together.
Use a flat weight placed on top of the layered shape,
such as this fabric-covered re-purposed free weight,
to press the stack flat until the glue as dried
completely, which could take a few hours.
The pressing with a flat weight will help avoid
warping of curling caused by drying glue, and
should be considered essential.
4. For the half arm stacks, make sure that the center
shapes include the nib that will fit into the center
whole arm slot and help with positioning.
5. When the shapes are stacked and completely
dry and flat, fit the whole arm into the center slot
of the main snowflake shape, and center it and
glue in place.
6. Insert the first diagonal half arm into one of
the diagonal slots and . . . 
. . . nudge the center nib
into the whole arm center slot, center up
and glue in place, both where it fits in its own slot,
as well as . . . 
. . . where the perpendicular edges touch.
(This image shows all of the diagonal half arms
in position, with glue being applied to touching edges.)
Here is the completed snowflake.
7. To finish the ornament, consider threading a
length of soft ribbon through the top punch hole,
then both ends through a 1/2" diam. bead
(this one was painted), then knot the ribbon ends.
It has also been sprayed with adhesive mist,
and sprinkled liberally with clear crystal glitter.