Showing posts with label snowman. Show all posts

Friday, November 19, 2021

Christmas Rosette Ornaments Trio


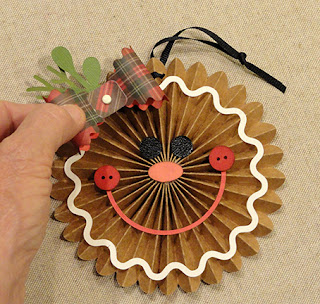
Gingerbread Boy and Girl, plus Snowman characters
are featured in this trio of dimensional ornaments - 
fun projects to hang from pegs or chandelier, 
or add several to a Christmas or winter seasonal swag. 
Medallion measures approx. 4.625” diam. assembled.
 Each begins with a pair of pleated panels join to form 
the medallion base with a pair of holes for twine 
or ribbon hanger at top. 
Gingerbread Boy or Girl have face area surrounded with 
squiggle icing ring, button smile finials, 
dimensional hair bow (girl) or neck bowtie (boy) with cedar and
 boxwood sprig as optional embellishments.
Snowman’s expression is created with layered button 
and “threaded” X stitch eyes, carrot nose, 
three-layered simple top hat with holly accent.  

NOTE the rosette assembly steps will be referenced
from a previous tutorial post, then the different designs
will be explained for design differences in assembly,
beginning with Gingerbread Boy, Girl, then Snowman.

GINGERBREAD BOY ROSETTE ORNAMENT
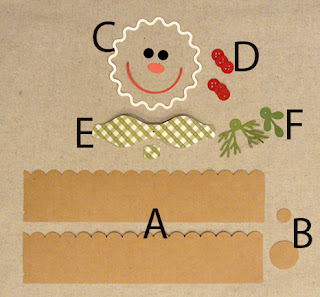
ASSEMBLY: 1. Identify and cut the shapes:
A rosette pleated left and right strips
B front (small) and back retainer circles
C icing face ring, eyes, nose and smile
D dimensional buttons (2 sets of 3 each)
E dimensional bowtie and front "knot" accent
F optional cedar dbl sprig and laurel sprig
ROSETTE ASSEMBLY (ALL DESIGNS)
2. Follow this LINK to view and follow 
the Crow Rosette Ornament design assembly tutorial 
Steps 2-9 for the pleating strip folding and
assembly that is basically the same for 
all three designs, except . . . 
. . . in steps 6 & 7, prepare the pleated ring and
gather from the backside-up position, so that 
the larger backside retainer circle is used first on
the rosette BACK, then invert the rosette assembly
so that the very small circle can be carefully positioned
over the center circular tunnel as shown here.
3. Orient the pleated rosette so that the punch circles
for the hanging ribbon are at the top/north position.
Then position the nose shape to cover the small
retained circle, center, and glue in place.
4. Because the holes may be obscured later during
assembly, thread the length of ribbon through the holes
now, then trim and knot top ends.
5. Prepare the dimensional buttons by stacking
and gluing three button shapes on top of each other,
aligning ALL of the cut edges as precisely
as possible. Complete 2 buttons.
6. Position the remaining face features:
icing ring centered on rosette, eyes above nose,
smile between nose and icing and centered,
buttons onto ends of smile.
7. Prepare the dimensional bowtie main shape by
adding some back curl to the center of each "loop"
shape to the side of center, as shown.
(Center does not need curl.)
8. Bend each side inward toward center to align
the punch circles and glue one layer then the other.
9. Position and attach knot shape over front
with punch circles aligned.
10. Assemble the optional sprig embellishment, if desired,
by layering and aligning the punch holes.
11. Position under the bowtie with punch holes aligned,
and glue in place. Insert and attach a mini contrast
brad through the holes as accent.
12. Position and attach bowtie under the smile.
It may be helpful to use hot melt glue or equivalent
thick, quick-grab glue to attach.

GINGERBREAD GIRL ROSETTE ORNAMENT
ASSEMBLY:  13. Identify and cut the shapes:
A rosette pleated left and right strips
B front (small) and back retainer circles
D icing face ring, eyes, nose and smile
E dimensional buttons (2 sets of 3 each)
F dimensional hair bow and front "knot" accent
G optional cedar and laurel sprigs
14. Refer to Step 2 above to follow the link and
complete the pleating and attach retaining
circles as directed with the exception notes.
15. Prepare the dimensional buttons by stacking
and gluing three button shapes on top of each other,
aligning ALL of the cut edges as precisely
as possible. Complete 2 buttons.
16. Position the remaining face features:
icing ring centered on rosette, eyes above nose,
smile between nose and icing and centered,
buttons onto ends of smile.
17. Prepare the dimensional bowtie main shape by
adding some back curl to the center of each "loop"
shape to the side of center, as shown.
(Center does not need curl.)
18. Bend each side inward toward center to align
the punch circles and glue one layer then the other.
19. Position and attach knot shape over front
with punch circles aligned.
20. Assemble the optional sprig embellishment, if desired,
by layering and aligning the punch holes.
Rotate to arrange the two attractively as desired.
21. Position under the hair bow with punch holes aligned,
and glue in place. Insert and attach a mini contrast
brad through the holes as accent.
22. Position and attach bowtie under the smile.
It may be helpful to use hot melt glue or equivalent
thick, quick-grab glue to attach.

SNOWMAN ROSETTE ORNAMENT
ASSEMBLY:  23. Identify and cut the shapes:
A rosette pleated left and right strips
B front (small) and back retainer circles
D hat crown & base    E hat band    F hat brim
G holly sprig   H berries triple base plus 2 singles
I dimensional buttons bases and ring rims (2 sets of 3 each)
and X threaded faux stitching
J carrot nose
24. Refer to Step 2 above to follow the link and
complete the pleating and attach retaining
circles as directed with the exception notes.
25. Prepare and layer the embellishments:
a) layer and attach  the two single berries onto two of
the lobes of the triple berry silhouette;
b) layer and attach the button base and rings separately,
then layer and attach rings onto base, matching
edges as precisely as possible; create 2 buttons.
Here are the assembled units.
c) complete the button eyes detail by applying a dab of glue,
centering the X stitch cut out over the center of button,
then tucking the ends down through the holes . . .
. . . so that the ends poke all the way through.
26. Prepare the hat shapes for assembling
(NOTE that the top shape shown here was modified
to be a layering "silhouette" - to include the brim -
in the final published version.) Then . . .
. . . glue the band (centered) onto the silhouette,
followed by the brim shape. Press under flat weight
until liquid glue has thoroughly dried.
26. Add the holly sprig to brim area as desired.
27. Add the ribbon loop to the ornament top at this point
in assembly (not shown) because punch holes may be
obscured by hat attachment.
28. Position and attach the carrot nose with broad end
(at left here) to cover the smaller front retaining circle.
Determine angle and positioning desired, then attach
the hat.
29. Position and attach the two button eyes.

Saturday, January 14, 2017

Spiral 3D Snowman

Perky snowman lifts his globe head 
and carrot nose to the snowflake sky! 
His spring-y body is held extended 
by a central hexagon post 
(with suggested 5/16" cut-to-size wooden dowel). 
Measures approx. 6.75" tall with 5x5" circle base. 

Add the " snowflakes ring 2 variations" 
plain ring inside the base for even more sparkle 
(cut a slit to let it fit around post).  

ASSEMBLY: 1. Identify and cut the shapes:
A upper head section
B lower head section
C post   D  post collar
E facial features (eye and liner,
3D nose, smile with cheek circles
F scarf
G button build up (5 each x 2)
H snowflake button base
I button attachment tabs (4)
J scallop base for stand
K main base   L spiral with top platform
M spiral accent
2. Prepare the nose shape by bending back
on all perforations.
3. Form the nose into a cone to bring the
straight side angle edge to overlap the opposite
side tab to the perforation line, and glue edge in place.
To glue this seam securely, you may need to insert
a flat narrow pointed tool such as the tip of
this emery file, to provide a "press against" surface.
4. Prepare the upper head shape by bending back
on all wedge section "horizontal" perforation lines,
as well as the side edge tabs and wedge tab.
5. Prepare the lower head shape in similar fashion
bending back on all perforation lines, including
side and bottom tabs, and octagon bottom "lid".
6. Working with the upper head first, bend together
the first segment seam straight edge and tabs to bring
the straight edge (on right of seam in this image)
to overlap exactly to the perforation line, and
glue in place.
7. Next, repeat the bending together process
to bring the next (mid) segment straight edge
to overlap corresponding segment tab perforation,
and glue in place. Repeat for the top segment.
8. Continue to form the three-part seams across
the upper head shape in the same fashion.
When the final wedge seams remain,
work carefully to complete the sequence of
segment seams for the two edges in tandem to fit 
the wedge into its place without causing previous 
seams to become loosened, and to achieve the
most accurate connections possible, with
nearly no opening at the center top.
9. Position the nose at the front of the upper head
and insert the upper angle edge tabs into the
corresponding slots, and also fitting the lower
tab into its corresponding slot.
Push the nose shape in fully until . . .
. . . the tabs are fully exposed on the inside.
Bend the tabs back (toward sides or bottom)
and glue in place.
10. Prepare the lower head shape by bending
adjacent edge or tab together so that the
straight edge overlaps the perforation line of tab
as exactly as possible. Glue seam.
11. Repeat the seaming process across 
the shape until . . .
. . . the final seam - two segments - are joined.
12. Align the front panels of upper and lower head
(nose panel for upper, octagon "lid" connection panel)
then insert the "tab" edge of lower head,
overlapping the straight upper edge 
to tab perforation line, center side to side,
and glue together.
13. Pivot the two halves together to insert tabs
and overlap remainder of straight edges to
tab perforation lines, and glue in place.
NOTE: it will be helpful to insert finger inside
head globe through bottom opening to apply
pressure to each seam to ensure a good connection.
14. Prepare the mouth by bending slightly
at perforations on each side of center,
and attaching each end at center of a cheek circle.
Position and attach at lower edge of upper head,
wrapping across the wedge seams as shown.
15. Layer eye contrast under shape with
black pupil shape.
Position and attach on each side of nose
in upper wedge areas on each side of nose.
NOTE if the eyes cross a seam, you may
choose to add a slight bend to the eye shapes
before attaching.
16. Bend bottom tabs inward, apply glue,
then bend bottom octagon "lid" into position,
adjusting the form so that the octagon edges
line up as precisely as possible with the tab
perforation lines.
NOTE: it may be helpful to insert a narrow flat
tube through the hexagon opening to a position
behind the tab to provide a "press against" surface.
17. Prepare the post shape by bending back
on all of the long perforation lines, and on
short end tab perforations.
18. Form the post shape into a tube to
bring the straight long edge to overlap the
opposite tab to align at perforation 
as precisely as possible.
One easy way to do this is to use the 5/16" dowel
as a form around which the post is formed.
19. Measure and mark the dowel to length that
matches the post length from top edge
to bottom where tabs begin.
Cut to size.
20. Position and attach the spiral accent shape
on top of the spiral base shape  . . .
. . . aligning the center back dash guide marks
of each, and NOTING that the narrowing end
of accent will gradually move from being centered
top having the inside cut edges line up.
21. Bend the spiral layers slightly at
the center back perforation mark. Then . . .
. . . apply glue to the final ring of the spiral between
the dash and bend and the narrow tail.
Prepare to attach the bottom "ring" of the spiral shape:
locate the center back hash cut on the spiral base
and position the bend/hash cut of the spiral shape
on top of it so they align, as well as aligning
outer cut edges of both shapes as the spiral ring
is attached to the spiral base.
(NOTE the bottom ring of the spiral attached
to the spiral base, and the bend at center back.)
22. Insert the post upper end through the hex
opening of the spiral base, and through
the top platform of the spiral.
NOTE that the platform opening has a notch
to indicate the front of the snowman.
23. Prepare to attach the head by applying
quick-grab glue (such as the Fabri-Tac liquid
adhesive shown) somewhat liberally to the end 
of paper tube, and dowel end.
Work quickly . . . 
. . . to orient the front of the head to the front
of the spiral and base, then insert the head
onto the post, and push head down as far
as it can go to seat the post end at the
dome surface inside the head.
Apply finger pressure to the top of the head
and post until the joint is secure, taking care
to keep the post as straight and upright as possible.
24. Prepare the collar shape by bending back
on each perforation line, bending lower edge
tabs outward.
25. Prepare to secure the spiral platform in place
by wrapping the collar shape around the post
underneath the platform that is threaded
onto the post.
Work slowly to insert the collar upper edge
between the post and the hexagon opening edges
of the platform.
26. Apply glue to the upper surface of the tabs
and attach to the underneath surface
of the platform.
27. Apply glue to the post near the top
exposed area below head - approx. scant 3/8" -
then . . .
. . . slide the platform with the collar
up as far as it will go until collar upper edge
stops at bottom of head.
Hold in place until secure.
28. Prepare arm shape by bending down
slightly at shoulder, up slightly at elbow.
29. Apply glue to the back upper surface
of the platform, then slide the partial-hex shaped
cutout of arms around the post just above platform.
30. Prepare the scarf shape by adding some curl
to the center, and possibly to the lower ends
(end curl may be more appropriately added
near the end of the assembly).
31. Wrap the center of the scarf shape
around the post at the "neck" area
above platform, overlap and align
the brad punch hole, and attach brad
through hole. Add a dab of glue to secure
the positioning of the two layers, if desired.
32. Layer the button shapes to create two
five-layer buttons. Apply pressure to help join
and also to help avoid curling or warping
as liquid glue dries.
33. Attach each button build-up shape to the center
of a snowflake. (Snowflakes can be cut in
multiple layers and assembled as circle buttons.)
If desired, thread twine or cord through the holes
and tie a bow.
34. Prepare the button attachment tabs by
bending forward at the perforation lines.
35. Attach the half circle portion of a pair of
tabs to the backside of the button/snowflake assembly.
The squarish portion of each tab will come together
at center, but are not attached to each other.
36. Position each button at center front
sliding the split tab over the spiral, and attaching.
Here you can see where the buttons have been placed.
37. For extra color splash and visual interest,
cut the separate design "snowflake ring",
cut a slit between two flakes (this becomes
the side-back position) . . . 
. . . insert below the bottom (detached) ring
of the spiral and bend the circle to
allow it to encircle the post.
. . . position a snowflake at center front,
and attach in place to the spiral base.
Here is the completed spiral snowman.