Showing posts with label PepperMint Pathway. Show all posts

Monday, September 16, 2013

PepperMint Pathway: Candy Markers Tutorial

This tutorial includes information for preparing the magnetic candy markers
that will be placed on the pathway to count off the days. 


In this closeup, you can see the finished candies both in the bowl awaiting their turn to work, and also attached by magnetic attraction to the first two tiles on the quilt.


Step 1. Use a good adhesive to attach each of the magnet discs to the backside center of a wood disc. One good adhesive is Fabri-Tac.


Step 2.Spray paint fronts and backs (including magnet) with white acryllic paint. Apply several coats to produce an even smooth and thorough coating.


Swirl designs can be applied to painted discs by hand painting (transfer design to disc using stenciling template) or stenciling (use templates to mask areas to remain unpainted). This tutorial will demonstrate how to use the adhesive vinyl transfers available for purchase in the "Findings Kit" from hearthsewnpatterns.com .

Step 3. Peel away excess vinyl areas to leave just the swirl designs on the paper carrier sheet. Note there are 3 designs, with 6 shapes of each provided. Cut designs apart.


Step 4. Position the small square of transfer paper (remove protective backing first) over the selected design with sticky side toward the vinyl.


Step 5. Use a rigid tool such as a credit card the rub or "burnish" the transfer sheet to the vinyl design. Do a thorough job of rubbing to help the vinyl come off it's backing more easily.


Step 6. Peel away paper backing from vinyl design taking care to make sure it is attached to the transfer paper without shifting the arrangement.


 Step 7. Turn transfer sheet with design over so that backside of design is face up. Place flat on work surface. Position front of painted disc over the design and take care to center the disc over swirl design. Press disc down once it is positioned.


 Step 8. Turn over the disc and transfer sheet. Burnish or press/rub the surface of the design through the transfer sheet to adhere the vinyl to the disc front.


Step 9. Carefully peel back and off the transfer sheet, making sure that the vinyl pieces stay attached to the disc. It may be helpful to use finger or fingernail to assist the edge corners to begin separating from the transfer sheet and to stay attached to disc. Once sheet is out of the way, apply finger pressure to make sure all pieces are firmly attached in place. Also press along the disc edges in case any of the vinyl overlaps there.


Step 10. Prepare the Wrapper Netting Cutting Guide template. Fold a section of netting yardage to create a 6-layered shape slightly larger than the template. Position template over layers and staple (or pin) in place through all layers.


Step 11. Use scissors to trim all layers to match template. Use staple remover to remove staples and template (or unpin). Layer and repeat 3 more times until all 24 netting wrapper shapes have been cut.


Step 12. Apply a dab of adhesive to backside "rim" area of disc, then attach center of one straight edge of netting at that spot. Only a fraction of an inch of netting should be covering the rim of the disc, with the majority of netting extending above. Continue with wrapping process while adhesive is still wet.


Step 13. Begin wrapping the netting around the decorated disc, keeping the netting snug but not stretching it. Continue wrapping a second time around, with opposite straight edge ending approximately at the center on the back.


Step 14. Apply pressure to the backside to wrapped layers so they will adhere to the previously-applied glue.


 Step 15. Cut, thread needle, knot end and attach a 12-15 inch length of white perle cotton yarn with a stitch through the netting layers at center of side extension just beyond disc edge. Take a second stitch in place to anchor the yarn.


Step 16. Wrap the yarn around the netting 3 times . . .
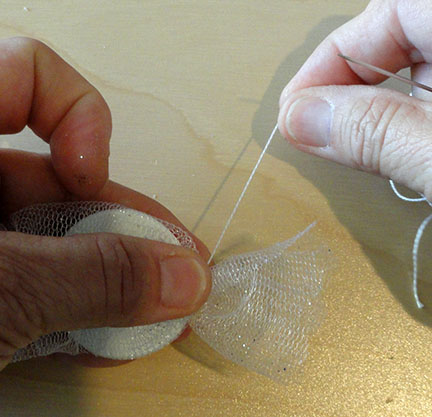


then pull yarn tight to cinch in the layers.


Step 17. Insert needle through the wrappings on backside (as photo shows) to begin to form a knot, then slip needle through the formed loop and pull up tight.


 Step 18. Insert needle under the netting layers on backside and pass back out about 3/4" away from insertion to leave a tail buried. Clip yarn above netting surface near exit point.


Step 19. Repeat for the opposite end. Fluff and separate end layers as desired.


This is how the finished candy marker should look. 


PepperMint Pathway: Heat Transfer Tutorial


This tutorial includes instructions to add the vinyl numbers 
to the pathway "tiles" of this Christmas countdown quilt.
Numbers can be added using other methods.
If you are adding them as heat transfer vinyl numbers,
you will be using the pre-cut numbers that were included in the purchased kit
available through hearthsewnpatterns.com .


 The heat transfer numbers in the kit will need to be peeledto separate the excess waste from the numbers on theirthick plastic carrier.

Use a sharp tool like this weeder, or a toothpick or tweezers
to "weed" away the smaller interior excess pieces
such as the ovals within the number 6 & 0.
With the weeding completed, cut the number units apart by dividing
the carrier sheet into strips and then into rectangles that contain the numbers.
Keep all double digits such as 10, 11, 12, etc., together in their pairings.

 The sheet will include extra star shapes so you can conduct a test. Cut a star into a separate square. Cut or trace a test tile onto a scrap of the tile fabric you have selected for your project.

Step A. Place the fabric face side up on the ironing board or pad. Turn the plastic carrier sheet over so that the cut vinyl shape will be next to the fabric. You will be seeing the shape through the plastic in its non-reversed form. Position test shape for final placement.


 Step B. Remove any water in the iron and turn the steam settings off. Heat iron to the cotton/poly setting (255-315 degrees F). Cover the star/plastic with a cotton press cloth or teflon pressing sheet if available. Apply hot iron to the transfer area for 7-12 second and use medium pressure. 


Step C. Remove press cloth. Peel plastic from transfer shape.

If the transfer shape adhered properly, you are ready to transfer numbers following the same process.

If the number did not attach properly, adjust the iron to slightly hotter, then repeat the covering and pressing process, applying more pressure and pressing a second or two longer.


Step D. Position the plastic with number vinyl next to the pre-cut tile (should already have the fusing margin at edges on the backside, with paper liner STILL in place.).

For this sample, I used a circle traced with temporary marker as a "target" to help align the numbers. Refer to the pattern for tile shapes and placement of each number, since the numbers should remain more or less vertical even as the tiles begin to shift to follow the curve of the pathway.


Step E.  When pressing is completed, peel away the plastic carrier piece and discard.


Tiles are now ready to position and begin attaching to the pathway arch.

TAKE CARE WHEN USING IRON NEAR VINYL NUMBERS!


DO NOT TOUCH VINYL WITH HOT IRON!


Thursday, August 29, 2013

PepperMint Pathway Newest Hearthsewn Pattern


Who can resist the magic of a colorful candy cottage?
Cover the “tiles” day by day along the numbered arch pathway
with magnet-backed peppermint candies, and before you know it,  
Christmas has arrived!
Numbers can be applied as vinyl heat-transfers or as stitched appliqués.
Swirl designs can be stencil-painted or applied as adhesive vinyl shapes.
Metal washers hide behind the numbers 
(glued in place then enclosed with stitching).
Finishing touches include quick machine quilting, 
stripe bias binding with or without accent piping.
Finished size: approx. 27” x 27” 

Available after Sept. 1st, 2013. Retail mail order: $12.90 plus $1.25 S&H