Six-sided candle is assembled as
outer and inner
tubes that fit together
to provide strength and sturdiness.
Top has a recess
that accepts a
"standard" LED tea light with a punch-hole cover
that fits over the
flame tip to conceal
the purchased tea light's power base.
Measures approx. 2.5" deep x
3" wide in three sizes
from 9" to 6.375" tall when
assembled.
Display as a single, or group as an ensemble.
The assembly model used in this tutorial
will be the large candle. Except for the size
of the hull, its accents, and base insert shapes,
construction is identical for all three sizes.
ASSEMBLY: 1. Identify and cut the shapes:
A main candle hull
B hull top recess rim gluing ring
C hull top "cover" hexagon
D tea light "dome" cover
E hull side accent shapes (6)
F base insert main
G optional base bottom "cover"
H base top opening reinforcement collar
NOT SHOWN is the alternate paper "flame"
presentation with its own dome shape.
This alternative can be viewed in assembly
of roman candle, steps 11-14 or 15, at
2. Prepare the main hull shape by bending
BACK on all vertical perforation lines,
on bottom at rim tabs, and on second
perforation down from top edge; also bend
forward at the topmost ledge tabs.
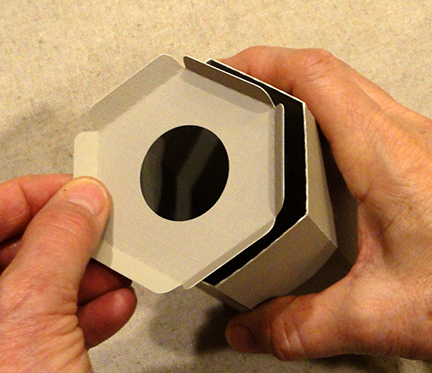
This image shows closeup how the top flanges
and rim tabs will be bent into position to
eventually hold the ring and cover where
tea light will rest.
Wider flange tabs fold to the inside of the hull,
and narrower at-the-edge rim tabs bend inward
toward the center to form a ledge.
4. Position and attach the accent shapes
in each of the 6 hull panels, offset .1 from all
edges or panel perforation lines, as shown.
5. Bend 5 of the top edge flanges into place
and glue ONLY the flanges into place to
the backside of the hull shape, leaving the ledge
tabs free. Also glue 5 bottom rim tabs in place.
NOTE that the flange and tab opposite the long
side seam flange are the ones left un-glued.
6. Form the hull into a tube to bring the straight
side edge to overlap the opposite flange,
adjust so that top and bottom panel edges
line up properly, then glue the seam.
NOTE that the symmetrical shape of the hull
allows it to be flattened to apply finger pressure
along the seam being joined.
(Re-adjust once the seam is done back
to the hexagon tube shape.)
7. Bend the final rim flange and bottom rim tab
inward to proper positions and glue in place
as was done for similar tabs in step 5.
8. Bend all ledge tabs at perpendicular angle
toward center of tube interior, then apply
adhesive to the upper surface of the rims
all around. Then . . .
. . . insert the rim ring into the opening
to rest on the ledge tabs, adjusting the hexagon
shape as needed to exactly match the ring edges.
Apply finger-tips pressure all around the rim ring
to attach securely in place.
9. Position and attach the cover hexagon insert
into the top recess.
10. Prepare the base insert in similar fashion
to the bending prep done for hull, except
at the top rim edge there are only simple tabs,
and one of the bottom tabs has been replaced
by the bottom hex finger hole panel.
11. Bend the top edge rim tabs back and glue
in place, except leave the end tab opposite
the side seam flange un-glued at this point,
in similar fashion as was done for main hull
in step 5.
12. Form the insert into a tube and complete
the side seam in similar fashion as for
hull in step 6.
13. At insert bottom, bend the tabs inward
at perpendicular angle, apply adhesive to
the outer face of tabs, then bend the bottom
hex panel into position, adjust so that
hex edges align as precisely as possible
at the tab perforations, then . . .
. . . use finger hole
to reach inside to apply pressure around
the edges to secure the tabs to hex panel.
14. Prepare the base collar shape by bending
all edge flanges upward.
15. Apply adhesive to the backside of the flanges,
then position the collar into the base's top opening,
and push tabs down equally until . . .
. . . top edges are even with the rim tab fold edges,
then apply finger pressure all around to secure
in place.
16. Insert the collar end of base into the
bottom opening of the main hull shape.
NOTE that this should be a very tight fit
and it may require the assistance of a thin blade
style tool such as a paper craft spatula to
get the final corner to insert as required.
Slide the insert in to within 3.4" or so,
then pause to apply adhesive to
the exposed hull faces, then . . .
. . . push the insert in fully so that bottom
is flush with bottom of hull.
17. Once hull-base connection gluing is secure,
position and attach the optional bottom hex
cover in place.
18. Prepare the tea light dome insert by
bending back all edge flanges.
19. Push the flame tip through the opening
and allow the cross cuts to flex so that circle
opening rests as flush to power housing
as possible.
Push edge flanges toward the center, then
insert the tea light into the top recess
and gently push downward so that it rests
fully onto the hexagon platform.
There will be approx. 1/8" interior rim exposed.
Here is the completed candle stick with
tea light in place.
Activate the tea light flame by removing
the dome and switching on the light, then . . .
replace the dome as directed at the beginning
of this step.
Shown here is the trio of varied size
tea light candles available to create
an ensemble. Or use your imagination
to configure a mantle or centerpiece
gradated row, menorah or other presentation.

 2. Go to Candles in Three Sizes for LED Tea Lights tutorial

 Here are the three heights of the candle trio.