
Dimensional tray has subtle hourglass shape
with
sturdy walls and rim accents.

Designed to be used as a base for candles . . .

. . . and a greenery
centerpiece
with narrow candle trio at center,
filled with various sprig and pine cone elements.
Angled platform structures are included
as
attachment base for greenery.
Tray is also appropriate as a serving tray for
loose candy and other goodies.
Measures approx. 11.25" long x 6.375"
wide x 1.5" deep.
(Centerpiece assembly will follow construction steps
for the tray, after Step 25 .)
(Centerpiece assembly will follow construction steps
for the tray, after Step 25 .)
ASSEMBLY: 1. Identify and cut the shapes:
A main hull base
B hull bottom cover C hull inside (top) cover
D side walls arch (2)
E side wall outer accent overlays (2 sets)
F left inside side wall extensions (2)
G right inside side wall extensions (2)


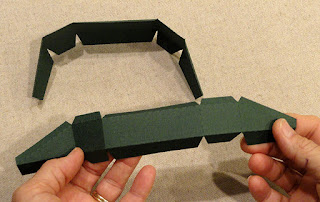
 5. Arrange the two hull shapes so that the ends
are inward as shown.
Slide the two seam edges together,
tucking the tab under the opposite straight edge
on the side, and . . .
 . . . the shaped tab that is an extension
of the rim under the opposite rim . . .

. . . and urge hull halves together until the straight rim
edge matches up to the tab dash cut,
and glue together all overlapping surfaces.


 . . . applying fingertip pressure along the seam edge
from the inside of the hull,
until all edges are securely attached and
glue is dried.


 . . . apply glue to the margin behind the dashed
guide line along the side four angles for side wall.


 A weeding tool "hook" may help if walls get
pushed to far back.
Attach both wall sections into hull.


 Bend the end inner wall into position to overlap
the side wall end tabs, and also nudge the bottom
flange back until it is at position exactly at
perforation guide line.
 To help provide a press-against surface to
complete the seams, insert a skewer or other rod
tool into the bottom panel openings and adjust
so that it is behind the seam being completed.
Move tool to other holes to help press other seams.
Complete both ends of inner walls.


 16. Apply adhesive, position and attach
the back/bottom cover.


 20. Prepare the boxing strips by bending back
on the vertical perforation lines and on upper edge
tabs and bottom flanges.
 22. Bend the next boxing wall segment into position
to align the next straight edge along top tab perf line,
and glue in place.

 24. Bend the bottom flanges inward, then . . .
 . . . apply glue to the flanges and also
to the front flange of panel . . .
 . . . then insert into tray ends, with approx. .375"
space between all edges and tray interior wall,
and attach in place.
 Candles trio or larger hex candle can easily fit
in the flat tray space between the platforms.


 30. Position cedar sprig short shapes at tray
sides, overlapping end evergreen sprigs as shown.
It may be helpful to bend cedar stem tip to help attach.


 35. If desired, attach a length of floral wire
to the stem of each pine cone, using quick-grab
glue such as hot melt. Curl the end to provide
a glue-up surface.


A main hull base
B hull bottom cover C hull inside (top) cover
D side walls arch (2)
E side wall outer accent overlays (2 sets)
F left inside side wall extensions (2)
G right inside side wall extensions (2)

Also cut two sets of the rim accent shapes.

2. Prepare the hull side walls shape by bending back
on all perforation lines, taking care
NOT to bend the horseshoe-shaped rim area
of the shape.

Bend the center flange tab forward.

3. Position and attach the side outer wall
accent panels offset approx. .1" within the panel
perforation perimeter folds.

4. Bend the side walls back to line up the adjacent
panels, overlapping the straight edge over
the opposite tab, and glue side seam.
Complete all four seams on two side wall units.

are inward as shown.
Slide the two seam edges together,
tucking the tab under the opposite straight edge
on the side, and . . .

of the rim under the opposite rim . . .

. . . and urge hull halves together until the straight rim
edge matches up to the tab dash cut,
and glue together all overlapping surfaces.
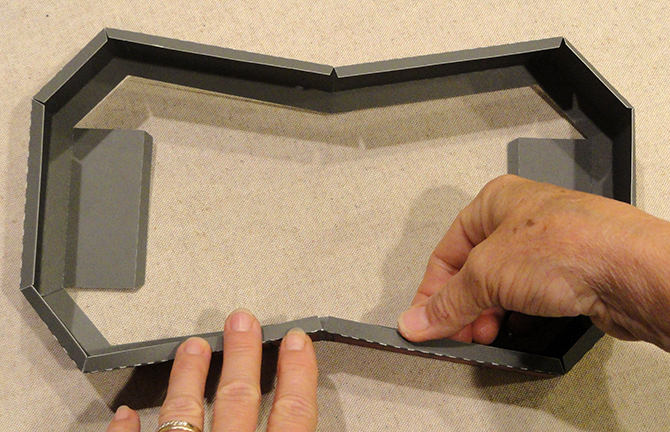
6. Fit the hull bottom panel into the hull assembly
(shown here from the bottom between side wall flanges)
then invert the tray and fit the bottom panel edges
snugly down into position, with edges matched
up to each wall segment bottom flange perforation line.

7. Apply glue to bottom flanges, then apply pressure
to the side walls all along to ensure that walls
stay snugly around bottom panel edges,
while also . . .

from the inside of the hull,
until all edges are securely attached and
glue is dried.

8. Hole openings on hull bottom panel are provided
to allow a tool to be inserted to assist gluing
of inner wall seams later in the assembly process.
Use scissors to carefully trim away excess
bottom flanges so that openings are clear.

9. Prepare the inside left and right walls by
bending upper and side flange tabs back,
and bending bottom flanges forward.
Identify the small L or R symbol cut into the outer end
tabs.

10. Pair one left with one right for two sets,
then join the center seam (center tab DOES NOT have
a letter symbol cut) of each set as shown.

12. Identify the small letter symbol cut into the end tabs
of each wall section, (as shown, the 'R' will be
on the LEFT end of the set).
The R end will attach to the RIGHT end of
the hull's end wall.

Apply glue to the top flanges of one wall unit, then . . .

guide line along the side four angles for side wall.

13. Fit the wall under the rim and slide into place
to match the rim straight edges along the flange
perforation lines, while also positioning
the bottom flange straight edge . . .

. . . to line up exactly at the base perforation guide lines.
It may be helpful to use a tool such as the spatula
shown to help nudge the edges into place.

pushed to far back.
Attach both wall sections into hull.

14. Apply glue to the end flange of the left
and right wall sections, then . . .

. . . apply glue to the margin behind the guide
perforation line at hull ends.

the side wall end tabs, and also nudge the bottom
flange back until it is at position exactly at
perforation guide line.

complete the seams, insert a skewer or other rod
tool into the bottom panel openings and adjust
so that it is behind the seam being completed.
Move tool to other holes to help press other seams.
Complete both ends of inner walls.

15. Apply glue then insert the interior panel
cover and . . .

. . . apply pressure all around edges to ensure
that it seats into position completely.

the back/bottom cover.

17. Position and attach the rim accent strips
onto all rim angles.

Here is the completed hourglass tray.

18. Platform inserts with an angled surface
are included in the cut file to build and insert
into the tray to provide a surface to attach
greenery.
For the pair of platform inserts, cut the shapes
as shown here:
H platform panel
I side and back boxing strip wall

19. Prepare the platform panels by bending
bottom flange forward slightly.

on the vertical perforation lines and on upper edge
tabs and bottom flanges.

21. Position the back long straight edge of panel
along the long upper tab, adjust for end alignment,
then glue in place.

to align the next straight edge along top tab perf line,
and glue in place.

23. Repeat the alignment and gluing process
for the final angled seam.
Complete the seams for the second side tab
sequence for this platform.
Complete both platform insert units.


to the front flange of panel . . .

space between all edges and tray interior wall,
and attach in place.

in the flat tray space between the platforms.

GREENERY CENTERPIECE
The following steps will explain the greenery,
tray and candles centerpiece.

25. Here are the finished elements used in
the centerpiece project:
A hourglass tray B platform inserts
C candle 3D trio
D cedar sprig center (2)
E cedar sprig sides (2 left & 2 right)
F cedar sprigs short (3 left & 3 right)
G evergreen sprigs - long (8)
H evergreen sprigs - short (4)
I ponderosa sprigs (4)
J boxwood sprigs (2 long & 2 short)
K pine cones (4) L ribbon bow & "found" berries

26. Position and attach platforms, candles trio.
27. Position and attach left & right cedar sprigs
and center cedar sprig as shown at tray end.

28. Shape the evergreen long sprigs by carefully
curving into an arch, so the sprigs can flow
over the tray rim slightly, once in place.

29. Position and attach four long evergreen sprigs
spaced across the tray end assembly as shown.

sides, overlapping end evergreen sprigs as shown.
It may be helpful to bend cedar stem tip to help attach.

31. Position and attach stem ends of
two ponderosa sprigs as shown
(one near center, one forward).

32. Position and attach cedar center sprig
to overlap previously-attached sprigs.

33. Position and attach two short evergreen
sprigs as shown (one at center, one forward).

34. Position and attach long boxwood sprig
just back of center, short boxwood sprig forward.

to the stem of each pine cone, using quick-grab
glue such as hot melt. Curl the end to provide
a glue-up surface.

Insert the pine cone stems/wires down into
the greenery and glue two in place.

36. Repeat Steps 27-35 to fill and arrange
the second half of tray. If there is space around
the candlesticks near the center as there was
with the sample project, tuck and attach brown paper
shred bunches down to conceal the tray base
and platforms that still show through.
37. Tie a ribbon bow, then position and attach
to the rim center front.

Add other embellishments as desired
(sample project has twisted twigs, floral berries,
and teardrop berry picks added.
Enjoy your paper floral centerpiece project.

Is there a video anywhere showing how to put this together, Im not good just with pics. Great design.
ReplyDeleteSorry, I only do still photos for turorials.
Delete