Monday, June 28, 2021

Firecracker Stars Stripes Boxes Trio

 
Square column box composed of LID that fits snugly 
over top of BASE. A trio of stars are featured on 
LID side panel overlays (with matching solid top overlay). 
BASE side panel overlays consist of corner wraps 
with separate strips at center. 
Twisted and glued jute twine pokes out of LID 
to suggest the firecracker’s wick. 
Functions as both a gift box or holiday décor. 
Each of trio measures approx. 2.85" wide x 2.85" deep.
Approx. heights: tall 9.6”; medium 7.7”; short 6".
Combine the trio of sizes for a decorative ensemble 
or centerpiece.

NOTE: All three box sizes are constructed in practically
identical manner, except that tallest box base hull has
separate bottom panel that needs to be attached.
Short box is used for this tutorial demonstration.

ASSEMBLY: 1. Identify and cut the shapes:
A base box hull
B center stripe strips (4)
C corner (double) stripe strips (4)
D base neck collar reinforcement
E lid box main shape
F star side panel overlays (4) and center overlay
G interior wick attachment/concealing disc
2. Prepare the base hull shape by bending back
on all perforations for panels, side flange tab,
bottom tabs and panel.
3. While the hull is flat, position and attach each center stripe
onto a side panel, using cut-in dash lines for alignment
up center, with bottom edge of stripe aligning
at bottom perforation line.
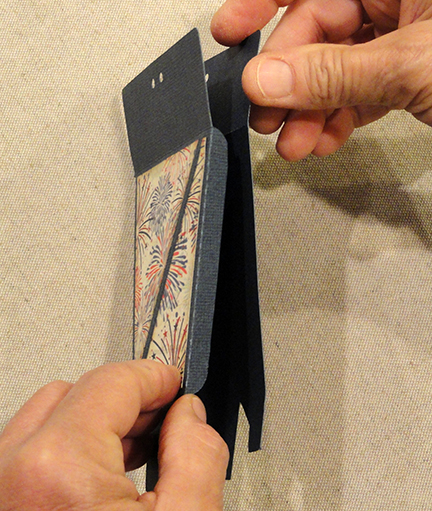
4. Form the hull shape into a tube to bring side plain edge
to overlap the opposite side flange tab to perforation line,
and glue seam.
NOTE: hull can be pressed flat to apply fingertip
pressure along seam to help secure it.
5. Bend the bottom flanges inward, bend bottom panel
down into position, adjust position and hull shape,
then glue the three seams.
NOTE: reach fingertips into hull interior to
bottom to apply fingertip pressure along three sides
to help attach bottom panel edges.
6. Bend each of the corner double stripes back
along perforation lines. Apply adhesive to underside
of stripe, then position at corner, with bottom edges
aligned, and press into position.
7. Prepare the base hull top opening collar shape
by bending the edge flanges forward (upward).
8. Apply adhesive to the backside of 
side flanges, then . . .
. . . insert the collar into the hull top opening as shown
(tabs upward), and slide down into position where . . . 
. . . flange edges align with top edges of hull.
Apply pressure to flanges all around to attach securely.
9. Prepare the main lid shape by bending back on
all perforations for panels, tabs and flanges.
10. While the shape is flat, position (offset) and attach
accent panels within corresponding panels as
defined by perforation bends.
11. Bend the side panels down into position,
with side tab inward, to bring the plain side edge
of a side panel to overlap the adjacent side tab's
perforation line, and attach. Repeat for all 4 corners.
12. Bend edge flanges inward and glue securely.
13. Prepare the faux wick/fuse by cutting a 4" length
of jute string.
Bend jute in half . . . 
. . . and apply quick-grab clear-drying adhesive 
around loop, leaving 1/2" of ends unattached
Press the loop sides together, then twist tightly
to attach the "two" plies together . . . 
. . . with the 1/2" ends remaining free. Keep the twists
tightly former until the adhesive dries completely,
and the wick looks like one length.
14. From the underside of lid, insert the top end
of wick through the center hole . . . 
. . . and push through to outside, stopping . . . 
. . . at the position where the ends can be bent away
from center and glued to lid underside.
15. Apply glue to the concealing disc, then position
over the wick ends and glue securely in place.
16. Insert contents (if using as a gift box), position
lid over base . . . 
and slide on and fully down into place.

Sunday, June 27, 2021

Box 3D Treat Tote Bunting Doilies

 
Dimensional, small-scale treat box has perforations 
to bend lower hull walls to create container for 
fun July 4th or other occasion gifting. 
(Enlargeable to fit specific needs.) 
Square “on point” bottom is closed with bend-n-latch flaps. 
At top, header panel holds two punch holes 
for twine or ribbon tied closure. 
Straight band and sawtooth bands embellish front 
atop three half circle “doily” style bunting shapes. 
Measures approx. 4.7” tall x 3.625” wide at top 
x 2.25” square deep. 

ASSEMBLY: 1. Identify and cut the shapes:
A tote hull (this shape has been modified slightly)
B front (and optional back) offset accent panels
C-E half circle doily accents
F plain and sawtooth accent strips
2. Prepare the hull by bending back on ALL perforations
for panels, side flange tab, bottom latch tabs;
bend forward on top header panel perforation lines.
3. Position and attach the offset accent panels within
the hull panels as defined by perforation lines.
NOTE: if desired, cut a second set of accent panels
for the back of the tote.
4. Bend the header flanges of all three doily shapes
forward slightly. Center side to side, with top edges
matched and punch holes aligned, then attach 
the three layers at top flange and lightly behind 
overlaid doilies.
5. Position and attach the plain accent strip on top
of the sawtooth strip, with bottom and side edges
aligned. Position and attach strips assembly at
doily assembly header, above perforation line.
7. Fold the hull in half, bend the side flange inward,
then glue the side seam.
NOTE that the hull can be laid flat with fingertip
pressure applied along the side edge to help
secure the seam.
8. Squash the hull by pressing the side folds inward
to open up the interior as the hull bends on diagonal folds.
9. Close the bottom by bending A) square "slot" flap
inward . . . 
. . . B) both side flaps inward . . . 
. . . C) then tab flap inward, pressing down on all
to allow tab tongue to slip into the slot created.
Finally, allow the bottom tabs to relax into perpendicular
formation (this may be assisted by pushing with a tool
such as a pencil end from inside). If desired, apply
glue to secure the flaps in position. Otherwise,
the hull can be "disassembled" and flattened
for storage and use at a later time.
10. Position (centered) the doily assembly with
bend and perforations aligned . . . 
. . . and attach.
11. Open top panels, fill tote, then close.
Thread ribbon length through top holes
and tie knot and bow. 
Here is a side view of completed tote.

Saturday, June 26, 2021

Circle Tag Garden Fresh

 
Round medium size tag features outer scalloped edge, 
outlined circle with angled banner-style panel. 
Fancy Garden letters are cut then positioned onto 
the partially welded ring/banner shape 
(watch for unattached ‘a’, ‘r’, and ‘n’). 
Word cut “fresh” is added on top. 
A single hang hole provides a place to attach 
with twine or narrow ribbon. 
Disc measures approx. 4” diameter. 
Size coordinates well with Box 3D Garden Crate gift box. 
Or use with a personal gift of garden produce, 
as invitation element to a harvest luncheon, 
or as sentiment tag on bottled preserves being gifted. 

ASSEMBLY: 1. Identify and cut the shapes:
A tag base with scalloped edge and hang tab
B contrast disc underlay
C accent overlay with diagonal panel edges
and partial "Garden" lettering
D opt. contrast diagonal panel underlay
E contrast rim ring (NOTE: an unbroken ring
is also included in the cut file)
F 'Garden' letters
HINT: leave the letters in grouped arrangement
during cutting, then retain the 'waste' portion as
placement guide (see Step 5)
G 'fresh' word cut
2. Position and attach the contrast diagonal panel
underlay behind the contrast diagonal panel ring.
3. Position the contrast disc behind the diagonal ring
rim assembly, rotating the ring to center the punch holes
array under the top "arch", then attach in place
where rim and panel overlap disc.
4. Position and attach the contrast ring (either whole
ring or separate parts where ends tuck up next
to letter edge shapes). 
5. Position and attach the separate letters over
the existing 'welded' letters, then . . . 
. . . position the separate letters between other
letters. NOTE it may be helpful to retain the weeded
"waste" paper scrap to use as a stencil overlay
to assist with positioning of individual letters
(when letters remain grouped when positioned
during cutting process). 
Here the 'stencil' is aligned over the in-position
letters to establish alignment, then individual
'e' is placed into window and attached.
Repeat for 'a' and 'r'.
(Remove and discard stencil when positioning 
has been established.)
6. Complete the tag:
A) position the inner tag assembly onto
the scalloped tag base;
B) apply hang hole eyelet if desired;
C) position and attach "Fresh" word cut.
Here is the completed tag.
The Garden Fresh round tag is specially sized
to adorn the top of the crate box that may hold
the Gardener Hat Easel Card.