
Requires
12x12 cutting capacity and stock.
Large dimensional turkey features a modified
pyramid form
composed of lid and base, with a fancy tail feathers array
that
can be decorated with eleven black soda pop pull tabs.
Hat with band and
buckle are arranged assembled,
then attached to the “lid” portion of box,
along with wide eyes, dimensional
beak with wattle lobes.

Body is shaped with
contour overlays on three sides,
flanked with stylized two-part wings,
cutout breast feathers at front.
Neck feather ruffs are attached at base rim
opening.
Tail is layered, with can pull tabs attached with glue and
soft twine
(perle cotton) at lacing punch holes,
then attached at box base’s backside
bump-out.
(Shapes included to complete a tail array without pop can tabs,
or
with card stock cut faux tabs.)
4.75” thickened base square; tail array 8” wide x 5.25”
tall.

ASSEMBLY: 1. Identify and cut the shapes:
A main body BASE hull B body contour shapes
C back body bump out to hold tail array vertical
D base opening collar reinforcement
E base platform build up layers
F main LID hull G lid opening collar reinforcement
H eye assembly (lrg, middle, indiv small), wattle,
and beak
I hat crown J hat band, buckle
K hat brim with center opening tabs
L hat brim layers for thickness (2)
M wing base and overlay (1 for left set; 1 for right)
N neck feather sections (3)
O feet (1 left, 1 right)
P tail feather base (2 to layer for thickness)
Q tail feather accent with tab lacing holes
R tail feather top layer accent
Also pictured: 11 black pop can pull tabs
from Pepsi Zero cans

so they can be drying while other assembly progresses:
A) layer the hat brim sections, taking care to match up
ALL cut edges as precisely as possible.
 Place the glued-up layers on a flat work surface,
and under a flat, heavy object such as this thick book.
Consider placing other heavy objects on top of it
to assist with the pressing, and allow the shapes
to dry for several hours or over night. Pressing
helps minimize or prevent warping or curling of
glued-up shapes when assembly with liquid adhesive.
 B) layer, glue and press the platform shapes
into a single stack, matching up all cut outer edges.
Press flat until dry as described above.
 C) Layer, glue up and press the tail feather base
shapes.
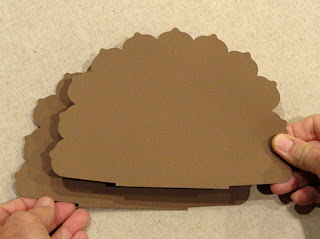 3. Prepare the BASE main hull shape by bending back
on all four wall panels, and on wall side flanges as shown.
 4. Prepare the tail attachment "bump out" panel by
bending back on all panel edges, bottom flange,
side walls and edge tabs, and tiny wedge tabs as shown.
 5. Assemble the bump out by bending back the top
and adjacent wall panels to bring the short side plain
edge to overlap the adjacent wedge tab to perf line,
and glue together the seam. Repeat for second side.
 6. Repeat the bending, aligning, overlapping of
mid-side seam. NOTE that this tiny tab and seam
may require patience to get the seam to grab.
Consider using a spatula tool blade placed flat
behind the seam to provide a press-against surface.
Allow to dry thoroughly to ensure seams hold.
 7. Position the bump out behind the back wall bump out
cut opening, then insert through the opening until
edges of opening rest at the creases of the sides
and top tabs. Glue in place. NOTE that at the bottom seam . . .
 . . . the bump out has tapered to zero.
Bend the bottom flange back, apply glue, then
refold into position to attach it to the BASE's bottom panel.
 8. Join the four wall seams by bending adjacent walls
into position, flange tabs bent inward, straight side
edges overlapping flange to perforation lines.
Adjust for alignment of wall edges at top of seam,
then glue in place.
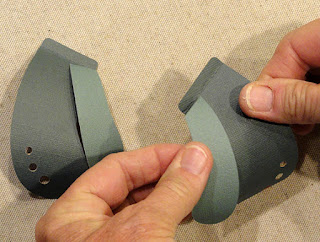
 9. Prepare to attach the three wall contour panels
by adding some back curl from top to bottom of panel.
To do this, place the panel face down on work surface,
then hold a dowel or round shaft pencil across the panel
and flat against work surface, as panel is carefully but
firmly pulled along under the dowel and upward.
Add curl between the top and bottom flange tabs.
10. Bend the top flange forward, and the bottom flange back.

from the bump out panel, which is the back.
Position the bottom flange of the FRONT contour
panel (with the chest feather cutouts) under the front
edge of the hull, centered from side to side, push in
so that wall-to-bottom panel crease fits into the flange's
crease, and glue in place.

and align top flange tab with top cut edges matched.
 13. Repeat the process to align each of the right (shown)
and left contour panels on respective hull sides.
NOTE that the back edge of the contour panel does NOT
bulge outward as the front edges do, but is straight
and in line with the hull's back panel slant.


14. Prepare the beak shape by bending back along
the center perforation line; bend the back tabs forward.
15. Prepare the feet shapes by bending the tabs back.
16. Position the feet so that they angle away from center
and slightly outward. Tuck tabs under the contour wall
shape and glue in place. Also add a dab of glue behind
the middle of foot, then bend into position and attach
to the contour wall - allow toes to be unattached and
extend slightly away from body.

17. Apply hot melt or other quick-grab glue to
the bottom of the hull and contour tabs that
wrap under base hull, then position, centered, on
the platform shape.

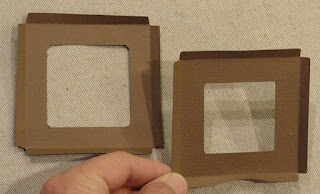
18. Prepare the base opening and lid opening collars
by bending the edge flange tabs forward.
19. Apply glue to the underside of base's flanges,
then insert through hull opening and into the cavity,
then carefully pull up . . .

. . . into position to align flanges top edges with
hull top edges, and glue in place.

20. Assemble the eye unit by attaching middle eye
onto large bottom "whites" eye base, then positioning
each single eye over the middle eye with highlight
oval openings aligned, as shown. Press 'til dry.

21. Prepare the wattle two-lobe shape by adding
some back curl to the long portions on each lobe
using a narrow dowel or round pencil. Then . . .

. . . finish the curl to be rolling inward so that
the inward cut edge becomes at the top of
the vertical curled edge near the bottom of each lobe.

22. Prepare the LID hull shape by bending back on
all panels, side long flange tab, top "lid" square
and adjacent shaped tabs, as shown.

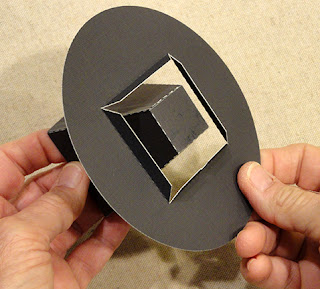
23. Insert the tabs from beak into the arrowhead
window on front of lid, so that tabs are along
both top angled cut edges. Then . . .

. . . on the backside of lid shape, bend the tabs back
and glue in place.

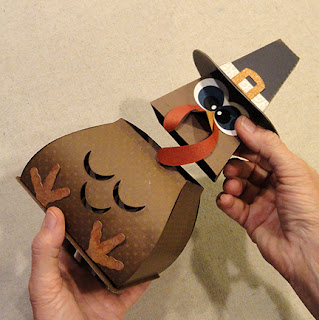
24. Position the top connector tab of the wattle
above the beak, with the underneath angled corner
edge hugging the top of the beak.
Position and attach the eyes assembly over the tab
and snugly above the beak, and glue in place.

25. Form the lid hull into a pyramid shaped tube to
bring the straight side edge in line with and overlapping
the opposite long flange, adjust for top-to-bottom
alignment, then glue the seam.

26. At the top, bend the shaped tabs inward to
perpendicular, apply adhesive to outward surface,
and bend the "lid" square down into position.
Adjust so that "lid" edges align with perforation
bend edges, then apply pressure to secure in place.

It likely will be helpful to place the lid assembly top
downward on flat work surface then insert a flat-top
tool to apply pressure all around the tabs from inside.

27. Apply adhesive to the lid opening collar edge
flanges backside, then carefully insert into the neck
edge opening (try to keep glue from spreading too
thoroughly to the inside hull edges), and . . .

. . . push inward until the collar fits into its
appropriate level. Keep the collar square parallel
to the hull's bottom cut edges, and the designed
margin of approx. .3 between flange edge and hull
edge even and uniform. This spacing away from
edges allows lid to fit onto top of body hull.

28. Prepare the hat brim shape by bending
the center flanges upward along perforations.
NOTE that the brim shape is NOT round, but
slightly oval; the half-circle notch indicates "front".

29. Prepare the hat crown shape by bending back
on all panel, "lid" side flange and top shaped tabs
as shown.

30. Form the crown into a pyramid tube, then
join side seam . . .

. . . and top in similar manner to lid hull.

31. Apply adhesive around the outer bottom edge of
crown assembly, then slip the brim assembly and . . .
. . . push into place all the way down crown so that
on the underside the crown edge aligns exactly
at brim bottom edge, as shown.

32. Apply adhesive to underside of brim joined
layers (from Step 2) then carefully slip over crown
tip and move down into position on top of
the main brim, and attach in place with outer
edges aligned as precisely as possible.
Consider pressing the newly-layered brim under
flat weights placed around edge until dry.

33. Prepare the hat band shape by bending back
on perforations that separate the four segments
and tab. Form the band into a ring to overlap
the straight side edge across opposite tab to perf line,
adjusting top to bottom, then joining seam.

33. Slip the hat band ring over the crown pyramid
and move down into position . . .

. . . resting on the brim. Move up slightly to allow
adhesive applicator tip to apply glue under the band,
then reposition and attach in place.

34. Position and attach the buckle at front of crown,
centered and with straight bottom edge even with
band bottom edge.

35. Apply glue around the bottom inside edge
of hat crown, then slip the hat over the lid head hull. . .

. . . and push down evenly into position and attach in place.
Hold in place until fully attached.

36. Close the box by placing the lid on top of
the base hull - a relatively snug fit.
NOTE the lid rims can be glued together if desired,
converting the turkey box into a decoration.
37. Prepare the wing shapes by adding back curl to
the bottom two-thirds of each main and smaller front shape.

Position the appropriate front wing shape on top of
the main wing so that top straight edge aligns
at top tab perf line, and front edge aligns with
tab's front edge, and glue together where the two
wings overlap. Repeat for the second wing assembly.
38. Position the top tab of the wing assembly
along the associated side of body hull (wings should
curve toward front as shown), with top edge of
tab fit snugly under the lid edge, with approx. 1/4" to
3/8" between back of tab and hull back edge,
and glue tab in place. Repeat for second side.

39. Prepare the neck feather units by bending
each "feather" forward at perforations.
Add back curl to each feather - as much as can be.
40. Position and attach feathers tab centered along
contour wall edge, covering wing tab.
Repeat for opposite side. Also center one neck feather
unit along base hull front below contour top perf line.

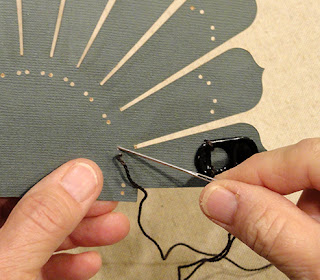
41. Tail pop can tab stitching assembly:
A) thread a 36-40 inch length of soft twine or no. 5
perle cotton onto a blunt darning needle as single ply.

B) position the first tab on the end feather as shown
with the opening oriented toward tail bottom.
Stitching punch holes should align on each side at
margin near bottom of opening.
NOTE tabs will eventually be glued in place;
you can decide if it makes sense to position
and attach prior to or after stitching.

C) on backside of first feather, use a small piece
of cello tape to anchor the tail of thread somewhat
below the first stitching hole.

D) insert needle to draw the thread through to front.

E) insert needle into the adjacent hole so that
the thread will wrap over the tab's frame and hold
it in place; draw thread all the way through to back.

F) insert needle through next "inside" hole from back
to front and draw thread fully through to front.
G) insert needle into the outward hole to wrap thread
over the second side of frame and hold tab in place;
pull thread all the way through to backside.

H) move downward along first feather to insert
needle into the closest hole near feather base,
and draw thread all the way through (here
and throughout as stitching progresses).

I) insert needle into the adjacent hole to create
a stitch that shows on front of paper shape.
These inward stitches help hide the thread
behind the paper cut shape.
J) repeat steps B-G to position and attach with stitches
the second tab.

K) repeat steps H-I to carry thread down behind
shape, then back to attach next tab.
L) continue the stitching steps to position and affix
each of the remaining tabs until all eleven are in place.
This image shows the backside of the work as
the stitching progresses.

M) if more thread is required to finish, cut and
anchor thread end in place on backside with
small pieces of cello tape, then anchor on
additional length.
N) when all can tabs are in place, trim excess . . .

. . . and anchor final end with tape.

42. Further secure the can tabs by neatly applying
a dab of quick grab multi-media adhesive behind
the solid portion of each tab's top portion.

43. Position and attach the top tail feathers accent
shape, centered, with bottom edges of each aligned.

44. Position and attach front layers assembly onto
the layered for thickness tail shape (from step 2),
centered, with bottom edges even. Press with
flat weights until all layers are secure and dry.

45. Apply quick-grab adhesive to the face of
the bump out at base hull back panel, then
position the tail assembly, centered, and with
bottom edges aligned. Hold in place until secure.

Here is the completed whimsical turkey 3D box
and decoration.

HAPPY THANKSGIVING!
