Sunday, November 29, 2020

Ornament 3D Dome Blossom

Dimensional disc form is composed of front and back 
that each has petal-like indentations that suggest 
a poinsettia or other Christmas flower. 
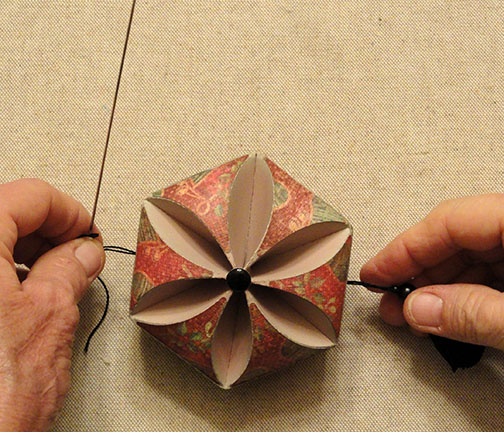
Add jewel or stud at center at intersections. 
Tie on optional tassel or bauble at bottom, cord or ribbon 
through interior to hang with loop or decorative hook at top. 
Disc measures approx. 3.25” tall x 3.5” wide 
x 2.25” deep when assembled. 

ASSEMBLY: 1. Identify and cut the shapes:
A front ornament body
B back ornament body (tiniest bit shorter than front)
C center accent rounded rectangles (4 whole; 2 with punches)
D front and back (12) rounded triangle accent overlays
2. Prepare the front and back body by bending back
on all the "squared" perforation lines for center panel
and for sections and end tabs.
Also carefully make slight bends back along the curved
perforation lines that form blossom details.
At the center perforation line that bisects the center
of the rounded "petal" configuration of perf lines,
re-direct the bending direction of the bend so that
it creates of "valley" fold ONLY through the blossom;
the "mountain" fold should remain in the center narrow
section.
3. On the front ONLY, position and attach the center
accent rectangles, with punch accents placed to
line up with punches of body.
(NOTE that the sample ornament has colored shading
added to the inverted blossom portions of the front
and back, as added accent and coloration.)
4. Form the front body into a tube to bring the straight
side edges to overlap the opposite side tabs to perf lines,
then glue the side seam.
Repeat for the back body assembly.
5. To begin forming the final front or back shape,
first make sure that the petal-center perforation lines
are bending as "valley" folds, then . . . 
. . . begin to bring the "points" created together
at the center - NOTE this will need to happen more or 
less at the same time for all six points of the blossom
configuration, or the perforations may tear.
Continue to bend the top sections inward . . .
. . . until all the points converge together at center.
Hold the positioning with one hand, while . . . 
. . . a carefully placed (maintain neatness) dab of
hot melt or other equivalent quick-grab glue is placed
down the converging folded edges at center.
Quickly press the centers back together, quick-adjust,
and hold together until fully cooled/dried and secured.
(Take care NOT to press down at centers to avoid tearing.)
Repeat for the back of ornament.
6. Slip the BACK ornament assembly edges into place . . . 
. . . into the FRONT and push together slightly, but first . . .  
. . . apply adhesive to the side panels of the BACK . . . 
. . . then push BACK fully in so that the front straight edge
and the back panel's perforation lines match up
as closely as possible all around.
7. Prepare the rounded triangle accent overlays to fit
onto the FRONT or BACK by first adding curl from wide
base edge toward point, as shown, using a rod tool
such as this pencil. Then . . . 
. . . position and attach each accent over the rounded
portion of ornament face, with slight offset margin
all around shape between edge and perforations
defining the area.
8. Position and attach a large puffy circle, stud or
jewel at the blossom intersections on FRONT and
BACK to help conceal any less-desirable construction.
9. Prepare a tassel or other hanging bauble/bead
on a narrow cord, thread with long doll needle through
the center (interior) of the disc from bottom to top,
then complete by adding top bead,
forming a hanging loop, attaching
to separate loop or hook, etc.
Here is the completed ornament disc.
This side view shows the puffy disc profile.

Ornament 3D Triangle Facets


Dimensional spherical form has added offset contrast 
triangle accents in the middle rows (or more as desired) 
with optional tassel or bauble at bottom. 
Thread cord or ribbon through center with optional “spread” 
decorative ball cap, add bow and decorative hook or loop at top. 
Spherical measures approx. 3” diameter x 3.375” tall when assembled.

ASSEMBLY: 1. Identify and cut the shapes:
A ornament body
B accent triangles (center only = 8;
other combinations possible, up to 18)
2. Prepare the body by bending back along all perforation
lines for triangle facets of globe and tabs.
3. Arrange as desired, then position and attach variety
of triangle accent shapes over the triangle panels.
(This model restricts the 8 accent shapes to
the center portion of the body.)
Here is the body with accent shapes attached.
4. Begin to form the sphere by bending the first and second
triangle top left extensions together so that the straight edge
overlaps the adjacent tab to perforation line.
5. Continue to bend the edge and adjacent tab inward
to align, adjust and attach along the seams to complete
four seams.
6. Repeat the seam joining along the bottom sequence
in the same manner.
At this point of the assembly, there will be a three-part
seam left to be completed.
7. Prepare hook with beads array for top of ornament
with a "stop knot" that will set on the inside of the sphere . . . 
. . . with the beads and hook on the outside at the top
position. Repeat for optional tassel with beads array
for the bottom of sphere as desired.
8. Re-align the three edges of the remaining seams
and glue together.
As an alternative to attaching the hook and beads
prior to completing the final seams, a long needle
could be used to insert the tassel/bead cord stringer
through the center of the sphere, with the cord ends
that are carried out the top of the sphere forming
a hanging loop, or attaching to a loop.


Ornament 3D Pyramid Bell

Dimensional drop ornament with four downward peaks 
is cut from a 7” square to dress up or down as you choose. 
Surprisingly easy origami-style folding creates the hull. 
Add offset contrast accents in one or more prints 
(consider up-cycling Christmas greeting card panels); 
add optional mini-eyelet to center; add tassel to bottom,
 thread cord or ribbon through center and opt. decorative ball cap, 
add bow and decorative hook or loop at top. 
Bell measures approx. 3” wide x 3” deep x 3.75” tall when finished.

ASSEMBLY: 1. Identify and cut the shapes:
A bell body
B upper accent shapes (4)
C lower accent shapes (4)
2. Fold the bell body on the vertical and horizontal
"cross hair" holds, then . . . 
. . . fold back on the diagonal lines also.
3. Fold back on the shorter "interior" octagon perforation
lines, then . . . 
. . . re-direct the vertical and horizontal short extension
lines that fall at the square's edges to be "valley" fold.
4. NOTE that the areas indicated in this image
(half diamonds) that fall along square's edges
will NOT show in the final pyramid bell, but will
fold to the inside. These DO NOT have accent decorations.
5. Preview where the accent shapes will be placed
once the bell is assembled into its 3D form.
DO NOT attach them yet, since they wrap around edges.
6. Begin to form the 3D bell by pushing the center sides
inward. Turn the shape face side down, then . . . 
. . . "pinch" the point walls to help direct them inward . . .
. . . then as points begin to take shape, push the center
downward until the form "pops" slightly to help the re-directed
folds release and the bell to begin taking shape.
7. Continue to push the points upward and together . . .
. . . until the pyramid is fully formed and points come together.
8. The center bottom hole can have a grommet
"eyelet" inserted and affixed if desired . . . 
. . . as shown here. Unfold the bell to attach eyelet.
9. To attach a hanging loop with optional beads, etc.,
prepare the array with a large "stop knot", then
insert at one point so that the knot is inside the point;
glue in place to the backside of the point, taking care . . . 
. . . NOT to glue point's side walls to backside of point,
but instead try to let them remain free.
Also prepare the bottom tassel/beads, etc., and
insert through the bottom hole with "stop knot" or other
anchor to be attached inside the bell.
10. Apply quick-grab glue to one of the opposing
interior point walls as shown here . . . 
. . . then push the points inward again and align
all points together so that bend edges align as
precisely as possible. Hold in place until securely dried.
11. Prepare the accent shapes by bending upper
shapes BACK at centerline, and bending
lower shapes FORWARD at centerline.
12. Position and attach upper accent shapes
as shown so that center perforation fold fits/aligns
at the center side fold, and . . .
. . . lower shapes in similar fashion at lower portion.
Here is the completed bell ornament.