
Two multi-faceted shapes are seamed with tabs
to create
left and right heart halves that are joined at center seam.
A 5/16” diameter wood dowel-wrapped post
attaches
to flat back panel with two brackets, and then fits
into bottom shank
column, then onto the Candle Stand.
Heart measures approx. 4.375” tall x 5.75”
wide
x 1.625” deep, and approx. 7.125” tall with post.
A longer post wrap shape
is included to convert
the heart into a pick or wand.

Pairs well with
“Valentine Be Mine Banner Trio” designs.
ASSEMBLY: 1. Identify and cut the shapes:
A & D outer side heart panels
B & C inner side heart panels
 E interior cross brace
F back heart panel
G upper post bracket with closed top end
H lower post band bracket
 I post wrap
J column shape with contour top
K stub to fit column into candle stand top recess
L post anchor collar build up shapes (5-6)


 . . . align the center straight edge of the one half
over the corresponding flanges of the other half
to perforation lines, beginning with the center segment,
 . . then working upward and downward to join
the entire seam.


 NOTE: it may be helpful to use a thin blade-type tool
such as the spatula shown here, placed under
each intersection being glued together, to provide
a "press-against" surface where finger pressure
can be applied.
 12. Bend the tabs of the interior cross brace upward
at perforation lines.
 13. Apply glue to the outer surfaces of the four tabs.
Identify the widest angle of the puffy heart front
assembly, then . . .


 15. Bend the top end "cap" and side panel segments
back with tabs inward and under end "cap",
and glue the two seams. Repeat for opposite
side two seams.
 16. Position the upper bracket at top center of
back heart panel, and insert tab through slot.
On backside, bend tab back and glue in place.
DO NOT glue the side tabs in place at this time.


 18. Use scissors to hand trim away any excess
back heart panel that may not align exactly
with the rim shape of the front heart.
 (NOTE: if using the long post in place of the shorter
post which is joined to column for candle stand display,
follow steps 19 through 25 only.)
19. Prepare the post wrap shape by bending
back on each long perforation line.


 23. To attach the post to the heart, insert top post
end through exposed cross brace tab and then
into "tube" of top bracket.
Apply glue to bracket and side tabs undersides,
center the post, and glue bracket to top of post
and to back of heart panel.


 27. Form the shape into a tube to bring straight side
edge to overlap opposite flange tab perforation line.
adjust and glue longer segment edges only.

 NOTE it may be helpful to insert a thin blade style
tool such as the spatula shown here under the hex
edges, one at a time, to help apply pressure
to join the seams.

 30. Form the "boxing strip" portion of the nib shape
into a ring to overlap straight edge over end tab
and join side seam.


A & D outer side heart panels
B & C inner side heart panels

F back heart panel
G upper post bracket with closed top end
H lower post band bracket

J column shape with contour top
K stub to fit column into candle stand top recess
L post anchor collar build up shapes (5-6)

2. Prepare the heart main shapes by bending
back on all panel and tab perforation lines,
except bend the center seam tabs forward
(may be re-directed during assembly).

3. Join the flange tabs for outer side hearts:
bend the upper sections back to overlap the
first segment straight edge (left in this image)
to overlap the adjacent flange tab to perforation line,
and glue the segment seam.

4. Bend the top segment and opposite flange
back to align the straight edge to overlap the flange
to perforation line and glue the segment seam.

5. Repeat the process for the lower portion
of the panel, bending the edges to align and overlap
the straight edge over flange to perf line
and glue seam for first segment. Then bending
to overlap and join the final segment seam.
6. Repeat these steps for the other side of
outer side heart panel.

7. Position the corresponding inner panel next to
the completed outer side panel, lining up
the middle segments, then overlap the straight
edge of the inner panel to overlap the corresponding
flange tab to perforation line, adjust, and glue the seam.
8. Continue to bend, align and glue the two remaining
segment seams above and above the middle seam,
until the two sections are joined.
9. Repeat this process for the opposite side assembly.

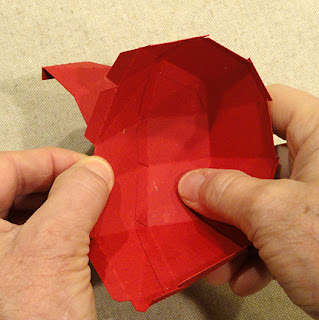
10. Bend the center flange tabs upward slightly
(if not already done), then . . .

over the corresponding flanges of the other half
to perforation lines, beginning with the center segment,

the entire seam.

NOTE: if may be helpful when joining the middle
segment seam to align, adjust and join the two edges,
then hyper-extend the heart halves toward each other
face to face and apply finger pressure to secure the seam.

11. Bend the rim flanges inward on the back edge
of the heart assembly to perpendicular positions,
then apply a drop of glue between the ends of flanges
where they overlap . . .

. . . and apply fingertip pressure at each angle
to secure this "platform" rim.

such as the spatula shown here, placed under
each intersection being glued together, to provide
a "press-against" surface where finger pressure
can be applied.

at perforation lines.

Identify the widest angle of the puffy heart front
assembly, then . . .

. . . insert the brace into the back cavity with
the end perforation edges aligned precisely
with the bend of the heart at the side angles
identified in previous screen. The inward/bottom
tabs should also be touching the backside of heart wall,
where they can likewise be joined.
Hold in place until all tabs are securely joined.

14. Prepare the post top bracket by bending back
on all perforation lines, except the top tab which
is bent forward.

back with tabs inward and under end "cap",
and glue the two seams. Repeat for opposite

back heart panel, and insert tab through slot.
On backside, bend tab back and glue in place.
DO NOT glue the side tabs in place at this time.

17. Apply glue to the rim platform all around, then . . .

. . . quickly position the back heart panel over
the back cavity of the dimensional heart assembly . . .

. . . so that cross brace outward hex-hole tab
fits through the corresponding slot . . .

. . . while at the same time aligning the top centers and . . .

. . . bottom centers of each. Apply pressure all around
the rim to secure connection between panel and heart.

back heart panel that may not align exactly
with the rim shape of the front heart.

post which is joined to column for candle stand display,
follow steps 19 through 25 only.)
19. Prepare the post wrap shape by bending
back on each long perforation line.

20. Form the shape into a tube, then . . .

. . . insert the uncut dowel length inside the tube
to act as a "press-against" surface.
Apply glue to the long flange tab, then overlap
the opposite straight side edge to perf line,
pushing the two together consistently along
the post length, and glue the seam together.

21. Align the ends of wrap and dowel exactly,
then mark the end of wrap. Remove wrap
and cut dowel to size.

22. Slide wrap up slightly and apply glue to end,
then quickly repeat for opposite end, finally re-positioning
wrap exactly to allow glue to dry.

end through exposed cross brace tab and then
into "tube" of top bracket.
Apply glue to bracket and side tabs undersides,
center the post, and glue bracket to top of post
and to back of heart panel.

25. Position the lower bracket strip about half way
down below tab, and glue in place to post and
to heart panel.

26. Prepare the column shape for candle stand version
by bending back on all panel, tab, top and bottom hex
panel perforation lines.

edge to overlap opposite flange tab perforation line.
adjust and glue longer segment edges only.

28. At bottom, bend tabs inward, bend hollow hex "ring"
down into position, and glue to tabs, taking care
to adjust the column tube shape so that tab perf lines
and hex edges align.

tool such as the spatula shown here under the hex
edges, one at a time, to help apply pressure
to join the seams.

29. Prepare the nib shape by bending back
on all tab and panel perforation lines.

into a ring to overlap straight edge over end tab
and join side seam.

31. Bend the bottom shaped tabs inward, and
the end hex "cap" down and glue edges together.

Place the nib face down on work surface
and apply fingertip pressure to tabs and cap
being joined for a secure join.

32. Prepare the interior post anchor collar by
layering and joining all of the cut hex shapes,
one by one into a stack, taking care that all
edges align as precisely as possible.
Place the stack under a flat weight while drying.

33. Position and glue the collar in the bottom
of the nib assembly, centered.

34. Bend the upper flange tabs of nib assembly
outward, and apply glue to the face side of each.

Insert the nib into the column tube and insert
through the hex opening at bottom . . .

. . . so it is fully through . . .

. . . then glue the tabs
to inside of bottom hex "cap" of column.

35. Complete the six angled seams at top of column
shape by bending the sections inward slightly
to overlap straight side edge over tab to perf line
of adjacent section.

36. Bend the top tabs inward, the hex "cap" down
into position, adjust and glue in place.

37. Apply glue to the bottom of post and dowel.
Insert the bottom end of heart post through column
top hex opening, then . . .

. . . adjust and move around until the end
"seats" fully into the hex recess of the collar
at bottom of the nib inside column.
Hold in place and apply pressure until secure.

Here is the completed heart with post and column.

38. Install heart assembly on top of candle stand
by inserting the nib into the hex recess
of platform. NOTE: it may be helpful to apply
some kind of "temporary" adhesive to keep
the nib in place, because the heart project
is tall and a bit top heavy.
(If the candle stand will remain connected
to the heart as a "permanent" display piece,
simply glue the column nib in place.)

Here is the full display ensemble,
with "valentine" banner attached to
glittered heart front, and ribbon bow.
