Sunday, January 25, 2015

Roses Bouquet Valentine Box Card

A dozen roses - a bouquet in a box -
is an extra special way to say
"I love you", to your Valentine,
your sweetheart, mother, sister, friend.
This tall box card is designed to evoke
the image of a flower vase.
Two interior bridge strips (plus box back and front)
provide the stage for the multiple layers
of rose stems and rose leaves which organize
the bouquet stems, so assembly is a snap.
A layered tag with heart and "valentine" word cut
attach to the front at a fold out punch tab.
Fold the card flat to send.
Open into its box form for display.
Finished size is approx. 2.5" wide x 2.5" deep x 10.25" tall.
Folds flat to approx. 7" wide x 11.3" tall.

ASSEMBLY GUIDE:
1. Identify and cut the shapes:
A main box shape
B flap overlays and accent swirl shapes
C optional inside back box overlay
D bridges (2)
E layer 1 shapes for inside box front panel
F layer 2 shapes, extra leaf stem
G layer 3 shapes
H layer 4 (box back) shapes
I clear support panel for layer 3
J clear support panel for layer 4


 2. Layer the flap overlays and decorative swirl rim shapes, then apply adhesive and attach to the backside of the main box shape.

3. Optional: If the card stock selected for the main box shape has a backside you don't want visible as the back panel, position and attach the back interior panel with as many edges aligned as possible. (NOTE this shape does NOT extend to the panel bottom in order to make it possible to cut all shapes that should match to be cut from one 12x12 sheet.


4. Fold box shape back (mountain folds) on vertical panel and tab perforations. Fold flaps back in same type fold.

5. Form box into a tube to bring side seam tab perforation and straight back edge together. Align bottom edges of both sides of seam, then apply adhesive and join.

(NOTE: it is possible to fold the box shape flat on work surface to join this seam flat.)


OVERALL INFO: Bouquet is arranged as layers 1-4, front to back, in the interior of the box tube. Rectangle panel at bottom of most shapes should be lined up, joined (dimensional foam squares is suggested), then positioned in front or behind the bridges, as directed in specific step instructions.

6. Assemble 6 left and 6 right buds by layering the smaller petals shape on top of the larger base petal shape, point and curved edges lined up that match.

Position and glue buds behind stem shapes as shown. Left buds should have the smaller shape as the "outside" most shape (left one here happens to be wrong).


7. Prepare layer 4 assembly for back interior of box. To provide more dimension, place two or three foam squares on the backside of the rose bud unit . . . 


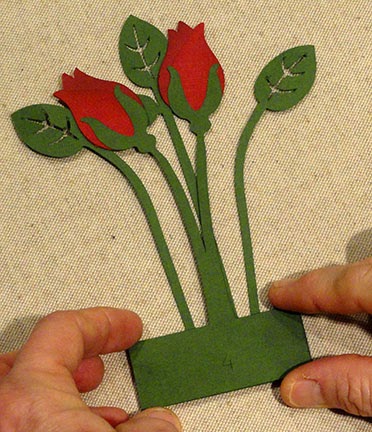
. . . then turn it face side, position with rectangle panels lined up, and attach.


NOTE:  the "left" and "right" rose bud orientation on this unit is correct, with smaller top layer on the outward half of the bud assembly.

Each rose bud stem unit for layers 1-4 should have left single or pair with "left" bud orientation, right single or pair with "right" bud orientation.


8. (Optional) To provide hidden support for tall stems in layers 3 & 4, clear acetate or equivalent shapes can be cut and attached behind the layers assembly.

Here, a double-sided permanent adhesive in strip form is placed in the bottom section of the layer 4 clear shape ( These adhesive strips will allow the clear shape to attach behind the assembly.


Attach the clear support shape behind the leaf layer, lower and side edges matched up. 

Position and attach foam squares behind the clear shape.


9. Position the layer 4 assembly in front of the back of box card, with top edges of rectangle base at same level as flap perforation lines, and with rectangle centered side to side in the box space.

(NOTE: tall stems may flop forward at this point in the assembly. If you prefer, you can apply spots of adhesive to help them stay in place. Once other shapes are in front of these, they flop much less.)

10. Prepare both bridge shapes by folding back side tabs on the perforations.

11. Apply adhesive to the front surfaces of the tabs for the first (back) bridge, then insert it into the box interior and position it one-third of the way forward from back panel. Adjust so that bridge strip is parallel to the front and back panels (while the box is opened and squared up), then attach the tabs to the interior sides of the box. Hold until secure.


12. Fold the box flat and apply pressure in the locations of the bridge tab attachments to help make final adjustments to the way the bridge and card will fold flat. (Minor re-folding may take place at the bridge tab perforations, as needed, in case bridge was not perfectly parallel during the positioning step.)

Repeat this step after the second (forward) bridge is inserted, too.


13. Begin layer 3 by placing and attaching the taller leaves unit behind the bridge, centered side to side with bridge and rectangle panel top edges lined up.


14. Layer the (f to b) shorter leaves unit, buds unit, and clear support shape in the same manner with dimensional foam squares  between all layers as was done for the layer 4 unit in steps 7 & 8 above.


15. Position and attach the layer 3 unit in front of the bridge.


16. Position and attach bridge 2 halfway forward from bridge 1 and the front of the box cavity.


Fold and apply pressure to make final bridge tab adjustments as was done for bridge 1 in step 12.


17. Assemble layer 3 with leaf unit in front of buds unit, foam squares providing dimension between these layers as for other layers.


18. Position and attach layer 2 in front of bridge 2.


19. Layer 2 have a single stem leaf unit that is inserted behind the bridge, at the approximate center. Apply adhesive to the bottom 3/4" or so of the stem, then insert behind the bridge, adjust up/down, side-to-side into the best position for the bouquet arrangements, then apply pressure to attach to the bridge backside.


20. Prepare layer 1 assembly by attaching leaf unit with foam squares in front of buds section.


Also position the shorter leaf pair unit to the front of this assembly (no foam squares suggested here), with both rectangle panel top edge lined up, AND with the backside of the shorter unit facing forward.


Fold the front leaf stem forward.


21. Position and attach layer 1 behind the front of the box, with rectangles upper edges and flap perforations lined up. (No foam squares recommended here.)

Make sure that the front punch hole tab is NOT glued to layer 1, but remains free. 


22. Layer the tag and join layers.  Thread twine, string or ribbon length through the front punch hole tab and the tag and tie in knot and bow to secure.


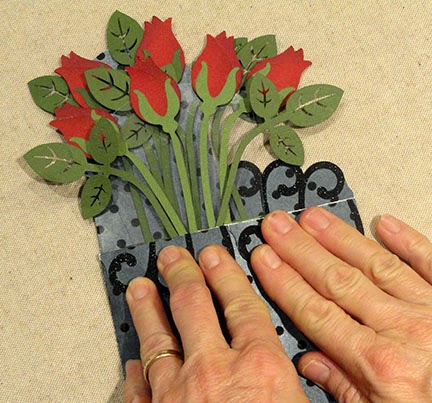
Here is the box finished and open in display mode.


Here is the box card folded flat, 
in its "presentation" mode.
(It could be inserted into
an oversized envelope to mail or give.)


Friday, January 23, 2015

Love Stories 3d Book Box

If you're looking for a memorable way
to give your Valentine a gift card this February 14th,
this paper craft design 3d book box
will make it unforgettable.
Assemble outer and inner covers (complete with spine detail),
assemble the front and back inner boxes,
prepare the card insert (includes single and double inserts),
put together and attach detailed front cover accent layers,
close it up with the latch and nib,
and your "story" is nearly complete!
(After the giving, the box doubles as decor!)
Box measures approx. 8” x 5” x 1.25 when closed.
ASSEMBLY:
1. Identify and cut the shapes:
A book outer cover with contrast spine strips
B book inside cover with inner spine strips
C front inner box (short left side) with end
D back inner box with end
E cover base panel with decor shapes
F tab strap (to shapes to layer)
G latch nibs (2)
H gift card (single) holder


2. Study the assembly process of the original 3d book box at this TUTORIAL, steps 2-11, then return to this post to get the information about how this larger project is assembled.

NOTE that the outer and inner cover assembly with spine strips can be assembled, but the decorative front panel is prepared and attached before the inner boxes are positioned, for this project.


3. Prepare the latch nib by gluing the upper, rounded tabs of the two nibs together back to back, with lower tabs left unattached. Bend the lower tabs outward.

4. Attach nib to front decorative panel by inserting into the small slot at the right upper panel edge from the backside. Glue lower tabs in place on the backside of the panel.


5. Position (centered) the decorative panel onto the base panel front and glue in place.


6. Glue the decorative panel rim and scrolls shape in place at the edge of the panel.

7. Glue the two latch strap shapes together, smaller on top of larger, with edges offset.

8. Prepare to position the base shape for the "Love Stories/heart" shape decorations on the panel front by placing latch strap slot over the nib. This will show you where the "e" and the heart loop should be positioned in relation to the strap tip.

Glue the Love Stories shape in place.


9. Glue the decorative words or hearts shapes over the base shape in order: 1) heart; 2) Stories with separate jot shape for 'i'; 3) Love.


10. Position and glue in place the tiny hearts onto the decorative panel in their cut out positions.

NOTE that the two corner hearts on the base panel will be positioned and glued in place AFTER the panel is attached to the book's front cover.


11. Position and glue the inner front and back boxes as described in the original 3d book box tutorial. NOTE that these inner boxes as slightly larger than those in the original design, so that the small triangle notches at the outer side edges that help identify the front and back of the inside covers will be covered when the boxes are glued in place. Aim at getting center notches and boxes aligned, then adjust to get an even margin of inner cover exposed beyond box edges.


12. Prepare the card insert and place inside the back inner box.


13. Close the book box. Prepare to attach the latch strap by first positioning the slot over the nib, wrapping the strap's folded-back perforations around the right side edge . . .


. . . then glue the back portion/tab onto the book's back cover. Hold until it is secure.

NOTE: To assist the latch strap to remain securely closed over the nib when the gift card box is being delivered, use some tacky glue strips to the underside of the latch strap tip around the slot. This adhesive should be "temporary" so that the latch can be undone to open the box, but strong enough to help the tip stay in place as long as desirable. 


14. The box is closed by sliding the back inner box inside the front inner box edges.


Here is the finished, closed book box.


Tuesday, January 20, 2015

Penguin Canister Assembly Guide

Penguin canister character begins with a cardstock vessel
with short lid section where a knit stocking cap
created from a second-hand child's sweater sleeve snugly sits. 
Cardstock multi-shape tassel ball tips the cap end over.
Dimensional beak, bright layered eyes, scarf,
layered heart and feet bring him to life.


ASSEMBLY:
1. Identify and cut the shapes:
A canister body
B canister top rim
C canister bottom rim
D canister bottom cover
E head top cap
F cap top cover (rim shape is not needed)
G top cap flanges
H front body
I beak box
J face details, hearts, scarf shapes
K feet shapes
L stocking hat template
M hat tassel main circles
N hat tassel bottom row partial circles


2. Construct the canister body following the same procedure as used for Scarecrow canister, as shown in tutorial HERE, steps 2-6.


3. Prepare the head cap by folding tabs and sections back on all perforations.

4. Form the cap shape into a tube to bring the side straight edge to line up with the tab perforation line, and glue in place.

5. Glue cap top cover to top tabs (wider notch cuts between tabs). Fold bottom rim tabs up inside cap and glue in place.


6. Identify the cap flange shapes. Star cutout is widest center section flange; circle cutout is for angle sections on each side of center sections; "S" flange is for "side" sections.

Fold flange tabs back and glue in place.

Insert flange that corresponds behind the various sections of the head cap . . .


. . . leaving a generous 1/4" exposed below cap rim edge, and glue in place. Glue all 8 flanges in place.


7. Prepare the dimensional beak by folding all sides back, tabs outward.

Fold the ends and sides to form box shape with straight end or side edges lined up with tab perforation lines, and glue in place.


Bottom beak end is very narrow, so it may be helpful to use a narrow tip tool such as this spatula handle to insert into the end to press against to join edge and tab.


Here is how the beak box should appear when prepared.


8. Insert tabs into body slots from front, 
then . . . 


. . . press tabs outward and glue in place.

Bend body shape back slightly on vertical perforation lines.


9. Assemble remaining eyes, beak accents, cheeks, heart, scarf and feet units by layering where necessary, then position and attach to the body front unit. 

Feet bottom edge should be flush with body bottom edge.

10. Glue body unit to the front of the canister, with top and bottom edges aligned exactly.


11. Cut stocking hat from existing knit "fabric" using template and following directions included in the cut file.

For the sample project, a nice knit children's sweater is used as the "fabric". It was selected to use one of the sleeve ends with ribbing section as the hat band, because the wrist opening measured to stretch at approx. 8 inches.

Ribbing end was planned to fold back approx. 7/8", so opening template end was aligned at the 7/8" measure mark.

12. Turn the cut shape face side in. Thread a length of heavy thread (or embroidery floss, or, as in the sample case, a piece of unraveled yarn from the cut edge of the remainder of sweater from which the hat piece is cut) onto a large needle. Whip-stitch the "raw" cut edges securely.

NOTE that this sample cap section includes the wrist ribbing that will be band. The original sweater seam in that area was left in tact, and does NOT need to be stitched as part of the new hat side seam.


13. Thread another length of thread or yarn onto the needle. Begin at side seam and approx. 1/2" below top raw edge to stitch a running gather stitch around the top opening.


14. Tie yarn ends into a simple (overhand) knot and cinch up tightly. Knot again to secure gathers.


15. Prepare the tassel paper ball by folding curved edge tabs forward for all whole and partial circles on the triangle perforation lines.

16. Separate the whole circles: 5 for top cap; 10 for middle raw. Remaining 5 partial circles will form bottom "cap".

Assemble top cap, middle row, and bottom by aligning and gluing together the tabs that line up as shown.


This image shows tabs being aligned to be joined. The shapes pictured are partial circles for the bottom "cap" of the tassel ball.


17. Form the middle row into a ring to bring together the opposite curved tabs. Glue together.


18. Glue the top cap to the top of the middle row.


19. Glue the bottom "cap" to the lower edge of the middle row to form the tassel ball.


20. Compact the hat tip as much as possible. Apply adhesive to the tip, then insert into the bottom opening of the tassel. Push tassel ball onto the tip until gather stitches are not visible. Hold in place until joint is secure.


21. Slide the hat opening over the head cap . . .


. . . until the crown ribbing fold edge conceals the cap lower edge. 

Flanges should still be exposed.


22. Place the cap onto the canister by aligning the canister and cap openings, with cap flanges lined up to slide inside the canister top opening.


23. Flip the hat tip and tassel to fold to the right. Attach the snowflake to the hat brim.


Here is the finished Penguin canister.