Thursday, February 29, 2024

Shamrock Tag with Buttons

 
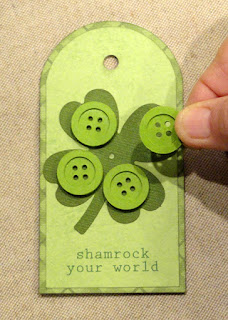
Large tag “card” has classic round-top shape 
with back base that bends away below punch hole 
to provide concealed sentiment or greeting area. 
On front, offset accent overlay holds four-leaf shamrock 
decorated with 4 layered-for-thickness buttons. 
A center punch hole can accept a jumbo (18mm) 
decorative brad if available, or stack and attach 
a paper disc, if desired. 
Optional “print & cut” front accent panel which
 includes phrase “shamrock your world” 
can be substituted. 
Add ribbon loop accent, then attach to gift or treat 
for St. Patrick’s Day fun. 
Tag measures approx. 4.5” tall x 2.35” wide 
when fully assembled and closed 
(a standard plastic gift card can be attached 
inside or to back). 

ASSEMBLY: 1. Identify and cut the shapes:
A tag front   B tag back with upper perforation
C tag front accent, with opt. "print & cut" phrase
D shamrock
E discs to layer as substitute for brad
F button rim rings (4 sets of 3)
G button body discs (4 sets of 4)
2. If desired, use Silhouette Cameo "print & cut"
tools and procedures to set up the tag front accent
which includes the "shamrock your world" phrase . . .
. . . then lift the printed and cut accent from mat.
3. If using paper disc cutouts in place of jumbo brad,
layer and attach into a stack, taking care to align
all outer cut edges as precisely as possible. Then . . .
. . . place under a heavy flat weight such as this
fabric covered re-purposed free weight bar and leave
in place until stack is completely dried, for several
hours or over night. Pressing in this manner will help
prevent warping or curling of layered shapes glued 
together with liquid adhesive.
4. Repeat step 3 for the button rim rings, and 
. . . also the button bodies, stacking and gluing
the prescribed or desired quantity of shapes,
and then pressing until thoroughly dried.
NOTE that it may be helpful to use a pointy tool such as
this stylus to clear out all interior openings of the stack
or of individual layers.
5. Layer the rim ring stack onto the front of
the button body stack, and attaching together,
taking care that outer cut edges are aligned
all around. 
Repeat until there are 4 complete buttons.
6. Prepare the tag front by centering and attaching
the accent shape over the front tag shape,
taking care to align the ribbon hole precisely,
and making sure that there is an even, narrow
offset margin all around accent shape edges.
Press under flat weight until dried.
7. Use the middle punch hole to align the center
of the shamrock shape, then rotate the shamrock
slightly so that leaf edges overhang accent
panel edges a tiny bit at sides, then . . .
. . . glue in place.
8. Bend the top portion of the tag back base forward,
then apply glue above the perforation.
Reverse the front tag to be face down, then
position the backside of tag rounded upper portion
over the matching portion of tag, adjust so that
cut edges align, then . . .
. . . attach together. Press until dried.
Here you can see how the tag is intended
to look, with a hinging action where back panel
can bend away from front tag.
9. Position the four prepared button stacks onto
the leaves of the shamrock so that they are
equi-distant from the center alignment hole,
centered more or less within the leaf,
and attach in place.
10. Position the substitute disc stack
at center of buttons so that it overlaps
them in a balanced or even way,
then glue in place.
To help the discs look more like a brad,
consider using Nuco Chrystal Glaze
liquid on the disc front, then allow to dry.
(Otherwise, use the jumbo brad to
insert through front tag only layers
at the positioning guide hole.)
To help the discs look more like a brad,
consider using Nuco Chrystal Glaze
liquid on the disc front, then allow to dry.

Tuesday, February 13, 2024

Double Ends Popper Box Extra Large

Assemble this two-part hull gift box to decorate
 for holidays, seasons or occasions with boxy ends 
that pull sides-outward to open and close. 
Add "print & cut" for my Valentine oval accent layer
from a separate design file, if desired.
Decorate with coordinated center and end overlay accents, 
fussy-cut text from specialty print paper, stamp, 
or print a festive greeting on accent oval. 
Then fill with candy treats. Surprisingly easy to assemble. 
(Use solid card stock that appears the same on 
front and back; two hull shapes can be cut from 
one 12x12 non-directional sheet.)
 Gift box measures approx. 6” long x 2” wide x 2” deep 
when assembled and fully closed 
(that’s large enough to insert a standard plastic gift card 
diagonally). 

ASSEMBLY: 1. Identify and cut the shapes:
A main hull and B add-on hull end shapes
C accent shapes for center (4)
D accent shapes for ends (8)
E optional scalloped oval and plain edge oval
F substitute "print & cut" plain edge oval
2. Bend back on the long horizontal perforation lines
of the hull to begin to create the box tube, including
the long edge flange tab.
3. At the end, bend the "solid" strip forward so that
it is face-down over the front of the main hull
(valley fold).
4. Bend back (mountain fold) to crease across
the narrow neck of the triangle shapes.
(NOTE that the first fold in previous step is
now hidden under the main hull.)
5. Bend back along the final perforation line in
the series (mountain fold) and crease.
6. Repeat steps 3-5 for the add-on end hull shape.
7. Apply adhesive of choice along the inward edge
tab face surface, then . . .
. . . overlap the straight end edge along the tabs'
perforation lines, taking care to align the segments
of the add-on with the panels of the main hull.
NOTE that there is a slight "notch" at the end of
the final "solid" strip. This extra length for the end
section will help the ends have a bit more "wrap"
allowance for the pull-open ends.)
8. Prepare to attach the accent shapes to the hull
assembly while it is flat. Fold the end panels inward
so that the "solid" portions are covering the side
portions of the middle hull as shown. This will reveal
only the portion of the box hull that will be visible
when the popper-end are in closed position.
9. Position and attach the center accents between
the end folds and the wall sections as defined
by the perforation lines or straight edge.
10. Position and attach the end accents, centering
within the popper end panels as defined by
the perforation creases or straight bottom edge.
11. Prepare the optional oval medallion by centering
and attaching the plain oval (with desired stamp,
hand-penned or fussy-cut message) over the contrast
scalloped oval.
Alternatively, prepare the "print & cut" oval message
following procedures and techniques for that method,
then position (centered) and attach.
12. Position and attach the oval accent medallion
onto one of the center two hull panels. Center the
medallion in the visible portion, or . . .
. . . to one side, if you plan to add a ribbon/bow
accent tied around the hull.
13. Prepare to close the box by pushing the "bridge"
narrow neck outward so that fold line is farthest out.
14. Form the hull into a tube to bring together
the plain long edge to overlap the opposite long flange
tab. Adjust and attach together to close the seam.
15. Prepare to close the first "popper end" by bending
the box end extensions inward. NOTE it may be easiest
to begin at the seam segment, bending first miter
end in, then moving counter clockwise to bend
the next end in so that the miter angle overlays
the regular corner end of the previous end.
Continue until all four ends are bent inward, then . . .
. . . flexing that fourth end so that it can tuck
under the first end as needed for the proper
sequence of overlapping of miter edges. 
16. Arrange the popper end straight edge to
overlap the tucked-under tab, and . . .
. . . join seam.
As the first seam is being set, gently ease the popper end
outward and away from the main hull. Then . . .
. . . adjust and re-attach the seam as necessary.
Hold and apply pressure until secure.
17. Repeat for the second end.
Here is the completed, closed popper box,
with ribbon accent tied on.

Thursday, February 8, 2024

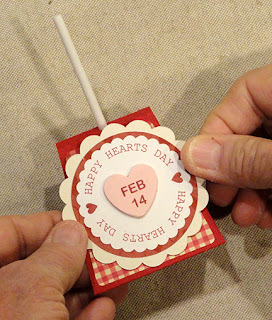
Valentine Lollipop Sleeve Four Variations

 
Dress up a hard candy sucker for a Valentine’s 
special treat with these cover stands. 
Two styles are included with each design: 
tent style with fold-in base flanges to provide 
secure positioning rims; 
or simpler sticky-taped pinch-to-close top edges. 
Dress up the front panel with the scalloped discs, 
choosing which shapes you want, or 
the whole ensemble. 
If desired, substitute “print & cut” scallop front layer. 
Three designs available separately:
1) “Happy Hearts Day”, and “Feb 14” candy heart 
that can be stacked for thickness; 
2) Be Mine printed disc; 
or 3) Love You printed disc.
2) Be Mine printed disc; or 3) Love You printed disc.

Fourth design that includes cut shapes only
with swoosh heart and faux stitched disc.
Also suitable to embellish with your own “found” 
stickers and jewels, etc. 
Tent measure approx. 2.375” tall x 2.375” wide 
at base x 1.5” deep. 
Pinch-close style measures approx. 2.375” tall
 x 2” wide x 1.625” deep.

NOTE: the Happy Hearts Day disc "tent" style
design will be described thoroughly first, with 
the "pinch" sleeve simple assembly following in Step 14.
(Identifying and cutting steps are both at beginning.)
The other designs are similar enough that the general
assembly steps will can be followed for all other designs.

ASSEMBLY: 1. For the samples shown of the designs
which include the print & cut disc designs, begin by
identifying the shape that will be set up to print
then cut, then follow the standard processes to
accomplish the printing and cutting.
2. Identify and cut the shapes (tent style):
A main tent hull
B front offset accent shape
C medallion scallop base circle
D accent circle
E print & cut scallop circle
F stacked heart with print & cut front, 6 to layer
3. For the alternate design:
Identify and cut the shapes (pinch-top style):
A main tent hull
B front offset accent shape
C medallion scallop base circle
D accent circle
E print & cut scallop circle
F stacked heart with print & cut front, 6 to layer
For either design: 
4. Layer the main medallion shapes, centered,
and glue together.
5. Layer the candy heart shapes into a stack with
the printed shape on top, taking care to align
all cut edges as precisely as possible,
 and glue together
If possible, press the stacked shape with a heavy
flat weight such as this fabric covered weight brick,
and leave in place for several hours until thoroughly
dried.
6. Position the heart shape, centered on the medallion,
and glue in place.
For the tent style:
7. Prepare the main shape by bending back on
 the perforation lines for the center section . . .
. . . including the top "tent" bridge and flange tab.
For the side extensions, bend the mid lines into
an inverted 'V' to create the ridge.
8. Apply glue inside the ridge perforations, then . . .
. . . bend and flatten the ridge segments so they
stack on top of each other and apply thumbnail
pressure back and forth to securely join.
Take care that the end extension does NOT get
attached to the inward extension.
It may be helpful to bend the end flange back
to prevent attachment while continuing to apply
pressure until the rim is completely joined.
(Complete this step for both extensions.)
9. Apply adhesive to the underside of the extension
from inward perf line to edge of rounded flange . . .
. . . then bend the extension inward and
press in place until well attached.
Repeat for the opposite extension which
will meet up with the previous extension 
end edge.
10. Once the extensions are securely glued in place,
bend the rims into perpendicular position where
they will be ready to help hold the sucker in place.
11. Position the accent shape onto the front panel
with even offset margins at sides and bottom/top
panel-defining perforation lines.
12. To complete the gift, insert the sucker stick
into the "tent" panel hole . . .
. . . and bend the tent panel and back flange down
to overlap the top of back panel, straighten and
glue flange in place.
Here is the completed tent to this point of assembly.
13. Position and attach the medallion.
"PINCH" GLUE TAPE CLOSURE SLEEVE
14. Prepare the main shape by bending back on
the two bottom panel perforation lines.
15. Position and attach the front accent panel.
16. Apply two-sided sticky tape across one end
flange on the inward surface close to cut edge . . .
. . . insert lollipop between and so that it rests
on the center bottom panel.
Bend the front panel into position with stick
centered at half-circle cut out (helps keep lolli
straight), align and pinch the upper edges
until secure.
17. Position and attach the front medallion.