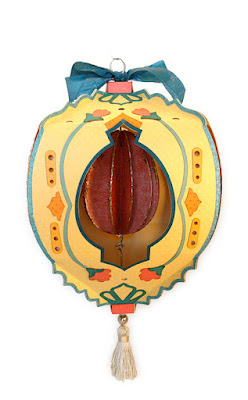
Confection-colored details adorn four outer
panels
of this acorn-shaped vessel which encase the inner lantern hull.
Bracket edge flanges add style at
upper and lower angled edges.
Thread wire or ribbon through center, add beads or
tassel
at bottom end, fashion hanging “eyelet” at top.
Add interior magic by attaching
a dangler of some kind,
such as the “Egg 3D Hollow Ornament”,
“Egg 3D Slice
Form Ornament”, or
two-sided “Cross Scroll Ornament” separate designs.
Enhance holiday decor by hanging from chandelier,
archway, high shelf or other
appropriate location.
Lantern measures approx. 8.25” tall x 4.25” wide when
assembled.
ASSEMBLY: 1. Identify and cut the shapes:
For the inner hull -
A hull two-wall sections (2)
B end collar reinforcement inserts (2)
Not shown: end [repairing] reinforcements (2)
C outer wall panels (4)
D decorations (4 sets), including:
left & right edge trim sections for upper, middle, lower
end brackets for top & bottom
stem rectangles for top & bottom
edge trim for center window opening, crown trim
double-tipped stems, blossoms & sepal overlays
with mid-side flourishes
three-hole "pop tabs" for left and right
all perforation lines except the end collar shapes
side edge and overlap to match up with flange's
perforation line, and glue seam.
Repeat for bottom panels.
overlap straight edge across adjacent tab and join.
two side seams, plus . . .
. . . two upper angled seams and
two lower angled seams, plus . . .
. . . and two upper & lower stems.
6. Bend the side walls of the reinforcement collar insertsforward/up, apply glue to underside/outside of walls,
then insert backside-down into the square
opening. Slide down until . . .
then apply thumb/fingertip pressure at each wall
until firmly in place.

7. Plan and devise a hanging method.
This may include narrow ribbon that can attach an interior
dangling object just at top, or from bottom with a tassel end,
two ends up through lantern interior -- including through
dangler -- then through top to form a hanging loop or
attach to a decorative hook.
NOTE: the ribbon or wire or other center mechanism can be
completed after the outer walls are in place.
However, it may be easier to manipulate and handle
before the walls are in place.
THE PROJECT MODEL USES A WIRE.
A) Form an open end loop/hook at one end of a length
of 16 gauge or equivalent wire which becomes bottom end,
then attach tassel or other bauble, then close loop.
B) Lay wire assembly across top of hull, with end loop
in place where it will stop at bottom stem hole opening.
Measure up wire to approx. position where you desire
bottom of selected dangler to be in finished assembly,
and mark wire.

This image shows the slice form egg ornament as dangler,
held in place to help determine bottom measurement.


C) Form a cork screw "knot" just below the length
that has been marked. This change in the wire is
intended to stop the downward slide of the dangler egg
on the axis of the wire.
D) Insert the wire through bottom of lantern, turning
the wire so that the cork screw turns the punched hole,
while at the same time threading the egg's center tunnel
from bottom to top. Continue inserting the wire through
the top collar platform, then adjust as needed to help
the wire get to the final positioning.
E) At top, carefully use tool(s) to form a top hanging loop
and cutting away excess length.
8. As needed, position and glue in place 1-2 end
"repair" or reinforcement squares at bottom
and/or top collar platform, torqueing to allow the cut
split to open so it can be slipped around wire
or ribbon. Rotate the second (etc.) square so that
the split lands in a different direction from previous.
9. Add some slight back curl to each of the outer wall
shapes: turn panel face down on work surface,
then use a rod tool such as this 3/16" dowel
to press the shape in place while panel is drawn
up from under the tool.

10. Bend angle edge bracket flanges forward (valley)
and end "tabs" forward at top and bottom.

11. Add back curl to long decor shapes that will be
added on front of each panel, so that they will stay
adhered in place.
Then position and glue in place.
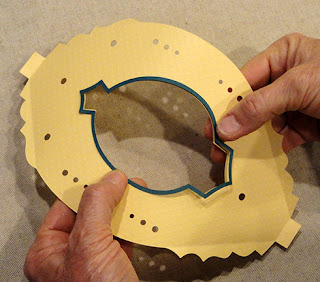
Shown in these two frames is the window trim shape.
Add the "crown" accent at the top (narrow end)
where it hugs the top of window trim.
Add the end rectangles and brackets,
"pull tab" shapes where they can "register" at
tri-hole cut out positions.
Prepare the double-tipped stems by attaching
the corresponding small or large blossom overlays,
then the sepals at bottom of blossoms.
Position and attach in space between window trim
and pull tabs, with the center angle centered between
ends of pull tabs.
Position and attach the side "crown" accents centered
and offset on outside of stem center angle.
Finally, add the panel trim shapes at angle edges
upper and lower, and arch side trim shapes.
12. Curve the first completed outer wall panel around
the hull, then position and attach top stem end to stem panel
of inner hull. (Use a quick-grab glue such as Fabri Tack,
to attach ends securely.)
Once one end is securely in place, "wrap" or curve
the panel around the hull to position and attach
the other end in place, gently urging angled perf lines
to match up with the perforation corners of inner hull.
13. Repeat Step 12 to position the next panel,
position and attach first end . . .
. . . then second. As subsequent panels are positioned
and joined in place.
As previously noted, urge the ends into position
to duplicate the end stem panels.
NOTE that the angled bracket flanges
should line up and be glued together as part of the
"adding panel on" process.
14. Continue to add final two side panels in place,
aligning, adjusting, securing and attaching bracket
flanges as done before.
15. Finally, add finishing touches, including
for this wire-center version, a ribbon tied in knot
and bow. (For a ribbon center, consider adding
decorative or painted beads onto the ribbon at stem ends,
or other appropriate decorations of choice.
Here is the completed lantern with slice form
egg dangling inside.


