
Imitating
take-away sandwich packaging, this triangular box hull
is cut in one shape
which bends to join at corners,
forming a wedge compartment measuring
approx.
3.5” tall x 3.5” wide x 1.5” deep.
Angled wall panel includes a rectangular
window to provide
sneak peek at loose goodies inside, with a “window” panel
to
cut from clear vinyl material.

At apex, large tab extends upward, containing
punch holes
for ribbon tying. Accent shapes are included to decorate
triangle
wall panels and end upright panel.
Versatile box for many occasions.

Add the
coordinated accent shapes from
“St Patricks Day Shamrock Flag Label and Ticket”
separate design.
ASSEMBLY: 1. Identify and cut the shapes:
A box hull B clear acetate or vinyl window "liner"
C front and back triangle, back rectangle wall accents
D-G optional shapes as embellishment from separate file:
"St Patricks Day Shamrock Flag Label and Ticket"

perforation lines for panels, tabs, flanges, except bend
forward on top extension fold-over panel base edge,
as indicated by pointing finger.
 3. Fold the extension panel down, fold bottom tab
out of the way, and attach extension panel in place.
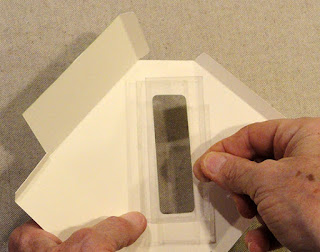
 4. Prepare the see-thru window panel to be attached
by positioning and attaching two-sided tape such as
this Cool Tak permanent tape along front side edges.

 6. Position and attach the accent wall shapes on
5. Remove carrier tape, then position the clear panel
over the backside of the hull window opening
within the side perforations that define the angled wall,
and attach in place.
the hull's outside surfaces, offset within the perforations
and cut edges that define the walls.
 7. Begin shaping and assembling the box by bending
the window panel/side panel up into position so that
the first end edge aligns at the perforation line for
the extension panel's tab, then join the seam.
 8. Repeat to join the seam for the opposite (bottom)
edge of window panel and wall end tab.

be helpful to insert a blade tool such as this spatula
inside the box to help push against the tab until
well secure.
 9. Align edge and tab perforation to complete
the bottom back (right angle) seam.


10. With the box fully assembled at this point,
prepare to fill and close the back "lid" triangle panel.
To help it stay in closed position, add double-sided
tape along both the flanges face surface.
Bend the back triangle panel into closed position,
taking care to tuck the inward ends of flanges
inside, then carefully closing.
11. If desired, prepare the "lucky!" print and cut panel
following Silhouette America's online store
Silhouette 101 tutorial for guidance.
(Or use the plain flag inner panel as desired.)

12. Position the printed inner panel over the offset
base tag shape, with double-point end edges aligned.
and attach. Add the shamrock shape over the assembly
to be within the matching offset edges, and attach.

14. Position and attach the flag assembly near
top of window panel, ticket at bottom, as shown.
Add a length of ribbon at panel extension hole
and knot as embellishment.
(Fill the compartment and close box.)

Here is the completed St. Patrick's Day treat box.
Change color scheme for accents, embellishments,
and treat for other holidays and occasions.

No comments:
Post a Comment