
is intended to be printed and then cut out
(activate Print
& Cut tool to add Registr Marks to print page)
to include the “celebrating
arrival of your little” as first part
of tag’s message. Offset tag base
measures
approx. 7.125” tall x 3.75” wide.
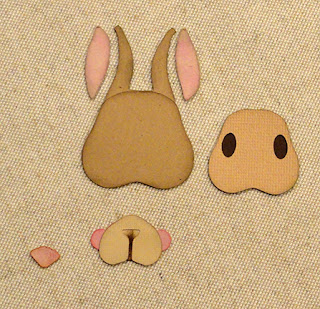
Baby bunny is layered to define
front legs, feet with toes cutouts
and contrast liner, head, head overlay with
ears, inner ears,
face overlay with eye cutouts and contrast liner,
muzzle with
cheeks to "rouge", muzzle overlay and nose.

Layer and assemble components
on body base
(measures approx. 3.5” tall x 2.17” wide).
Below bunny, use welded
words shape to complete
the phrase with “some bunny” and
optional separate
“some” for color contrast.
ASSEMBLY: 1. Identify and cut the shapes:
A Print & Cut tag front panel
B tag offset base (with extra layers to thicken, if desired)
C bunny body foundation
D legs E chest fur
F feet overlay with contrast toes/pad (2 ea.)
G head/ears overlay H left & right inner ears
I head shape overlay J face overlay with eye cutouts
K eye contrast show-thru
L muzzle overlay
M cheeks/muzzle base (with inked middle for muzzle detail)
N nose
O "some bunny" welded phrase P "some" welded word

review the process by searching silhouetteamerica.com
and clicking "Support" and following the "Silhouette 101"
path to search for "Print and Cut" tutorials.
Then Print & Cut the tag panel:
A) set up the 8.5x11" portrait printing/cutting page,
activate the "registration marks" tool, rotate/move
the tag shape onto the screen page within printable/cuttable
red guide marks.

B) send the job to your printer and print on medium
weight cardstock.

C) place the letter size printed sheet onto the cutting mat
in matching position to what was set up on screen.
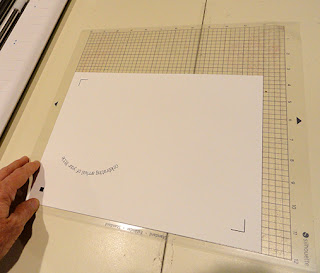
D) adjust cut settings as needed, then send the job
to cutter; NOTE that the cutter will begin by "reading"
where the registration marks are, then will
complete the cut in the desired position, including
the printed words arch.

remove the cut tag.

 4. Identify the small horizontal cut mark on the front tag
3. If using multiple tag base shapes for thick
presentation tag, layer and glue together the cut layers,
taking care to align outer cut edges and ribbon punch
hole as precisely as possible.
NOTE: the sample tag uses color front and back
layers, with two craft colored interior layers.
which will assist in positioning the bottom of bunny
assembly, then . . .
 . . . position and attach the front tag on top of
front tag base, with offset margin even all around
and ribbon hole opening edges aligned.
 Place the tag assembly on a flat surface, then
place a heavy flat object on top to press
the glued-up stack until completely dry,
which may take several hours or overnight.
Pressing will help minimize warping or curling
of glued stack when using liquid adhesive.
 5. Assemble the cut shapes to form the bunny body:
A) position and attach legs shape onto bottom of
body foundation, aligning feet outer edges,
and front paw lower edges, with shapes aligned
at center;
 B) layer feet overlays onto show-thru toes/pads bases,
and attach;
C) position and attach chest fur centered at top of legs;
 D) position layered feet over top of legs overlay
where shape edges align and attach;
 6. Assemble the head shapes:
NOTE that the cheeks/muzzle shape has cheek
"rouging" ink and center darker ink to emphasize
feature details.
 A) layer head overlay onto head/ears base
and attach;
B) layer muzzle overlay onto cheeks/muzzle base
and attach;
C) position eye contrast strip behind face,
and attach in place;
 D) layer muzzle assembly, centered onto lower portion
of face with lower edges aligned;
E) position and attach nose at center top of muzzle;
 F) position and attach face/muzzle assembly
onto lower edge of head assembly;
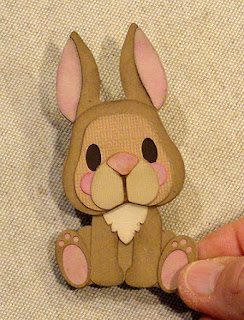
 7. Complete final bunny assembly:
A) position head assembly onto body base
and attach in place;
 B) position and attach the inner ears in
the recess created by layers.
 Here is the completed bunny assembly.
 8. If using the two-color words variation,
position and attach the "some" over
the combo word shape.
 9. Locate the guide mark cut, then . . .
 . . . position (legs edge centered) at the guide mark.
 Position and attach the welded words shape
below bunny.
 As a final detail, consider adding a tiny dot of
white or cream acrylic paint at upper portion
of pupils as shown in this image.
Refer to opening thumbnail image to view
the ribbon "cockade" attached at ribbon hole.

No comments:
Post a Comment