
Tall narrow angel figure is composed of outer body hull "LID" and
inner body hull "BASE" that fit together tightly
inner body hull "BASE" that fit together tightly
for strength. Skinny arm tubes enclose 1/4” wooden
dowels cut to size below threading holes, with fold-over
simple hands that
attach at bottom tab extensions.

and tabs, and fits onto the top of a hex tube-wrapped
1/4” wooden dowel
inserted through assembled body hull
to be attached at bottom.
Arms are
attached with narrow ribbon or twine and bead joints.
Brocade wings have
built-up layers on front,
aligned with small punch holes pair on back.

Embellishments
that make the angel a wee bit Irish include:
tiny thickened Celtic heart button,
small shamrock banner flags,
curly twine hair, kilted overskirt with
laced-front bodice,
and optional halo.
Measures approx. 7.75” tall x 5.25” wide
(across wings) x
2.5” deep (at base) when assembled.
This project as shown, with twine hair, lacings, etc., will also require:
14-20 yards of rusty orange med. gauge twin for hair
(sample project twine was tea dyed to achieve color)
10-12" lacing twine for pinafore
15" twine or ribbon for shamrock flag swag
14-20" of narrow ribbon or twine, 2 beads for arm joint
15" inches of 1/4" diam. wooden dowel for interior post, arms
decorative brads for wing back detail
ASSEMBLY: 1. Identify and cut the angel and
pinafore shapes:
A main hull body shape with "dress" overlay accents
B main base hull insert C base bottom panel
D hexagon post "collar" shapes (6-8)
E base upper opening collar reinforcement
F post strip with pass-thru holes for arm ribbon
G arm tubes with hand extensions
H head front I head back J cheeks stencil
K eye contr. show-thru panel L hand overlays (2)
M arm lift rolled strip "beads" (2)
N Celtic heart button front layers (4-5), button base
O pinafore bodice with lacing holes
P left & right pinafore skirts with add-on "kilted" shapes

(NOTE that, except for main base,
the shapes are cut as left and right sets,
with 2 layers of each being cut.
(Petal and upper wing interior circles and teardrop should
be retained from the petal cut, so that each will be
stacked in sets of 4 shapes.)

wrap-over flag bases, front accents, shamrocks.


2. Layer and glue together the shapes that need
to be prepared so that they can be drying
while other construction proceeds.
A. Stack and glue the post collar shapes,
taking care to align all cut edges as precisely as possible
(for this shape and all others), particularly at
the inside opening where post will need to fit.

NOTE: for glued-up shapes, it will be helpful
when using liquid glue to press them under a flat
heavy weight of some kind, such as the fabric-covered
re-purposed flat weight shown here, or a heavy book, etc.
It may take several hours for shapes to dry completely.
Pressing the shape stacks will help keep the flat,
avoiding warping and curling.

B. Layer and stack the heart button shapes, then . . .

press under a heavy flat weight until dry.


3. Layer and stack the left and right wing shapes:
A. the main base (double-wide) shapes
and the left and right wing bases;
also (NOT SHOWN) the inward feather "swoosh";
NOTE: following images may show the triple swoosh
shapes that were originally part of each wing half,
but which have been modified to a single in final design.

B. petal main shape, tip left and right,
contour left and right, middle circles stack
and tear drop stack;
contour left and right, middle circles stack
and tear drop stack;

C. upper wing base, tri-lobe overlay, upper feather,
circle stacks; then . . .
circle stacks; then . . .

. . . position overlays onto upper wing base,
then position and attach circle stacks into recesses.

4. Position and attach the petal assemblies onto
corresponding left and right wing half bases, then
place and attach the upper wing assembly.

5. Position and attach the wing halves on each side
of the double-wide wing base.

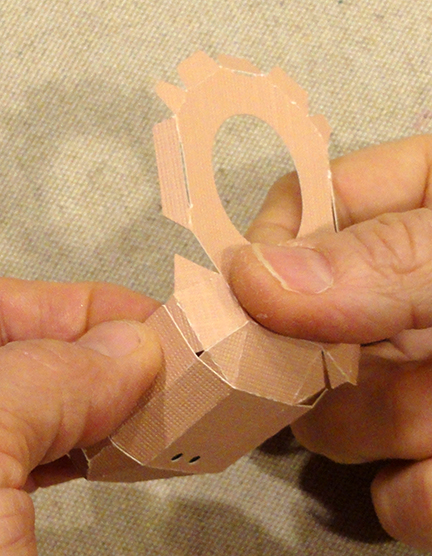
6. Prepare the post wrap shape by carefully
bending back on all the long perforation lines.

7. Form the post wrap into a tube. To assist gluing
of seam, insert the uncut 1/4" wooden dowel inside
the tube, then apply glue to backside of flange,
wrap straight edge over flange and force edge
around to match up with the first perforation line,
and apply pressure all along the seam until it is
accurately attached and secure.
of seam, insert the uncut 1/4" wooden dowel inside
the tube, then apply glue to backside of flange,
wrap straight edge over flange and force edge
around to match up with the first perforation line,
and apply pressure all along the seam until it is
accurately attached and secure.

8. To allow the arms "ribbon and bead joint" to be added
later in assembly, the post includes a punch hole on
each side through which the needle will need to pass.
Therefore, the dowel insert will need to be cut into two pieces,
The bottom length will need to be cut a approx. 21";
double check the measurement between bottom post tube
shape and bottom of pass holes. The top length will need to be
cut from top post tube shape edge to just above pass hole.
(Alternately, the hole can be drilled through the dowel,
when the dowel can be cut into ONE length and inserted whole.)
Insert top and bottom lengths and glue in place.

9. Prepare the main hull shape by bending back
on all segment perforation lines and side flange,top tabs and top "lid". Also push inward the top center
hex opening, then attach dress accent overlays while flat
(view those accents in the shapes layout photo above).

10. Form the hull into a tube to bring the straight
back segment edge to overlap the opposite flange
to perforation line, and glue the side seam.
NOTE it may be helpful to insert a rigid tool
into hull behind the seam to provide a press-against
surface to help secure the seam across the center.

the top "lid" into position to align cut edges as
tab perforation lines, and glue in place.


 B) add the 'X' stitches to bodice with twine lacing . . .
 . . . with cut ends held in place with cello tape strip


 F. bottom mid side two-part seam
(Complete second side in same manner.)


 28. Insert the bottom tab with hex opening
fully into the bottom slot of front head assembly
and glue in place.


 39. Prepare the "wig" by arranging loose coil into

 43. Position and attach heart button in place.

 45. Cut a length of twine (approx. 9-12"), locate center,

 Here is the completed Irish Angel project.
12. Prepare the lower hull shape by bending back
on all segments and flange perforation lines,
bottom base and tab lines.
13. Position the collar stack on the inside of
the base shape with hexagon openings
aligned as precisely as possible, and glue in place.

14. On the outside, position (centered) and glue
the bottom cover in place.

15. Form the lower hull into a tube to join the side seam.


16. Bend the bottom tabs inward, bend the bottom
panel into position, align and attach edges at
perforation edges.

17. Prepare the top reinforcement collar shape by
bending the edge flanges forward.
Insert the reinforcement into the opening, then . . .

. . . align first long tab edge at corresponding
hull top long edge and glue in place until secure.
hull top long edge and glue in place until secure.

Use a tool (such as this weeder hook) to pull
the reinforcement shape into position
(this is a snug fit) so that all other edges align
at top hull edges to be glued in place there.

18. Apply glue along inner hull lower wall edge,
then insert lower hull into the bottom opening
of the upper hull, and slide the two together
until bottoms are aligned as closely as possible.
19. Prepare the pinafore and bodice shapes:
A) bend back on all perforation lines, including skirt
top edge tabs;
on underside;
 C) assemble "kilting" hem layers by overlapping middle
(narrower) shape on top of bottom shape, with
lacing holes aligned, front and back straight edges aligned,
and glue together where they overlap;
 D) repeat this process to overlap skirt bottom
edge over kilting layers;
 E) add lacing stitches through holes so that
three stitches show on front in a continuous line.
 20. Assemble pinafore by overlapping bodice lower
edge over skirt top edge to top tabs perforation lines,
and glue in place, shaping the pinafore and skirt so it
will conform around the hull body.
Repeat for second side.
 21. Position the pinafore over the front hull panel
with bodice "strap" perforation in a line with hull
top edge, and attach in place. Then . . .
 . . . bend strap back to attach to top hull "platform"
so that angled end aligns with back platform edges.
and glue in place. Repeat for second strap.
 Wrap the skirt sides back around hull to align back
edge roughly along hull panel perforation line,
and glue each skirt side in place.
(NOTE that front skirt remains unattached to "drape".)
 22. Apply quick-grab glue to bottom of post.
Insert post gluey end through top hull opening, taking care
to orient the post so that the drill holes correspond to
hull/body sides so ribbon joint can pass through.
Pass post through the base collar hexagon opening,
then downward to seat into the hexagon stack opening
on base's bottom panel. This may take a bit of "fishing"
with post ends. Push post down until securely attached.

23. Prepare the head shapes by bending back
on all perforation lines for panels, wedge and edge
tabs, etc. Position and attach the eye contrast shape
behind the eye punches of face panel.

24. To apply cheek rouging, position stencil with bottom edge
at face panel bottom edge, hold or secure in place,
then apply distressing ink or stencil paint, etc.
with brush or, as in sample project, with fingertip.
Remove and discard stencil.
25. Bend head front panel segments to overlap
and align straight seam edges and perforations:
A. first top side seam

B. second top side seam

C. mid side two-part seam

D. bottom side seam
(Complete second side in same manner.)
26. Bend side panels of head partition back, then . . .

. . . apply glue to the lower wedge tabs and
to other side tabs.
to other side tabs.

Bend tabs inward then bend partition into place,
tucking tabs inside head edges, and glue in place.
Use finger access oval opening to reach inside.
(Refer to step 28 to see partition panel in final position.)

27. Prepare the back head in similar manner
by completing the upper . . .

. . . and lower side seams.

fully into the bottom slot of front head assembly
and glue in place.

29. Insert side and top tabs into corresponding
slots, push in fully, and glue in place.
If possible, at the same time, apply glue along
inner edge of head back so that these will
join to front edge edges.

30. Prepare the left and right arm tube shapes
by bending back on the long perforation lines
(similar to post tube) and also bend the upper
tabs and hex panel inward, and lower tabs and
hand* extensions inward (*hand extension base
perforation is bent back, second perf line is
bent forward).

31. Form the arm shape into a tube, using
the 1/4" uncut dowel to assist with aligning
side straight edge and side flange perf line
and providing press against surface for
the 1/4" uncut dowel to assist with aligning
side straight edge and side flange perf line
and providing press against surface for
gluing the seam.

32. Move the top of dowel down to align end
with top tabs and hex panel, then bend
tabs inward . . .

. . . bend "cap" hex into position and glue in place.

33. Cut two arm dowel insert pieces at 2.125" each
(NOTE that dowel will not fill the arm tube
beyond the ribbon-joint hole punch.

34. Insert dowel into bottom of arm tube
and push inward until end is clears
bottom/hand base tab perforations.
Glue dowel in place.

Bend tabs inward . . .

. . . bend hands toward center as shown,
glue hand base segments to top of dowel,
and hand main portions back to back
to each other.

35. Prepare hand overlays (with ribbon holes
if planning to include the flags swag option) by
bending back on center perforation line.
Apply glue to hand underside,
then wrap around hand extension,
adjust and glue in place.
bending back on center perforation line.
Apply glue to hand underside,
then wrap around hand extension,
adjust and glue in place.
NOTE: if incorporating the swag, the hand holes
will need to be "punched" through inner layers
using a sharp rod tool such as a pointy awl.

36. (Following images are from a previous project.)
Prepare ribbon or twine joint with bead ends
by threading a needle that will fit through selected beads
with a doubled length.
A. thread needle through bead and tie end knot and bow.
B. thread needle through first arm hole punches
(NOTE orient hand straight edge toward front body edge).

C. thread needle through first hull side panel hole punch,
then through both holes of post, then through
second hull side hole punch.

D. thread through holes of second arm.
E. thread through final bead, tie knot and bow,
and trim excess ribbon or twine.
E. thread through final bead, tie knot and bow,
and trim excess ribbon or twine.

37. Apply glue to back panel face and top end of
protruding post, then insert end into head bottom opening,
and slide head fully into position so that post top
attaches to head top underside, then apply pressure
so that back of post attaches to interior partition.
38. Prepare curly twine hair by wrapping tightly around
a narrow dowel or knitting needle, secured by paper tape
at each end. Once the rod has been fully loaded with
as much wrapping as will fit, wet the coil with liquid
(spray) starch and allow to dry. Carefully remove from
rod tool, then re-load and repeat until desired quantity
of "curls" have been produced.
selected-length loops, then laying pinched loops
(forehead edge) tightly in a line and machine stitching
near edge with matching thread.
HINTS: mark off the target curl length rectangle
onto a piece of type-weight paper to act as a guide
to arranging loop lengths, and to provide a pinch loop
end stitching guide line. The rectangle used for
the sample project was approx. 3" side to side
(loops were NOT stretched by loosely laid)
and approx. 5" long.
40. Remove wig from paper by tearing paper along
stitching-created perforation line. Tie off thread ends.
41. Center the "bangs" edge over top of angel head
and glue-tack in desired place. Then arrange hair
down head sides, creating "ear line" on each side,
then working ends to back head base, gluing in place
as arranging proceeds.
Arrange hair on top of head as desired - the sample hair
was loosely piled and intermittently glued in place.
A narrow hair ribbon was glue-tacked at head back base,
then wrapped forward to front top and tied in knot and bow,
secured with a dab of glue.
42. Apply glue to body upper back around punch holes,
then position and attach wings securely in place,
aligning holes. Insert and glue decorative brads in holes.
44. If incorporating the flag swag, prepare the flags
by bending base shape back on perforation,
attaching offset accent fronts and shamrocks.
then fold the first flag over twine and . . .
 . . . attach in place.
 46. To assist angel's arms to extend wide enough to
hold the swag at desirable width, prepare paper "beads"
to prop arms. Use fine-tipped tweezers to grab one end
and tightly roll bead strip, gluing as needed while
rolling proceeds, until . . .

. . . a tightly rolled bead is produced. Glue end to secure. Form two beads.
47. Apply dabs of glue to coiled side of bead, then
use tweezers to insert between arm and body,
and attach roughly at bodice-bottom level.
(NOTE this fixes arms in place so it may also be
helpful to glue arm top in place to body side.)
48. Thread swag twine ends through hand holes,
then neatly knot or bow ends, trim excess.
This comment has been removed by the author.
ReplyDelete