
(measures approx. 4.63” wide x 6.25” tall) includes
offset
rounded corner front panel, accent strip,
with shaped tag attached as principal
interest.
Tag includes slightly offset front overlay with round window,
back
layers with pair of ribbon tie punch holes,
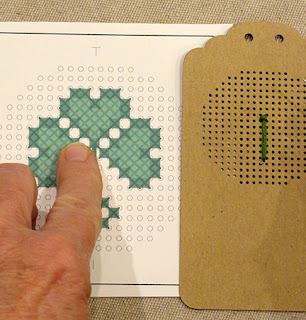
and cross stitch holes grid to hand
stitch the three-leaf
and stem shamrock.
Add St. Patrick’s Day welded word cut
below window,
if desired.
Tag measures approx. 2.57” across x 4.64” tall.
Plain
back shape is included in file to enable
tag to be created as an independent
project.
ASSEMBLY: 1. Identify and cut the shapes:
A card base B front accent panel
C stitching holes panel tag base (2)
D window tag front panel
E horizontal cross accent strip
F St. Patrick's Day welded word accent

the "waste" shapes from the stitching holes have
fallen out, or push them out with the end of a bent paper
clip. Then layer and glue the punch hole stitching panels,
taking care that outer edges, punch holes and stitching hole
edges all align as perfectly.
Press the glued-up shapes under a heavy flat weight
until thoroughly dried, several hours or overnight.

two shades of 6-ply embroidery floss
to complete the cross stitching.
 4. Cut a 24-30" length of 6-strand floss, then separate
 5. Take note of the smaller holes out of line from
two strands then lay them together. Fold the lengths in half
and thread the four ends (or alternately the loops)
through eye of a blunt tip tapestry needle. Pull the ends
part-way down - the loops will remain as the long end
and will be used to "tie on".
the other rows where the center stem will be added.

 6. Prepare to begin stitching by positioning the loops end

Compare to the stitching chart where the stem stitch
is shown.
of threaded needle below the holes array on tag backside,
and secure in place with a small piece of cello tape.
7. Insert the needle in the lowest smaller offset hole
for bottom end of stem.
On front, pull thread all the way through.
Next, insert the needle down (from front) through
the upper offset stem hole, then . . .

. . . pull thread all the way through till long stitch is
flush with front of panel.

8. Repeat the same steps to double the stem stitch
for better visibility.

9. Next, identify the bottom cross stitch of the upper
"heart" on the chart. Insert the needle (back to front)
through the upper right hole of that 'X' stitch.

Then complete the right slant stitch, and . . .

. . . the left slant stitch . . .

. . . as shown here.

10. Continue to refer to the stitching chart to complete
the outline of X stitches, working upward around
the top shamrock "heart" petal . . .
. . . then back downward until it is complete.
When the length of floss on the needle gets used
up, pause before it is too short to "tie off".

This is done by working needle to backside at the end
of the final stitch worked, passing the needle under
a few adjacent stitches as they pass across the backside
of the tag, then clipping excess off close to surface.

11. "Tie on" the newly-prepared length of floss
(as described previously in Step 4), beginning by
inserting the needle from back to front in the upper left
hole of selected 'X' stitch - shown here as the bottom
center "point" stitch of left shamrock "heart".
Pull needle and floss through, but leave a generous
loop on the backside.

Insert needle down through the bottom right hole
of same X stitch, push needle through to backside.

Draw floss through, then pass needle through
the remaining loop, and . . .

. . . pull flush to "tighten" the stitch.
This is the normal "tie on" process.

12. Continue to complete the charted X stitches
around the right and then left shamrock "heart" shapes.
Then pass the needle down backside of work
(invisibly from front) to emerge near bottom of stem,
to complete the series of separate X stitches there.
Tie off and tie on as needed.

13. When the design is completed, either tie off
final floss length as described previously. Or,
direct the floss down to imitate the beginning loop,
secure with cello tape. Then . . .

. . . snip through ALL floss to remove excess.

14. Prepare a length of floss of the interior contrast
color, tie on where it makes most sense, then
complete the stitches within each of the "heart"
shapes as defined by previous X stitches.
Tie off and tie on in usual manner as needed.

15. Position and attach the circle window front tag
panel, offset around sides and bottom edges.

16. Prepare the card base by bending back along side
edge perforation.
Position - centered in both directions - front accent
panel and attach to front panel.

17. Prepare welded word phrase by centering
contrast cross strip behind the "Patrick's" portion,
both side to side, and top/bottom,
and attaching in place where the two surfaces touch.

18. Add ribbon bow to the top of tag.
19. Position tag at center of front panel so that
top edge is approx. 1/8" below accent panel top edge,
and attach in place.
20. Position welded word/strip assembly, centered
side to side, and overlapping the bottom of tag
as desired ("St." portion below circle window),
and attach in place.

Here is the completed tag card.

No comments:
Post a Comment