
Here’s
a display solution for vintage (or contempo)
postcard art, decorative cards, photos
or composed designs.
Permanently-closed box with LID and BASE that fit together
(with interior structures for stability and strength)
to create a simulated
painted “wood block”
measuring 5x7 where artwork can be attached,
with or
without offset accent “mats”
(select from offset mat sizes included, or rotary cut
your own
custom-sized panels).

Use the decorative photo corners to mount while
also
preserving and protecting artwork.
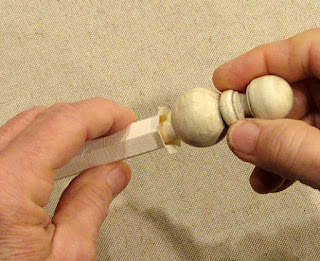
For extra flair, paint and attach a candle
stick “cup”
wooden base at bottom of “block”, and wooden finial at top
as can be seen in the first thumbnail image in this post.
(Optional LID and BASE shapes included to accept finial stem,
each with .375”
diam. opening, in either
landscape like sample, or portrait block orientation.)
ASSEMBLY: 1. Identify and cut the shapes:
A box LID B box BASE
NOTE that for the sample project, the LID and BASE
will be the landscape shapes with the finial hole
in the top boxing panel. Other choices are available
within the cut file.
C side interior support struts (2)
D top, bottom interior support struts (2)
E duplicate front panels to thicken box front (3-4)
F interior support hex tube post G post interior struts
H-I accent front panels J sample postcard artwork
K opt. protective decorative corner holders (4)

Following are images of the wooden short candle cup
and finials that are like those used for the sample project.


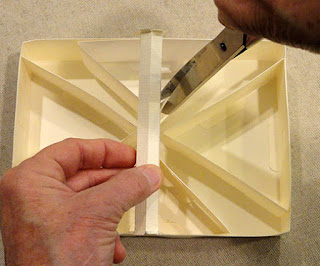
layer and glue together the four front panels, taking care
to align all cut edges as precisely as possible.
 Place the stack on a flat work surface then press with
a heavy flat object such as this thick book volume,
amplifying the weight by placing something heavy on top.
Leave weights in place until stack is completely dry,
which could require several hours or overnight.
Pressing in this manner helps prevent or minimize
warping or curling caused by using liquid adhesive.
 3. Position (centered) smaller accent panel onto
larger accent panel; press under weight if using
liquid adhesive.
NOTE that if selected artwork, card, photo, etc. requires
different sizes of accent panels, these can be measured
and cut out with rotary cutter, etc. to fit individual need.
 As a preview for the sample project, the vintage
post card will be centered within the accent panels.
If the postcard or other artwork can be attached,
it can be positioned and attached at this point.
For the sample project, protective corners will be
slid onto corners, and the corners glued to panel.
 4. Prepare the LID shape by bending back on ALL
perforations for boxing panels and end tabs.
 5. Repeat Step 4 for the BASE shape, noting that
the BASE panel can be identified by the small arrow
symbol cut into one tab; also, the finial opening for
the selected version is a squarish whole.
 6. While the LID shape is still in flat condition,
position, center and attach the stacked front
built-up layers onto the front panel, with edges
matches to the front panel perforation lines.
7. Position (center) and attach accent panels onto
the thickened front panel, within the perforations that
define the front panel with even margins all around.
Press the whole assembly under a flat weight until dry.

angles, with tabs bent inward, and glue the side seams
all around, for both LID and BASE.
 9. Prepare all strut interior support shapes by bending
back at vertical perforation lines; also bend bottom
edge tabs back.
 NOTE that the SIDE strut strips can be identified by
the half-circle notch cut from edge of end tabs.
SIDE strut strips will correspond to the short box sides
whether the project being completed uses the box
in its portrait or its landscape format.
 10. Form each strut strip into a triangular tube,
with end tab tucked under, and glue side seam.
 11. Apply glue to the bottom surface of tabs,
and also sparingly to the strut panel that will attach to
the inner surface of the BASE walls, then insert
into position, centered along corresponding BASE walls.
The top strut should also be positioned
so that the finial square openings of (long) wall panel and
strut are aligned as precisely as possible. Apply fingertip
pressure to walls being joined to help prevent warping.
NOTE that the other struts will also include finial
openings that won't be used with the landscape project.
When creating the portrait finial project, side strut finial
openings - which will be the top opening in that case -
will be aligned.
 12. Prepare the post support - short for this landscape
project version; long for the portrait version - by bending
back on all perforations for walls, side flange,
bend forward at each end tab perforation on both ends.

side edge around to overlap the flange opposite
to align at the flange's perforation line,
and glue side seam.
 NOTE that the symmetry of the post shape will allow
it to be pressed flat on work surface to apply
fingertip pressure along the seam for a good join.
 14. Prepare the post interior strut supports by
interlocking the two shapes at the half-length slots,
pushing together until ends of both align.
 15. Insert one end of struts into one end of tube . . .
 . . . so that the 'X' form of the struts align with pairs
of adjacent tube bends. Then push inward . . .
 . . . completely until strut ends and tube ends to
tab perforations align.
 16. When planning to insert the finial into the box's
top panel when block is fully assembled, it will be
necessary to remove some of the strut length at
the top, corresponding to the length of the finial "stem".
Poke the strut out of top end, measure stem length
along the strut X, then . . .
 . . . mark with pencil, and . . .
 . . . trim across the two strut ends at mark,
in a perpendicular cut.
 Then push the struts back into the tube and work
them down so that bottom of post and struts are even.
 Test to make sure the finial stem will fit into tube
without pushing the strut past bottom of tube.
 17. When using the interior post (particularly good
in adding support when finial and candle stand will
be in place), the points of the top and bottom strut
triangles will need to be removed to allow post to
be positioned down center. This is true for both
the landscape version shown with sample project,
and for portrait project.
Hold the post at center over struts, determine where
the strut point should be cut on each side of post,
then trim with perpendicular cut. Complete the same
trim cuts for the lower strut triangle as well.
18. Prepare to position and attach the post in place
by locating the finial opening at top, then . . .

. . . apply glue to the bent-back tab outer faces of
both top and bottom of post, then insert to place
post at side-to-side center, and also at boxing width
center . . .

. . . taking care that the tube aligns precisely within
the square opening. Apply pressure to secure the post
tabs to the top and bottom panel backsides.

19. Close the box by sliding LID over edges of BASE,
and push together completely. This will be a snug fit.

Apply glue between side walls - one as a time -
near back/bottom edge and apply . . .

. . . fingertip or other pressure to secure.
Take care with amount of liquid glue so that wall
warping is minimized.

20. If using the corners prepare by bending back on
both perforations for back triangle panel and tab.

panel, then apply glue along tab, press together until joined.
Complete four protective corners.
 Position the protective corner with the bracket edge
showing on front of postcard, as shown.
Repeat for all four corners.
 Without applying glue to the postcard, apply glue
to the corner back triangle panel, then . . .
 . . . position the assembly onto the front of block box,
center on accent panels, and attach corners in place.

21. Apply glue liberally inside the post through
opening, then insert and attach finial stem in place
at top of block.

Measure to locate center of bottom boxing panel,
and make small tick marks to indicate center.
Apply glue to the top of candle stand rim, then
position and attach centered end to end, and side
to side on bottom boxing panel.

Here is the completed project.

No comments:
Post a Comment