Thursday, August 30, 2018

Rooster Weather Vane Pick

Create a fun cake, potted plant pick for 
farmyard-themed events or decor. 
Three rooster body shape variation are stacked 
and glued together to give dimension. 
A skewer pick ( 3/32" diam.) provides the "post" structure, 
with the pointed end inserted into a pointed channel 
within the interior body build up shapes. 
Rooster body main shapes have bottom post-wrap stems 
to help secure in place with strong glue.  
Arrow whole and partial shapes are built up 
to allow "wrap around" attachment at bottom of stem. 
If desired, add the 1/2" painted wooden bead below vane. 
Sized to coordinated with "Barn 3D Model" design. 
(Find that tutorial by following this LINK.)

1. Identify and cut the shapes for Rooster Weather Vane:
A main body build up (with point recess; 4 each left & right)
B main body with bottom stem (1 each left & right)
C body front (1 each left & right)
D wings build up (5 each left & right)
E arrow whole (1 each left & right)
F arrow sections for build up (2 sets each left & right)
bamboo or wooden skewer 3/32" diameter
and 1/2" wood bead with hole to accept skewer
2. Prepare the build-up body layers (with wedge
cutout at bottom center) by layering the four
left-facing and four right-facing shapes and gluing
together, taking care to align all edges as PRECISELY
as possible.
When layering the shapes and gluing together,
throughout this assembly process,
especially with liquid glue which is recommended,
it will be essential to use a flat weight such as
the muslin-covered re-purposed free weight bar
shown here laid on top of the shape until the stack
is thoroughly dry and no longer cool to the touch.
(This may require a few hours to cure.)
3. Position the two stacks back to back
and glue together. Press with weight until dry.

4. Preview and check to make sure there are enough
built-up layers to match the skewer thickness
by inserting the skewer pointed tip 
into the cutout recess . . . 
. . . into the bottom of the built-up thickness.
If the thickness of skewer and body do not
match, add one or more layers as needed
to create the matched thickness.
5. Prepare the body main shapes with stem layers 
(left and right) by bending back the tiny tabs at stem sides.
6. Assemble the left and right body top layer assemblies
by positioning and attaching the corresponding
body fronts layer over main stem layers,
with edges as precisely aligned as possible.
and glue in place. Press with weight until dry.
7. Position, align and attach (and press) the front
body assembly layers over the body build up.
8. Prepare a left and right wing stack by layering
and gluing the four left and four right wings.
9. Position and attach the wings in place
on each side of the body using cut markings
on front body to assist with positioning.
10. Add a slight bit of "curl" to the center
of whole arrow shapes between guide marks.
11. Layer the pairs of point and fletching end shapes
into stacks.
12. Position and attach a fletching end stack over 
corresponding backside portion of whole arrow, and also
position and attach point stack.
Repeat for second whole arrow unit.
13. Assemble the pick:
A) cut stick to desired length
(for Barn 3D model, this length will be around 11"
but should be tested and trimmed as needed
once assembled and inserted).
B) insert the pointed end of skewer into
rooster shape bottom and glue in place securely.
C) Bend the stem side tabs of both front and back
into place to wrap around skewer . . . 
. . . and glue tabs to skewer.
D) Position center of first arrow unit below stem,
with cut guide marks on each side of skewer post,
then . . . 
. . . turn the assembly over to position the second arrow 
unit over the previously-attached arrow,
matching all cut edges.
E) Slide the painted bead up the skewer
to touch arrow, and glue in place.

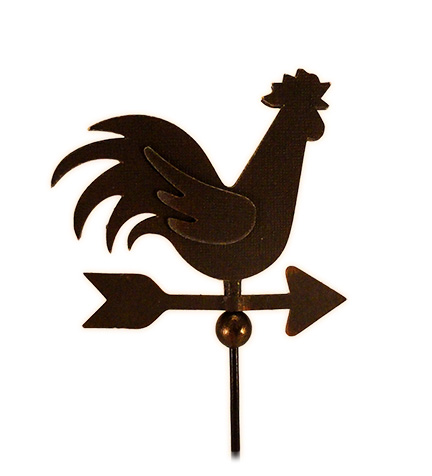
Here is the completed rooster weather vane design
shown with shorter skewer post.
For use with the barn model, insert 
Rooster Weather Vane accent post "stick"
through opening in loft roof, through
the roof support panel (look through door openings
to "fish" the end around until it inserts through hole)
then seat end into the round depression
in the hull bottom reinforcement panel center.
(Glue in place if possible.)


Wednesday, August 29, 2018

Barn 3D Model with Rooster Vane Pick


Stylized barn is built in lower and 
upper sections that fit together. 
Corrugated style roof adds detail for both main hull 
and turret-style loft with cutout overlays for all walls. 
See-through window and door openings have 
frame beam overlays with nail head "show-thru" detail. 
Measure approx. 5" wide x 6" long x 8.75" tall. 

Sturdy construction allows this decoration to be used 
and stored for repeated enjoyment.


Barn 3D Model is hown here with 
the slightly-oversized Rooster Weather Vane Pick 
inserted through loft roof and anchored at bottom
(Assembly steps for Rooster Weathervane can be found
by following this LINK to a separate tutorial.)

ASSEMBLY: 1. Identify and cut the shapes for BARN:
(NOTE: during testing, some shapes were modified
from the shapes shown in this layout*)
A roof main shape with separate back add-on back panel
B gable beam accent with contrast show-thru (2 sets)
C roof base   D corrugated roof panel
E loft turret main shape with accent overlays
F loft roof base   G loft corrugated roof panel
H loft window frame accents (2)
I Main hull shape with separate side, back add-on panels
and front, back and side overlays
J door frame accents and contrast underlays (2 sets)
*K corner triangle post reinforcements for main hull (4)
L main hull bottom reinforcement panels (3)
M & N side, front/back interior reinforcement panels (6 each)
*O roof interior support panel
NOT SHOWN: hull rim interior reinforcement strips (see step 10),
corrugated roof tab covers (see step 36) for main and loft roofs.
2. Layer the accent card stock beams and door shapes
(with the nail head cut out details) over the "show-thru"
darker accent and glue together.
NOTE: The coloration of the cut file shows
the "base" show-thru layer of both layers of
BOTH shapes as the same grayish color.
The bottom layer needs to be contrast to show thru.
3. Prepare the main barn hull base shape by
bending back on all panel and flange perforation
lines. Also bend back the side flanges on the front/back
separate add-on panel.
4. Position the separate side and front/back panels
in position to attach on the main hull shape,
then overlap the appropriate straight edge over
corresponding flange to perforation line
and glue in place to create the complete hull.
5. Position each of the sides or front/back accent
panels over the corresponding panels on the hull shape
with .125" offset margin all around, and attach in place.
6. Position and attach the layered door unit accents
over the front and back panel door openings
and glue in place.
7. Layer and attach the 3 base reinforcement shapes
into one stack, taking care to align all cut edges
as closely as possible.
(It is recommended to use 'dry' tape roller style
adhesive to avoid warping and curling of the stack.)
8. Invert the hull assembly face down on work surface,
then position the reinforcement stack over
the bottom panel, centered, with even tiny offset
margins all around.
9. Bend two adjacent walls back into position
to overlap the straight wall edge over the adjacent
flange to perf line, and join corner seam.
Repeat to join remaining corner seams.
10. Position and attach the hull rim strips along
their corresponding wall upper edge,
centering side to side along the wall edge.
Take care to align strip and wall upper edges
as precisely as possible.
11. (NOTE: the corner post reinforcement shapes
were modified in the final cut file to be shorter and 
have a straight-cut top end.)
Prepare the post shapes by bending back on
all of the vertical perforation lines.
12. Identify the flange panel that includes the 'F'
cut mark, then form the shape into a triangular tube
with the flange directed under the opposite panel
with straight panel edge overlapped to
perf line, and glue in place.
NOTE: it may be helpful to insert a narrow dowel,
knitting needle or equivalent inside the tube
to provide a "press-against' surface during
the seam gluing process.
13. Layer and glue together the 3 duplicate shapes 
for each of the front, back
reinforcement panels to create stacks.
NOTE that the front and back panel doorway bottom
frame was modified in the final file to NOT be closed.
Repeat the stacking process described above
for the two side reinforcement panel stacks.
14. Glue the corner posts into the interior corners
of the barn hull, placing the right angle corner
 edges toward the hull corner angle,
and taking care that the post bottom end is seated
fully down onto the hull layer within
the triangle recess created there by the absent
corners of the base reinforcement stack
shown in Step 7 above.
15. Prepare the main roof shape by bending back
on all perforation lines for panels and tabs.
16. Position the separate front/back shaped panel
along the tab opposite the connected shaped panel
in mirror image, overlapping the straight edge over
the corresponding tab to perf line, adjust end to end
to make sure edge angles align with panel ends,
and glue in place.
17. Position the beam accent units over the front
and back angled panel, with edges even where
they correspond, and glue in place.
18. Bend the tab flanges down, roof panels into position
to align the first perforation angled edge with corresponding
straight edge and glue in place. Then . . . 
. . . continue to bend the next section into position
to align and attach the next two segments
to corresponding roof tabs.
Repeat for the opposite end of this same angled
seam series, and also for the opposite end panel.
19. Prepare the loft structure main shape by
bending back on all panels and long tabs,
but bend bottom edge long tabs forward.
20. Position (red) accent panels within each
panel, with offset margin all around, window
opening edges matched.
Also position and attach the window opening
frames.
21. Form the loft into a tube to overlap the straight
edge over the opposite flange to perf line,
and complete side seam.
22. Fold the gable edge tabs inward,
then bend the roof half with top edge flange
inward and glue to flange tabs underneath.
Bend second roof half into place and glue sides
and top edges to flange tabs underneath.
23. Prepare the loft roof base panel by
bending back on center perforation line.
24. Prepare the loft corrugated roof shape by
bending in accordion formation, beginning
with end flange folded back on perforation line
as "mountain" fold, then bend the next perforation line
back as "mountain" fold as well.
Bend the next perforation line in as "valley" fold
(including the attachment tabs).
Continue across to bend in alternating order,
except for final two perf lines which are bent back
as "mountain" folds (including the opposite
end flange).
25. Bend the corrug. roof section center tabs
toward backside, then insert into the centerline
slots of roof base section.
On backside of base, bend inserted tabs flat
to touch base backside, and glue in place.
26. Repeat the tab insertion process from step 5
to insert the second row of tabs into the corresponding
roof base slots, and attach underneath.
Turn the assembly to complete the third set of
tabs of corrug. roof into corresponding slots,
and glue in place.
27. At each end of assembly, bend the end flange
around base edge, making sure that roof base edge
stays snugly along the corrug. bend perforation.
28. Push the loft structure through "window" in
main roof structure, and slide loft fully into position
so that roof edges seat along loft bottom flange perf lines,
then . . . 
. . . glue bottom flanges in place.
28. Prepare the roof interior support panel
by bending forward all side flanges.
NOTE this shape has been slightly modified
at corners in the final cut file, as is shown
in next frame.
29. Insert the support panel into the bottom
opening of the roof unit, slide inward until edges
align, then glue in place.
30. Prepare the main corrugated roof panel
in similar manner to the loft roof panel in Step 24,
including bending the end flanges back with
"mountain" fold.
31. Prepare main roof base panel by bending
back on all perforated lines.
32. Insert the center tabs into corresponding
center slots of roof base panel,
and glue to underside as in Step 25.
Then continue to bend corrugated panel into position
to insert mid-way tabs, second angle tabs, etc.
until all tabs have been inserted into their slots
and glued into place.
Also bend the end flanges around roof base edges
and glue into place.
33. Slip the roof panel assembly over the loft
structure and into position, and thoroughly attach
in place.
34. Position and attach loft roof section,
centering front to back.
35. If needed (check to see if the corrugation fold
is resting on the roof base section near ends) . . . 
. . . carefully apply a dab of quick-grab glue between
the corrugated panel and the base panel,
then apply pressure until it is connected in place.
36. To cover the corrugated roof tab openings,
position and attach the smaller cover tabs over
loft roof, and larger tabs over main roof.
37. Assemble the barn by placing the roof assembly
over the barn hull, with side reinforcement top edges
tucking inside roof.
NOTE: if you wish to have the barn remain a "box",
this connection can remain un-glued.
For best results, it is recommended that the roof unit
be glue-attached to the base.
38. If desired, prepared and insert 
Rooster Weather Vane accent post "stick"
through opening in loft roof, through
the roof support panel (look through door openings
to "fish" the end around until it inserts through hole)
then seat end into the round depression
in the hull bottom reinforcement panel center.
(Glue in place if possible.)
Here is the finished barn project.