
This large project features a realistic
sleigh-style
headboard cradle and stand.
Cradle has end posts that fit into
stand leg
openings to allow it to rock.
Stand has cross-braced tray that
connects
end stanchions.
Measures approx. 10.25" tall x 4.375" deep x 10"
long.
Duplicate layers are glued together
to add thickness to and strengthen components.
An elaborate
"gift box", this model can be used as
baby shower or nursery decor, miniature
dolly bed, and more.

Companion "crib mattress" box can be
placed in the cradle bed for extra realism.
(Find the mattress box as a FREE download design
at SnapDragonSnippets.com by following this LINK.)
ASSEMBLY: 1. Identify and cut the shapes:
A headboard and foot board dimensional shapes (2)
B headboard and foot board cross brace (2)
C foot/headboard upper contour reinforcement panel (2)
D rocker post shape (2)
E foot/headboard outer panel reinforcement (2)
F foot/headboard accent overlay (2)
G side rail fold-over panels (2) H top rail contr. accent (2)
I cradle bed (base) with tabs J base reinforcement (1-2)
K sleigh bed end piece (10+2 contr for each left & right)
L stand end leg base (with slots; 2) M stand leg build up (16)
N stand tray main shape O tray bottom build up (2)
P tray side panels build up (4) Q tray side accent overlay (2)
R overlay inner oval shapes (2) and punch cut "nails" (8)
S tray middle divider (2)
NOT SHOWN: post tabs cover shape (2; see Step 15)


2. Prepare the cradle base shape (letter I) by
bending the side flanges forward and
bending the end tabs back.

rectangles and glue together.
NOTE: beginning with this "build up" reinforcement
step and throughout this project,
use a flat weight such as the re-purposed weight machine
weight bar covered with muslin that is shown
in Step 27, place the glued-up shapes under
a weight until completely dry to help prevent
warping and curling.

on the bottom of the cradle base,
centered inside the perforation lines or cut edges.

5. Prepare the side rail shapes by folding
the rail shape at the cross perforation at middle
so that the face side is outside. Unfold.

then re-fold to glue the surfaces together to
create double-layer rails.
End tabs should remain unattached.

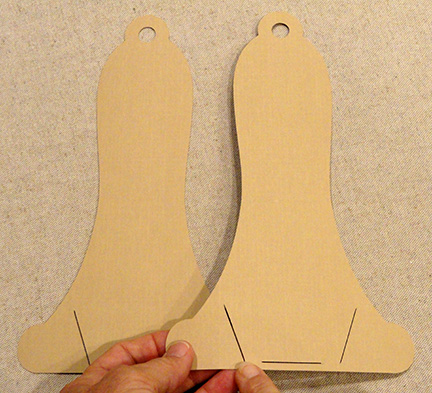
6. Prepare the headboard and foot board shapes
by bending the side "rail" extensions back
(the shape is shown here from backside)
and also bend the upper contour panels
back along perforation lines,
with side tabs bent back also.

7. Layer one accent panel over a reinforcement
(matches headboard or foot board) panel,
with even offset margins at bottom and sides
(top offset has shaped margin), with post hole
openings of each aligned, and glue in place.

8. Position and attach the end panel units
on the backside of each foot or headboard,
within perforation lines, and with post hole
openings aligned.

9. Position a side rail section bottom edge
along the side bottom flange edge of the cradle
base unit, with edges and ends aligned,
and glue in place.
Repeat for opposite side of cradle base and
second side rail section.
NOTE: cradle base flange edge and rail section
bottom edge must align "perfectly" to allow
this unit to fit into headboard and foot board.

10. Carefully work cradle base end tabs into
corresponding slots on headboard near bottom,
then work side rail end tabs into their slots,
and snug headboard into position so that
tabs are fully through to the outside.
Bend side tabs inward, bottom tabs down,
and glue in place.
Repeat for the foot board.

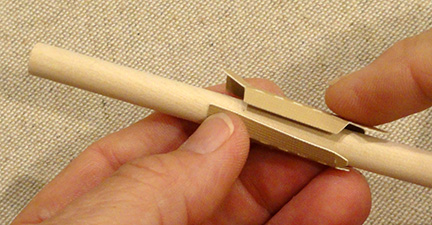
11. Prepare the post (cover) shape by bending back
on all panel, tab and cap perforation lines as shown.

12. Shape the post body into a tube, busing
a 5/16" diam. wooden dowel as a wrap-around form
to bring the straight side edge to overlap the opposite
tab to perforation line, and glue in place.
Also bend the top cap end tabs inward
and fold the attached hex cap into position
and glue in place.
NOTE: it may be helpful to leave the dowel
in place inside the post, with top flat end
even with tab and cap perf marks
to provide a press-against surface for gluing.

13. With post shape snug on dowel which is
pushed fully in, bend the bottom tabs away
and mark the post length on the dowel.
Cut dowel at mark (remove the mark while sawing);
repeat again for second post.

Insert each dowel nib into the prepared post shape
and glue inside.
Make sure bottom of dowel does not extend
beyond the post length when bottom tabs
are bent out of the way.

or foot board, working from

the inward face of the headboard
so that it covers the post tabs and opening,
and so that it is centered side to side,
then glue in place.
Repeat for the opposite cradle end.

into "curled" position to insert each side tab
into corresponding slot, then bend tab down
and glue in place. Repeat for second side,
then for opposite end.

panel shapes (C in shapes layout) by bending
back slightly at perforation line.

the contour of headboard upper end,
so that the perforation lines align,
and glue in place.
Position and attach the second reinforcement
in prescribed position on opposite end board.

19. Prepare the headboard cross brace by
bending at perforations as shown,
with top edge rectangle bent back and
lower edge shaped panel bent forward,
end tabs bent forward.

tray shape, with end tabs overlapped
(curved end panel at inward-most position)
and glue in place to maintain the right angle corner.
Repeat for opposite end

and glue all across to form reinforced ledge.

21. Position the cross brace at bottom
of headboard inside the side "posts"
and with shaped edges lined up,
and glue in place.
Also glue end panels to "post" surfaces
where they touch.
Repeat for opposite foot board.

22. Prepare the contrast top rails for side rail
panels by folding back along center perf line.

23. Position along top of side rail panels
so that they overlap around the top edge
and fold snugly flat, and glue in place.
Repeat for second contrast rail.

24. Layer 5 end rail shapes plus top contrast shape
into a stack, one by one, and glue all together,
taking care to align all cut edges as precisely
as possible. Use weight to flatten during
gluing process.
Prepare 2 RIGHT and 2 LEFT stacks.

25. Position the matching endpiece stack over
the attached endpiece portion of headboard
or foot board, align shaped edges that should
correspond, and glue in place.

26. Identify the inside layer shape for the stand legs
by locating the slots that will accept
the tray end tabs.
27. Layer exterior stand leg shapes into
two stacks of 8 each, taking care to match up
all cut edges and hole opening edges as
precisely as possible.

NOTE: use flat weight as previously described
to flatten the glued-up shape until glue is completely
dried, to avoid warping or curling of the paper shapes.
Layering of stack may be best executed if layered
in a series of 4 or so, flattening for a period,
then continuing to layer on the remaining shapes
and returning flat weight onto stack until dry.

28. Also layer on and attach the accent leg shape
onto the "front" of each leg stack,
with offset margins all around.

29. Prepare the stand tray shape by bending
side panels forward with end tabs bent back.

30. Layer the tray bottom shape, and pairs of
side panel reinforcement shapes with all
cut edges aligned, and glue each set together.
Use flat weight while gluing.

onto each reinforcement build up shape, centered,
and glue in place. Then . . .

. . . position and attach the center ovals
and the "nail head" punch dots.

32. Prepare the tray center divider shapes by
bending side and bottom tabs forward.
Layer the two shapes back to back and glue
panels together, taking care that tabs remain
unattached.

33. Unbend tabs so they are back to back,
then insert each set into bottom or side slots
of tray shape . . .

. . . then on the outside of tray, separate and
bend tab pairs to lay in opposite directions,
and glue in place to tray.

the underside, centered, and glue in place.


and bottom tab upward, and glue each in place.

36. Position the leg build up stack over the leg
and tray assembly with all cut edges lined up
and glue in place.
Use weights to press in place while glue dries.
Repeat for both legs.

Identify and cut the shapes:
A main mattress box shape
B tufting grid cutout
C button circle cutouts (17)
D interior support "struts" (2)

on all panel, side, top & bottom, and tab perforation
lines.

onto the top/front panel of the mattress box.
Position and glue each of the button
punch circles at the intersections.

bring the side panel to overlap opposite
flange to perforation line . . .

to backside of wall.
NOTE that this symmetrical shape will allow
flattening so that finger pressure can be
applied along the entire length of the side seam.

tab in, then bend end wall into position
and glue in place to close that end of box.

41. Prepare the support struts by bending each
at center perf line, then . . .

can fit together, and the two strips pushed together
so top and bottom edges of both are at same level.

42. Insert the strut support unit into the open
end of the mattress box and slide inside
completely.

43. Place the mattress box into the cradle
and allow it to slide down fully into place.

the cradle between stand legs, then placing
the rocker opening over the post, one then
the other. Adjust to center it.

on its stand.


This comment has been removed by a blog administrator.
ReplyDeleteOh my goodness this is absolutely awesome, I love it.
ReplyDeleteWow Jodi - amazing! <3
ReplyDeleteAs always Jodi, you do amazing work. I can't wait to make this project. Tell me, I have been unable to access the mattress. When will it be available?
ReplyDeleteProbably later today, through SnapDragonSnippets.com of course. If you are desperate for it before then, email me directly at hearthsewnpatterns(at)yahoo(dot)com and I can send it along to you as an svg file (free).
DeleteThank you responding so quickly. I can wait another day. Right now, I am finishing up your 3D Aloha Pineapple for one of my grand-daughters. Just want to say, I truly love the work that you do.
ReplyDeleteThank you,
Monica
Oh my goodness! This is such an amazing piece of art! I really don't know how you continue to create such amazing things, but you always do!
ReplyDeleteIs the mattress box still available?The link isn't working.
ReplyDeleteLove this project! Is the mattress box still available? The link no longer works
ReplyDeleteShould be. I'm on the road, but will try to remember to plug in my separate hard drive when I'm back at homebase soon.
ReplyDeleteHi. I actually found it as attachment in an old email to another patron. It is an svg file. If you still need it, please contact me at hearthsewnpatterns@yahoo.com and I will attempt to attach and email it back to you that way.
Delete