Sunday, December 26, 2021

Snowman Cocoa Mug Stitched Card


Shaped cold-weather card with the special touch 
of hand-stitching features mug front layer and 
reinforcing second layer that are pre-punched to complete 
a snowman (stitching chart included in cut file). 
Third layer of mug includes a cutout that surrounds 
cross-stitching as buffer. 
Whipped cream swirled dollop is layered, 
then bottom flange is inserted through mug back layers slot. 

Tie optional two-layer sentiment tag through 
mug handle front layers. 
Optional “hugs & hot cocoa” print and cut tag panel design 
can substitute for tag as desired. 
Tag measures approx. 4.125” wide x 5.6” tall 
when assembled and closed.
A companion snowflake cutout flap envelope
that is sized to fit this shaped card is available also.
(Tag will need to be adjusted toward center)

ASSEMBLY: 1. Identify and cut the shapes:
A mug front layer with stitching holes
B mug second layer with stitching holes, cream slot
C mug back layer with stitching "buffer" window
D whipped cream contour front layer
E whipped cream base layer
F tag base with front print & cut rectangle
G tiny snowflake embellishments with twine ties
H card base with left side perforation for fold
I optional interior sentiment panel
Also select and assemble the stitching needles
(recommended tapestry blunt needles with large eye
size no. 24/26) and floss colors. The snowman will need:
white for snow; orange for nose; scarf & hat color;
black for eyes, buttons, arms.
2. Complete preparation and glue up for a few shapes
and press each flat under a heavy weight until dry:
A) layer the whipped cream contour front shape
onto the base shape, matching edges;
B) center and attach the "hugs & hot cocoa" print and cut
panel (or the plain label if preferred) onto
the tab base shape.
C) fold the card base in half along the perforation . . . 
. . . then open to position and attach
the interior sentiment label as shown.
3. Prepare the two stitching hole shapes by cleaning out
any partially attached "chad" circle cutouts from ALL holes,
using the stitching needle to push these through to
backside, then rub or individually remove.
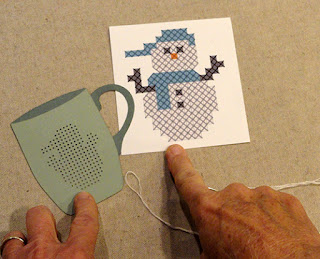
4. Position and attach the mug front stitching shape
onto the mug back stitching shape . . .
. . . taking care that all holes are as precisely aligned
as possible. One way to accomplish this is to push
the stitching needle through several holes and
sliding until perfectly aligned, as needed.
5.  Prepare to stitch by cutting a length of 6-ply floss
approx. 30-36" long (shorter for smaller areas),
and separating TWO of the plies.
A) Line up the ends of both plies and straighten
the plies so that they are without twists.
B) Fold the two plies to line up the four ends, then
crease the loop end to create a half-way loop.
Thread the loop through the needle's eye, then . . . 
. . . pull the loop through, leaving approx. 5-6" cut ends tail.
The loop becomes the long "end", with 4 plies
together which will form cross stitches.
6. Review the following diagram to fully understand
how the cross stitches are formed uniformly
with RIGHT SLANT stitches made across the row first,
then the return half of the run completing
the LEFT SLANT stitches.
7. Refer to the Stitching Chart, either on screen,
or printed, to locate the bottom-most beard cross stitch.
This is where the first stitch will be made,
afterward working upward through the design.
8. Visualize the 'X' of the first stitch, then insert the needle
UP from backside through the top left hole of the bottom FOUR
that will create the 'X". Pull needle and thread through
leaving approx. 3-4" of loop "tail" still on backside.
9. Insert the needle into the bottom right hole . . . 
. . . then pass the needle through the loop . . .
. . . and cinch the thread up firmly on the back. 
This is the "tie on" step.
10. Continue the X stitch pattern in the next pair of holes . . .
 . . . then continue across to complete the RIGHT SLANT stitches 
across the first (bottom) row of chart . . . 
. . .  then return back across to complete 
the LEFT SLANT stitches.
11. To continue, move up to next row after each row . . . 
. . . and add the LEFT slant stitches across and
then move back across to complete each X stitch
with RIGHT slant stitches.
12. Continue in the same manner to begin and complete
rows. When floss length on needle gets close to being
too short to continue, pause in mid stitch when needle
is pulled through to backside, then slip the needle under
the adjacent 4-5 stitches. Pull the needle fully through, then . . .
. . . remove needle and trim the excess floss close
to the stitching it crossed under.
This is "tying off".
13. As stitching progressed up the chart, skip the stitch
spaces for the non-white Xs (neck scarf) as shown, working
LEFT slant stitches across row with thread "floating"
across skipped spaces on mug backside, then
returning back in same manner to complete RIGHT slants.
14. NOTE where the "half cross stitches" are on
the printed chart that will help shape the snowman body,
head, and scarf at some edges. One of these is indicated
in this photo, and its punch hole configuration includes
an extra tiny needle hole in the center of the usual four
holes that create the X. 
Complete these special stitches by making a "half-slant"
stitch as shown on the diagram.
15. Complete the white stitches for snowman body and
head, tying off and beginning new floss length as needed,
until white stitches on chart are all in place.
16. Tie on successive colors to complete scarf, hat,
arms, body buttons and coal eyes, and orange nose.
For better definition, consider tying on a two-floss length
to outline "straight" stitches around eyes and nose, etc.
17. Position and attach the "buffer" window mug back layer . . .
. . . so that outer card stock edges match, including
curved slot edges, and that the window edges
fall just beyond the completed stitching all around.
18. Begin to attach the whipped cream assembled shape
by slipping the bottom edge of attached tab
through the curved slot . . . 
. . . then apply adhesive to face where it will
touch and attach to backside of buffer shape.
Adjust cream shape so tab edges are parallel to
mug side edges, and so that the cream shows 
appropriately at bottom above mug "rim".
NOTE that the card base offset will need to mimic
the shaped edges of cream, so compare the assembly
to the card base front corresponding edges and make
adjustments to cream tab attachment before glue dries.
19. Attach the tag to the mug assembly handle
with twine bow, as desired.
20. Position and attach the mug assembly onto
the folded card base, with .125" offset margin
all around (excepting the tied-on tag).
Position and attach the tiny snowflake buttons 
with bow tie embellishments (or jewels, etc.) as desired.
Here is the completed card.


Friday, December 24, 2021

Angel Peg 3D Figure Box

 
Simple dimensional angel replicates a peg form 
composed of six-sided tube connected to spherical head. 
Wings are swirly filigree layers glued together 
for thickness, attached at center back. 
Box’s base compartment is sized to slide inside body tube, 
with thickened circle bottom. 
Angel box measures approx. 5.875” wide (wingspan) 
x 5.375” tall x 2.125” deep (body diameter) 
when fully assembled. 

ASSEMBLY: 1. Identify and cut the shapes:
A body tube main shape
B body tube overlays (3-5)
C head lower dome
D head upper dome   E eye underlay
F halo layers: 2 plain interior layers, 1 halo with tab,
top and bottom outer layers (gold foil)
G head-to-body triangle post
H box base upper opening collar reinforcement
I wing layers for left & right: 2 interior shapes, 
1 front, 1 back reversed shape
J wing attachment bracket (2-3)
K base box insert tube
L base bottom platform upper layer with hex cutout
M base bottom platform whole circles (4)
2. Complete the layering and glue up of several
shapes, then press under a heavy flat weight
until completely dry:
A) base whole circles
B) wings attachment bracket
C) halo interior rings with tab ring as bottom layer . . .
. . . then add foil top and bottom layers.
D) left and right wing stacks
(As mentioned, press under a flat heavy weight
such as this thick book - possibly with other heavy
objects placed on top of book - until glued-up stack
of shapes is completely dried.)
3. Prepare the main body tube shape by bending
 back on all perforations for panels, edge tabs or
flanges, top hex panel, etc.
4. Identify the "front" panel which is directly under
the attached hex top 'lid', then position and attach
3 or 5 accent panels offset within the perforations
that define the center 3 or 5 wall panels.
5. Begin to shape the "neck" portion of body shape
by bending the first two trapezoid walls at top 
slightly inward to overlap the straight edge (right
in this picture) over the adjacent tab to perf line,
and glue seam. 
6. Repeat step 5 for the remaining 4 seams.
7. Form the body shape into a tube to overlap
straight side back edge across adjacent flange to
perf line and glue seam.
NOTE: it may be helpful to insert a rod-like tool 
behind the seam to provide a press-against surface
for applying pressure along the seam until secure.
8. Align the short trapezoid panel seam edge over
flange and join.
9. Bend the top hex opening tabs inward to perpendicular,
adjust the tube so that the top tabs create a regular
hexagon, then apply glue to the face of tabs,
bend the 'lid' hexagon into position with straight
edges aligned at each tab perf line, and glue in place.
NOTE: it may be helpful, once tabs-to-hex lid have
initial hold, to invert the tube top down on flat surface
and apply pressure from inside tube with the eraser
end of a new pencil, or similar tool.
10. Prepare the two head hemisphere shapes by
bending back on all perforation lines for panels,
tabs, top and bottom 'lids', etc.
11. Position and attach the eye underlay panel
behind the eye holes on upper dome's backside.
12. Begin to shape the upper dome by bending back
the edges of first seam sequence as shown, so that
the first segment straight edge (right in this image) 
overlaps the adjacent tab to perforation line, and glue seam.
13. Continue up the seam by bending the next segment
edges into position to overlap and align, then glue seam.
14. Continue in the same manner to align and join the two
segments of each dome seam all across shape.
15. To complete the dome final seam, position
and align the lead straight edge across the three tabs
of end edge in same fashion to join the segments
one by one. Then . . . 
. . . bend the top tabs inward at perpendicular angle,
apply glue to the face of each tab, then bend top 'lid'
hexagon into position so that straight edges align
as precisely as possible with the tab perf lines.
16. Repeat steps 12-15 to complete the head
lower dome.
17. Prepare the head attachment triangle post by
bending the post strip shape back on the three
long perforation lines.
18. Apply glue to the surface of the flange end 
(slightly angled end edges). Form the shape into 
a triangle tube with the flange end 
tucked under the opposite straight edge,
and glue the seam.
NOTE: it may be helpful to insert a narrow rod such as
this bamboo skewer inside the tube behind the seam
to provide a press-against surface for securing seam.
19. Complete the head domes assembly by first
inserting the post through the lower dome triangle
opening and pushing through more than halfway.
Apply thick quick grab glue such as Fabri-Tack being
used for model to the center underside of head upper
dome (where post will attach) . . . 
 . . . as well as to the tuck-under top segments of
lower head dome.
Quickly identify the front of the lower dome where
the triangle post edge is PARALLEL to the hexagon
front edge, then . . . 
. . . orient the lower dome front with the upper dome
front (eyes panel), and slip the lower dome upper
segment edges inside the upper dome . . .
. . . and slide the two together until the upper dome
straight edge aligns at lower dome first segment perf lines.
Immediately push the triangle post inward as far
as it can go until it presses against underside of
upper dome's lid. Approx. .5" of post should remain
outside of lower dome.
20. Join the head to the body by first orienting
the head front to the body front, then inserting
post end into body top panel opening.
Prior to sliding the two shapes fully together,
apply glue around post where the two surfaces
will touch, then slide fully together.
21. Prepare to attach halo to head by positioning
the stacked shape with tab bend downward
and rotated to fall down center back . . . 
. . . and angled slightly so that front rim falls
above top of dome segment that is above eyes panel
as shown, then . . . 
. . . glue the tab in place on head back.
If possible, also apply a discrete dab of glue
to each side front where halo touches head.
NOTE: if preferred, you may be able to devise
alternative methods to attaching the halo
so that it is suspended above head.
22. Position the wing stacked shapes - face side down
in this image, onto the attachment bracket, with
punch holes aligned, and center back straight edges
of wings abutting down bracket center,
and glue each to the bracket.
23. Position wings assembly onto the back of body tube
so that punch holes align, and glue together where
bracket and back panel surfaces touch.
If desired, insert and attach decorative mini brads
through punch holes.
24. Prepare the box base tube shape by bending
back on all perforation lines, except bend forward
at bottom tab perf lines.
25. Form the shape into a tube to align and join
the seam.
NOTE that the symmetrical shape of the tube will allow
for it to be flattened for applying fingertip pressure
along seam, if desired.
26. Slip the top layer base circle ring over the top
of the hex tube, then slide down into position . . .
. . . above bottom tabs, pausing to apply glue to
the upper face of tabs, then . . .
. . . slide fully down into position at tabs perf line
all around, and apply pressure to secure attachment
all around.
27. Position and attach the base bottom to the top
of the whole circle base stack. Apply pressure all
around until secure.
28. Prepare the base rim reinforcement collar shape
by bending the edge tabs forward.
29. Apply glue to the backside of the tabs, then
insert the collar into the top base opening . . .
. . .  and slide into position so that tab top straight
edges align with each of the rim edges of base tube.
Apply fingertip pressure to secure each segment
of the collar seam.
30. To close the box, insert the base tube into
the bottom of the angle body tube, and slide up
into place fully.
Here is the completed angle peg figure.