
Container
composed of faceted dome LID that fits
completely over straight-wall BASE to
create
a fun Valentine gift.

Decorate the lid with custom-sized
“Scalloped
Heart with Key” design, if desired.

Box measures approx. 4.5” tall x 5.125”
wide.
ASSEMBLY: 1. Identify and cut the shapes:
A LID dome all-in-one shape
B LID side walls upper boxing
C LID side walls lower boxing
D BASE main shape bottom panel, lower sides
E BASE upper edge sides
F optional box interior accent "liner"

cut these shapes as well:
G scallop edge heart base
H large accent heart overlay
I inner accent heart overlay
J key accent (5-6 to stack for thickness)
(NOTE that assembly for heart & key decoration
begins in Step 21.)
 BASE ASSEMBLY

2. Identify the two shapes needed to assemble
the base by locating the double "bite" notches at
wall end tabs (shown left) and upper wall edge tab.

Prepare the two shapes by bending back on ALL
perforation lines for heart "floor" panel, side wall
segments, upper wall segments, bend-in rim tabs,
edge tabs and flanges. Bend forward on the center
top wall perforation, indicated by the pointing finger
at top of image.

EXPLANATION: because the LID fits down completely
over the BASE, and snugly, optional finger notch openings
have been included in the main BASE shape so that
fingers can have edges to assist opening.
These were modified in the final cut file version to
have ALL require separating after assembly -
which is how the wall finger notches (right)
are shown here. See step 20.

3. Begin at center bottom to bend the wall end tab
inward, then bend left and right walls into position
to overlap straight edge across tab to align at
perf line, and glue seam, bottom half only
along length of tab.

4. With the upper wall strip bent to create the 'V'
at center top, position the two tabs on each side
of center to align with 'V' edges of heart floor,
then position and attach both tabs along 'V' edge
in one operation. Take care here and throughout
that straight edge and tab perf lines line up
as precisely as possible, and that bends of wall
correspond accurately with corners of heart floor.

5. Work across one wall strip to bend next segment
into position, adjust for alignment, and glue in place.
Leave final segment unattached until step 8, later.

As segments are added, assist adherence of tab
seams by placing assembly face down on flat surface
and applying fingertip pressure along tabs.

6. Complete opposite end strip segments in same
manner to fully join top wall.
7. At each side, bend (lower wall) boxing segment into
position to attach tab.

8. Apply glue to BOTH lower wall end tab and
upper wall final segment top tab. Then in one
operation, bend into position to tuck upper wall tab
under heart edge, overlap straight edge across
adjacent wall tab, adjust and complete each seam.

9. Add adhesive to the underside of the bend-down
wall rim segments, then bend inside of BASE and
glue in place, forming double walls all around.

NOTE that it may be helpful to apply glue to one or
two segments at a time, then when inner wall is
attached inside, place assembly with that wall flat
on work surface to apply pressure all along
the wall section.

10. Apply (dry) adhesive to backside of interior
accent "liner" heart panel, then place into BASE
and attach in place.

NOTE that the heart is large enough to hold
a standard plastic gift card, held in place with
sticky dot or equivalent.

LID ASSEMBLY
11. Prepare the dome shape by bending back on
all perforation lines for walls, regular and wedge
tabs, except bend the top center cross perforation
forward as "valley" fold.

Pay particular attention to the very narrow wedge
tabs at each dome side, where it will be especially
important to bend and crease the perforation . . .

. . . by pinching all the way to the heart edge.

12. Begin at upper right heart facet edge to bend
dome edge into position with tab inserted under
heart edge, adjust and glue facet seam.

13. Continue in same manner to bend the next
two "center" facets into position, align and
adjust to match up with the 'V' edge of heart
panel, then attach to complete
the two facet seams.

As with BASE, it will be helpful to invert the assembly
face down on flat surface to apply fingertip pressure
along tabs/seam edge.

14. At final facet seam, prepare then swing the facet
edge tab and end tab into position to complete both
seams in same motion.

15. Complete the pair of wedge tab seams at
each side of dome, as well as . . .

. . . the center bottom "point" seam.

16. Prepare the LID wall strips by bending back
on all perforations for wall segments, edge tabs
and flanges, except bend the center top perf line
as "valley" fold.

NOTE that identifying single "bite" half circle or
triangle notches are included in end tab edges
or top tab edges to show which corresponding ends
will be attaching to each other.

It may also be helpful to arrange the upper and
lower LID wall strips in the shape that will follow
the edge shaping of the dome to which they will
be attached.
 17. Begin with upper edge wall strip, to position

center 'V' edge tabs in position to match the 'V'
edges at dome top, tuck under the dome edge
and attach in place (tabs attach behind
the facets of dome).
 18. Continue in similar manner along

one side, then repeat for the opposite side,
to position, adjust and attach . . .

. . . each tab behind
each corresponding facet.


then positioning and attaching first long flange tab
to dome. Then . . .
 . . . as with previously-similar arrangements,

prepare, then swing final long flange and end tab
into position to join final edge and end seams.
 20. To close box, LID fits snugly over BASE . . .
 . . . and then slides fully down to be even with


bottom BASE edge. SUGGESTION: it may be
easiest to get LID into position by inserting top
curved lobes first, then fitting remainder,
while keeping the BASE parallel to LID
as much as possible.
 NOTE that the finger-grab cut outs of BASE

can be left in place if deemed unnecessary.
Or, they can be . . .
 . . . pushed/broken away at tiny connections

and removed. Edges of these cutouts will only
be slightly visible at side of box when fully closed.


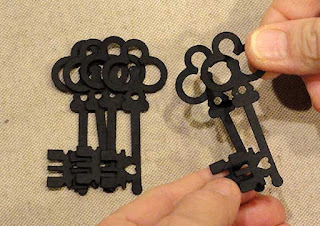 Immediately place the glued-up key stack under


SCALLOPED HEART & KEY DECORATION
21. Stack and attach together the several cut shapes,
taking care to align ALL cut edges as precisely
as possible.

a flat heavy weight, such as this thick book volume,
possibly with something else heavy on top.
Leave in place until glue is completely dried,
which may require several hours or overnight.


22. Position and attach the three heart accent shapes,
using cut out circles to assist with alignment,
and also checking to make sure . . .

. . . vertical centers align - with offset edges
appropriately "parallel".

23. Position key across center of hearts assembly,
at suggested slight angle, with shaft aligned between
tie holes, balanced as desired from side to side,
then temp tack OR glue in place.

24. Position accent hearts/key assembly onto front
of heart box dome with tie holes aligned, edges
appropriately offset within dome's heart shape,
and glue in place.

25. As desired, thread soft, narrow ribbon through
tie holes of lid and accent and tie neat bow.


