
Nordic sweater cross stitched tag is
the focus
element of this novel “action” card.
Six-inch round card base folds down at
back
to make the sawtooth center medallion “stage”
float within the snowflake
ring.

Stitching diagram is included in cut file.
Two-layer tag measures approx.
2.8” wide x 3.3” tall,
can be used independently.
Select one of the wintry
“print & cut” arch sentiments
to feature at bottom center: “freeze the
day”,
“wooly wishes” or “flurry friends”.
Companion envelope is available.

ASSEMBLY: 1. Identify and cut the shapes:
A card base with horizontal center perf line
B snowflake ring accent C ring reinforcement
D ring accent overlay
E center sawtooth circle F center plain circle
G optional interior sentiment plaque
H words arch tag for front (choose 1 of 3)
I tag front layer ("fringe" cut for bottom edge ribbing)
J tag second layer
K tag buffer layer (to help camouflage stitching depth)
L tag back layer
M printed stitching chart (or refer to on-screen chart)
N dark & light embroidery floss
Sample uses DMC 3768 for blue & 3865 for white

NOTE that the large whole circle that remains when
the snowflake ring is cut can be used to cut
the optional inside sentiment plaque - in fact,
the cut file is set up grouped to cut the two shapes.

2. Prepare the card base shape by bending back
on the center perforation line.

3. Position and attach the reinforcing half ring shape
onto the backside of the snowflake ring, at the upper
half. (This will help the ring stand straight and strong
when the card is folded in "open" position.)

4. Position the snowflake with reinforced half
above the fold of card base, then attach.
NOTE that the side center pattern repeats are halfway
onto the folded card, and halfway off.

5. Position and attach the contrast overlay ring.

6. Position and attach the plain center circle on top
of the sawtooth center circle, then . . .

. . . position the circle assembly onto the card base
so that it is centered within the snowflake ring . . .

. . . with a top center point aligned
with top center repeat, and "valley" between
points aligned with the card base fold.

7. Select a word tag from the three choices, then
use print & cut tools to cut the shape.
Position and attach over the snowflake ring,
centering with the all ring elements.
Add jewels or studs over end circle cut outs.

8. Position and attach sentiment plaque on
the inside of back circle half.

TAG ASSEMBLY
9. Prepare the stitching shapes by making sure all
the "crumbs" from cut-out circles have been removed.
One way to do this is by fashioning a "tool" by
straightening a standard paperclip, then using end
to poke through holes. Sticky side of tape can also
help to pick up and remove waste pieces.

10. Layer prepared shapes and glue together,
taking care that all cut edges that should align
are as precisely lined up as possible.

To help make sure stitching holes are properly
aligned, use paper clip tool to test significant
edge holes by inserting through.

Place tag front layers assembly on flat surface and
press with heavy flat weight until dry, several
hours or overnight. This will minimize or prevent
curling or warping of shape glued up with
liquid adhesive.

11. Obtain blunt tip tapestry needles in size 24 or 22.

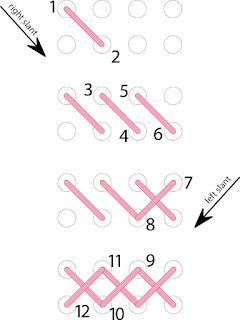
12. Study this diagram to understand how to form
cross stitches for uniform appearance and tension.
NOTE that the RIGHT SLANT stitches are generally
placed across the row first, followed by the LEFT SLANT
stitches placed coming back across the row.


TAG CROSS STITCHING
9. Prepare to stitch cross stiches by cutting a 30-32 inch
length of 6-ply floss for the footprints (pink).
Following substeps will describe how to separate single strands
from the 6-ply group to minimize knotting:
A) Separate 2 plies by holding the grouped floss length
somewhat firmly between fingers of offhand, isolating one
ply to pull away, then pulling it gently away from others
while the twists of the group begin to bunch up behind it.

Holding the ends together,
smooth together to create a loop opposite end.


C) Thread the ends through
the needle eye. Pull the loop through so that it is
the long end.

10. Study this diagram to understand how to form
cross stitches for uniform appearance and tension.
NOTE that the RIGHT SLANT stitches are generally
placed across the row first, followed by the LEFT SLANT
stitches placed coming back across the row.
11. For this project, begin at the top left hole where
the first cross stitch will be created.
Each square on the pattern chart represents 4 holes that
would be needed to create both the right and left slants.
A) Insert the needle with thread UP from backside
in the TOP LEFT HOLE where the first X will be made.

B) Pull the floss through UNTIL about 3-2 inches
of the loop end remains, then insert the needle
diagonally to complete the first right slant stitch.

On the backside of work, insert the needle
through the loop and . . .

. . . pull the loop tight to remove all slack.
This is the "tying on" process.

12. Insert the needle through to front of work, in
the top right hole of the next stitch to right
of first stitch. Complete the second stitch on that row.

Work the remaining right slants across top row.

13. Return back across the row to add the LEFT
slant stitches to complete the cross stitches.

14. Move downward to continue to follow the chart . . .

. . . to complete the next cross stitch row of
right slant then left slant stitches.
15. Move down to third row and follow the chart,
completing the first "blue" stitch right slant, then
skipping a cross stitch unit, then continue with the next
set of stitches, skipping the "white" stitch near row end,
and completing the single "blue" stitch at end.
Work back across row to complete left slant stitches.

As stitching proceeds, thread length will
eventually be used up. Before length is
unmanageably short, pause when the needle is on
the backside of work as a slant stitch is completed.
Slip needle under 3-4 stitches on the backside, then . . .

. . . slide the needle off, and trim the tails close
to the surface of the work.
This is the "tying off" procedure.

16. Continue to follow the chart to add cross stitches
as prescribed, selecting the most efficient pathway
you can imagine. The sample project worked across
chest then down left (as viewed) sleeve, tying on
to continue center body, etc. NOTE that there is
a "blank" column of stitching space where the sleeve
is defined and NO stitches are added.

17. When first color (blue) is completed, fill in stitches
in the light color selection. I like working from bottom up
when possible to avoid backtracking to avoid un-doing
stitching at new row beginning. Work until . . .

. . . all stitches are in place and final tie off is complete.

18. On backside, position and attach the edge-frame
buffer layer, then . . .

. . . position and attach solid tag back panel,
matching outer edges and hang hole precisely.
Press under heavy flat weight until dry.

19. Add twine or narrow ribbon tie at top hang hole,
then position and attach in place on front of
center circle assembly.

Unfold circle base when giving or sending, then
bend top half down to create self-easel to display.

No comments:
Post a Comment