
Celebrate
Valentine’s Day or a new baby with
this endearing mythical baby posing on front
of
low profile gift box sized to fit standard plastic gift card.
Also suitable
for other loose treats.

Cupid figure is build up of stacked silhouette base
layers,
then unit shapes are assembled to add details:
diaper, legs, feet and
toes, head and face features.
Figure measures approx. 4.5” wide x 4.75” tall.

ASSEMBLY: 1. Identify and cut the shapes:
A main base silhouette (3-4)
B back layer silhouette with guide marks
C front silhouette (shows as wings)
D belly contour contrast
F body base
G head with arms layer H hand overlays
I face overlay J smile inset, nose, eyebrows
K eye layers: whites, lashes, pupils
L kiss accent
M legs/feet base layer - shows as diaper
N legs overlay O diaper front overlay
P & Q feet front layers for l & r with
toes overlay base, separate toes
R safety pin and heart overlay

NOTE: the box assembly shown here was for
a different project.
The cupid baby box for sample is pink.
S LID floor T LID box interior insert
U LID boxing strips (with thumb cut out)
V BASE floor W BASE box interior insert
X BASE boxing strips

BOX ASSEMBLY
2. Identify the LID or BASE box panels:
LID main shape includes 'L' cut in
LID interior insert includes 2 "bites" at upper edge

3. Prepare the boxing strips by bending back on
wall perforations for panels and end tabs,
and bend edge long or corner tabs back/inward.

4. Join the boxing strips end to end by overlapping
the straight edge of one across end tab, adjusting
panels top to bottom, then attaching in place. Then . .

. . . join the second corner seam in same manner.

5. Adjust boxing shape so that it matches the floor
panel, then apply glue to edge tabs, position panel
and attach in place.

On the inside, apply fingertip pressure to ensure
complete attachment in place.

6. Repeat Steps 10-12 for the box BASE using
similar boxing and panel main . . .

. . .and insert shapes.

Apply fingertip pressure inside in same manner.

CUPID FRONT ASSEMBLY
7. Working quickly through the next 3 steps,
layer and attach together the main silhouette shapes,
taking care that all cut edges align as precisely
as possible.

8. NOTE that the back layer includes corner guide marks
that will eventually assist LID box placement.

shapes assembly, and attach in place.
 9. Position and attach the front (wings) layer onto

front of silhouette assembly. Position and attach
the contrast belly oval into the opening.


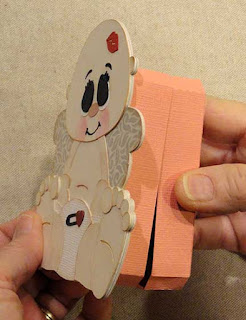
Immediately place the assembly on a flat work surface
and press with a heavy object such as the thick book
volume shown here, possibly with something else
heavy placed on top. Allow the assembly to dry
completely while being pressed, to help avoid warping
or curling. Pressing may require several hours
or overnight.

10. Layer and attach the legs/diapers shapes:
diapers layer, legs, then front diaper, lining up
corresponding edges as precisely as possible.

11. Assemble the body front with head/arms shapes:
layer and attach head base with attached arms onto
the body silhouette, then position and attach the
head shape where edges align.

Here is the body assembly.
12. Prepare to position and attach smile accent
and eyebrows into corresponding head recesses.

on top of lash shapes with highlights and corresponding
edges aligned, then position and attach at top
of eye "white" base shapes.


13. Position and attach hand overlays over
corresponding shapes at ends of arms.
 14. Position eye units into eye recesses, then
 15. Prepare to assembly left and right feet units . . .
 . . . by positioning large toe, then outer 3 toes over

position nose between eyes near bottom.
Position and attach kiss accent.


corresponding areas of toes base (NOTE that
the base shape shows through as second toe.
Also position and attach safety pin heart head
onto pin base.
 Finally, position toes units over corresponding area

at top of each foot base shape.
 16. Position and attach body assembly onto

previous silhouette/wings assembly, then
position and attach legs/diapers unit at lower edge.
Continue to align all corresponding cut edges
as precisely as possible.
 17. Position and attach feet over corresponding

area of legs base. (NOTE that highlight ink has been
applied behind the area where heel contour cut out
will fall to provide contrast.)
Position and attach safety pin over upper portion
of the front diaper. Press under heavy weight
until completely dried.


. . . as well as lower inward corners at other guide marks,
Here is the completed project.

FINISHING
18. Apply glue to underside of LID box assembly,
then position onto backside of cupid assembly,
locating the guide marks to align upper-most corners . . .

. . . as well as lower inward corners at other guide marks,
then apply pressure to attach.


18. Insert gift card, or fill with loose treats etc.

To close, slide BASE box inside LID box edges.
and push together . . .
 . . . until fully in place.


Here is the completed project.

No comments:
Post a Comment