
Vintage
style Valentine or sweetheart card features
lattice front panel overlay with
layered classic oval frame.
A pair of elongated heart ornaments, layered for
thickness,
suspend inside oval (use actual twine and tied bows,
or substitute
faux twine with bows included in file).
Below oval, layered banner tag can say
“I love you” using print & cut techniques and tools,
or stamp/pen other
preferred expression.
Presentation can be made dimensional by cutting,
layering
and attaching frame outline shape
behind lattice panel.
Card measures approx.
5x7 when
fully assembled and side-folded.
ASSEMBLY: 1. Identify and cut the shapes:
A card base with side fold
B lattice panel (2 to layer)
C outer rectangle frame
D edge strips to stack to provide buffer
to raise lattice above card front panel
2 sets of 5 ea. long for sides;
2 sets of 5 ea. for top, bottom
E shaped frame base with frame overlay
F oval frame overlay (2 to layer)
G layered tag shapes
H heart ornaments (2 sets of 6 each to layer)

and attaching the 6 hearts in 2 stacks, taking care
to align cut edges as precisely as possible.
 Immediately press under a heavy flat object such as

this thick book volume, possibly with something else
heavy on top. Leave under pressure until the stack is
completely dried, possibly requiring several hours
or over night. This helps minimizing warping or curling.
 3. Pre-assemble the banner by layering

the print & cut top layer (or substituted panel)
onto the center of the whole banner, with corresponding
edges aligned. Then . . .

with very narrow offset margin all around
(align punch holes). Press under heavy flat weight
until dried.
 4. Position and attach together the long buffer strips

into two 5-strip stacks, with cut edges aligned carefully,
and also the short buffer strips into two 5-strip stacks.
Press under heavy flat weight until dried.
 5. Position and attach the oval ring overlay shapes

into a stack, then . . .
 . . . the rim shape onto the shaped base . . .
 . . . then add the oval stack on top of
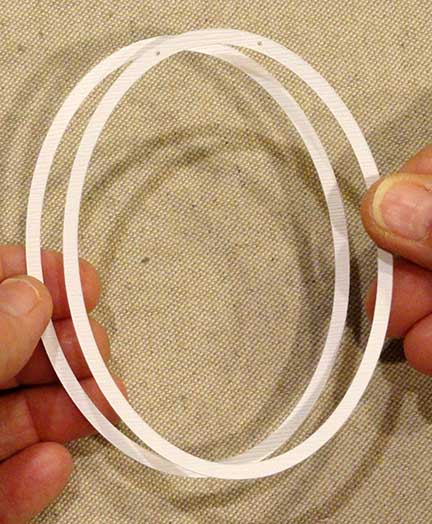

the shaped assembly, pressing under weight
after each unit is aligned and glued together,
as well as after the assembly is complete.
 6. Position and attach the lattice panels into

a stack, taking quick care to check and verify
that all cut edges are as precisely aligned
as possible. Press under a flat heavy weight.
 7. Position and attach the rectangle rim frame

onto lattice panels with outer edges aligned,
and press until dry.
 8. NOTE that the narrower portion of panel

above the oval opening is the TOP of the design.
 Position and attach the shaped oval frame

assembly on the front of the lattice assembly
with inner oval edges aligned.
 9. If desired, position the sides, top and bottom

glued-up buffer strip stacks onto the lattice
assembly, on the backside with outer edges
aligned. Press under flat weight until dried.
 10. Prepare card base by bending at perforation.

Position and attach lattice panel onto front of card base,
aligning outer edges, or edge and perforation line.
Press under flat weight until dried.
 11. Position, centered, the sentiment banner assembly

under the shaped frame. Press until dried.
 12. Prepare to attach the heart ornaments in place.

Cut 4-5 inch lengths of no. 5 black crochet cotton,
then insert bottom end through front of heart hole.

and secure in place either with cello tape or glue.
 13. Overlap the two hearts and attach together,

using the welded hearts shape guide if desired.
 Position the hearts assembly onto card front in

lower portion of oval frame, centered from side
to side, and glue in place.
 14. Add a dab of quick-grab glue at middle

thickness of oval ring in position directly
above where strings will extend, and . . .

When glue is dry and strings secure,
trim excess away.
 15. Pre-tie separate lengths of crochet cotton

into tiny bows, secure with dab of glue on
backsides, then position and attach
over end of string streamers.


No comments:
Post a Comment