
Shallow
cat-shaped box composed of lid which fits
snugly over base presents a whimsical
cat
holding heart photo prop sticks over eyes
in amorous expression.

Box is
large enough to hold standard gift card,
sticky-dot affixed inside to base
floor.
Dimensions: 4.125” wide at widest x
5” tall ears to toes.
Companion tags
designs available
in separate file: “Cat Tags Foursome”.
ASSEMBLY: 1. Identify and cut the shapes:
A LID front panel
B LID top and right side boxing strip
C LID bottom and left side boxing strip
D LID front panel overlay with guide marks
E heart wands l & r (2 ea.), hearts (4), arm overlays
F mount outline and nose overlays
G BASE main panel
H BASE right and side boxing strip
I BASE left and side boxing strip

J BASE overlay K tail overlay
L decorative liners for LID and BASE

2. Identify the LID boxing strips which each have
a small half circle notch at side tab edge.

and the BASE boxing does not.
 Also note that the LID main panel includes

an 'L' symbol cut in.
 3. Prepare the LID boxing strips by bending back or

forward on cross perforation lines so that the strip
corresponds to the main panel edges.

Bend edge tabs back.

Use a moderately sized rod tool such as this dowel
to add slight curl to the long side panels of
each strip, and also . . .

the bottom center segment (with finger notch).

 Align the first segment tab with the short edge

4. Begin with the right side/bottom strip to position
the first segment (past end tab) on the inner ear edge
of the main panel.

to overlap the tab to perforation line. Apply glue
and attach in place.

with the top ear edge and attach in place.

tacking opposite segment edge at end of panel
side edge. Then . . .
 . . . ease the edge into place and attach.

To assist in attachment, invert the assembly
face down on work surface and apply
fingertip pressure along seam tabs
(shown in later steps).
 7. Continue to position and attach leg bottom and

inside edge, then position and fit the bottom body
curved portion of boxing to fit panel edge in approx.
the same manner as for long side panel.
 8. Position and attach the second boxing strip

by aligning the end tab, then overlapping the end
straight edge across the end tab of strip 2, adjusting
so that top and bottom edges align, then glue seam.
 As boxing strip attachment progresses, invert face down

on table top and apply fingertip pressure along seam tabs.

apply glue so that the top curved segment can be
positioned and attached at the same time as
the end straight edge is aligned for the final side seam.
 10. Repeat the boxing strip and panel assembly

for the BASE and BASE strips.
11. Prepare the heart wands by layering and attaching
any multiple shapes selected for dimensional assembly.
Glue shapes for 2 pairs of wands and 2 pairs of hearts.
 Then position and attach hearts over heart ends

of wands, with narrow offset margin all around.
 12. On accent front panel, gently bend the arms

outward slightly, then position and attach the arm
outline overlays at cut edges.
 13. Use side guide marks to position and attach

mouth/tongue accent. Then . . .
 . . . position nose shape just above lowest point

in mouth arc.
 14. Locate the want bottom guide marks . . .
 . . . then carefully slip the wand under arm . . .
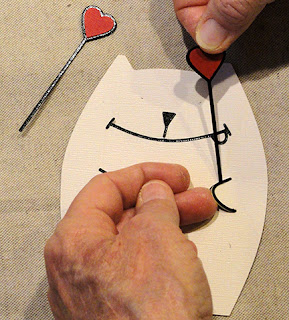 . . . and slide down into position to cover


the bottom guide mark, while also aligning
the "valley" corner at top center of heart with
"v" guide mark in face area. Apply glue to keep
the wand in place on body and underside of arm.

of LID, with narrowest of margins at all edges.
 16. If desired, "embellish" the hearts by adding

crystal glaze . . .
 . . . carefully outlining then filling in

the liquid, then allowing ample time to dry.
 17. If desired, position and attach the tail onto

back panel, using bottom position guide marks.
 18. Position and attach back accent panel onto

BASE outer face, with narrow offset edge all around.
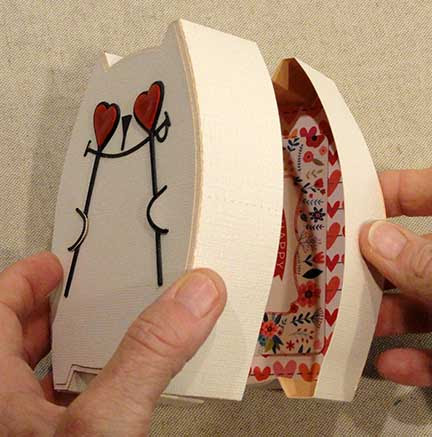
 19. Position and attach accent liner inside BASE

and LID (shown here with gift card sticky-dot attached).
 20. Close the box by fitting LID over BASE,

and sliding completely closed.
 Further embellish by attaching selected tags
from “Cat Tags Foursome” design group,
simulating tying around tail.

Not a Valentines fan but this one is utterly adorable <3 Love it!
ReplyDelete