Monday, May 30, 2022

Root Beer Mug Cheer Card with Dad Tags


Simplified and stylized shaped mug has layered “foam” bubbles
 at top, open handle, left side fold. 
Label the front with “ROOTBEER” and “Cheers” 
to create  a fun card for Father’s Day, 
to say congratulations with a non-alcoholic toast, 
or offer encouragement. 
Optional interior accent insert can hold 
a standard plastic gift card. 
Card measures approx. 4.63” x 6.25” to fit A6 envelope.
Companion "Dad" tag design (one of two)
can be attached, or accompany as a gift tag.
(Assembly notes for the tags begins in Step 12.)

ASSEMBLY: 1. Identify and cut the shapes:
A card base   B mug base/handle  C mug overlay
D foam/bubbles overlays
E root beer cheers assembly: base, cheers, letters
F optional interior gift card holder (shown with card)
2. Assemble the foam/bubbles unit. Begin by identifying
the three largest shapes by their order numbers
that are cut into the shapes. This one is #2.
3. Here are the shapes to overlay in order from
#1 (bottom) to top individual bubble circles.
4. Position shape #2 on top of #1 with
edges aligned where they match up.
and glue in place.
Add shape #3 on top of assembly.
Add the next largest shape (welded five bubbles)
on the left , then . . . 
. . . add the three-circle shape on left and two-circle
shape on right. Finally add the single circles.
Assist the multi-layered, glued up shape to stay flat
while the liquid adhesive is drying completely by
pressing flat with a heavy flat object such as this
muslin-covered repurposed free weight bar,
for several hours if possible.
5. Prepare the card base by folding along the left-edge
perforation.
6. Position the mug overlay onto the mug base
and attach, then . . .
. . . position and attach the mug assembly onto
the card base front, with edges offset as shown.
7. Position and attach the foam/bubbles assembled
shape onto the top of the card front, with top edge
positioned to have offset along top edges,
and to overlap the mug top edge.
8. Prepare the words assembly by positioning
and attaching the "root beer" letters onto the
base (NOTE that in the final file, the 'O's' are
hollowed out). Then . . . 
. . . position and attach the 'cheers' word cut over
the base (to cover the base shape completely.
9. Position and attach the Root Beer Cheers unit
on top of the care front, in selected, 
most-appropriate position. (NOTE that is a tag
is NOT attached somewhere on the right side
at or above handle, the words unit can be
vertically centered or slightly higher. With
the tag, move the words unit down as shown.)
10. If desired, position and attach the gift card
holder panel, centered inside the card.
To insert and position and card, gently lift
the side tabs and slide card into position
(before or after attaching panel to card base).
11. Consider assembling and attaching the oval
(smaller) tag for Father's Day or birthday - assembly
shown at Step 12, from "Tags Pair for Dad"
separate design. One position to attach it is to
tie with twine around the upper handle opening. 
Alternate positioning is higher up by punching
an attachment hole in the farthest-left
individual bubble circle - through all layers.

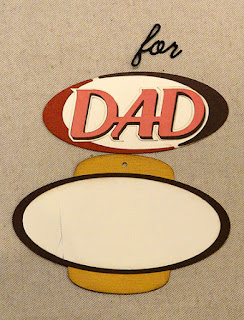
DAD Tags Pair Assembly:
12. Identify and cut the shapes for the larger tag
at left, or the smaller oval tag, right.
(NOTE that the larger tag may be too large
to use with the Root Beer Cheers card.)
For larger tag:
13. Position and attach the three base layers . . .
. . . centering and attaching as shown here.


14. Assemble the upper "layers" . . . 
. . . by attaching 'colored' front layer of 
DAD welded word on top of 'shadow' DAD (top and
 left edges align to leave some of shadow shape exposed),
then center the DAD layers on top of
offset contrast base shape.
Position and attach the crescent shapes at edges
of positioning oval, with narrow spaces between tips.
Complete the upper assembly by positioning and
attaching the 'DAD' unit on top of the crescent base.
15. Complete the assembly by . . . 
. . . positioning the crescent oval unit on top of
the bottom assembly oval, then adding the 'for' above.
16. Assemble the smaller oval tag by layering
the 'DAD' front and shadow layers as described
in Step 14, above. Also layer and attach the oval
and offset oval base with punch holes aligned.
17. Complete the tag by centering the word unit
on top of the oval base unit.

Here is the completed card with attached oval tag.


Friday, May 20, 2022

Cowboy 3D Boot Box with Flat Panels

Decorative container in a larger scale has front and back 
panel assemblies which are attached to open-topped, 
tapered at the toe interior vessel. 
Decorative details include instep, heel and upper overlays, 
cuff and instep trim 
(embellished with 18 small eyelets or brads), 
double-layer pull loops at top edge, 
heel strap with double star accent, scalloped Concho button. 
Consider adding “giddyup” or “howdy” tag (separate designs) 
Suitable for a gift box, western or patriotic display, 
or as part of table decor for a themed banquet.
 Measures approx. 7” wide x 9” tall x 1.75” deep when completed. 

ASSEMBLY: 1. Identify and cut the shapes:
A front and back base shapes
B front & back main upper base with top rim shapes
C front & back insets with edge trim, heel shapes
D heel straps, star accent
E layered straps, scalloped buttons
F vessel box front
G vessel box back
H vessel front boxing strip
I vessel bottom boxing strip
(NOTE that this shape has been modified in the final
cut file to include a window cut out to allow
fingertip access)
NOT SHOWN: panel to cover window cutout
J vessel back boxing strip
2. Prepare to attach the top edge trim shape to
edge of upper accents by setting eyelets into punched
holes of trim. One good way to accomplish this is . . .
. . . to position and attach the punched trim at
top of the upper accent shape. Then . . .
. . . use an awl or similar sharp instrument to
punch holes through the upper shape, then
insert and set eyelets.
3. Repeat the process for the instep shapes to position
and attach trim at top edge, then . . .
. . . insert and set eyelets. NOTE that the center hole
is NOT for an eyelet, but for the heel strap accent.
4. With the trim in place, carefully bend back along
the three perforation lines to add a little shaping.
5. Add similar shaping to the front and back base
shapes at the three perforation lines in toe area.
6. Position and attach the heel shapes onto
both instep assemblies.
7. Temporarily "join" the instep and upper assemblies
along the shaped edge (for ease in positioning onto bases)
by placing short strips of cello tape under the edge of
one of the shapes, then . . .
. . . position the two shapes together with edges
abutted, front and back edges aligned to be
continuous.
8. Position and attach the accent front or back assembly
onto the coordinated front or back base shape,
taking care to align the upper strap alignment/brad
holes of each, with even offset margin along upper
curved edge and sides. The series of perforation lines 
should be aligned on top of each other.
(NOTE if using liquid adhesive for assembly of these
large shapes, it is recommended that the shapes
be pressed flat under an ensemble of heavy weights
until thoroughly dried to avoid warping or curling.
Dry adhesive such as double-stick tape is recommended.)
9. Position the boot strap with star over the assembly,
matching the hole punches at forward end,
and strip curved back edge to echo boot's heel curve.
Insert and attach decorative large brad through
layers at star/strap punch hole.
10. Prepare to assemble the boot straps by adding
back curl to the center only of each layer as shown,
using a rod tool such as this dowel or a round pencil shaft.
11. Apply glue/adhesive to underside of accent strap
then position, with offset margin all around,
over the strap base, taking care to align punch holes
as closely as curving of shape will allow.
12. Add the back bend to the vessel front and back
panels.

13. Bend the side tabs of boxing shapes back,
and also bend the cross perforation lines forward
or back, to match the corresponding edges of
the vessel base to which each will be attached.
14. Become familiar with the single and double notches
that are cut into end tabs to assist with assembly
in the correct order. Here, the single notch is shown
on the bottom tab of the front boxing, and also
on the nearest end tab of the bottom boxing to
indicate that these ends will be joined during assembly.
Here, the double notch is shown
on the bottom tab of the back boxing bottom tab, 
and also on the nearest end tab of the bottom boxing to
indicate that these ends will be joined during assembly.
15. Position the front boxing strip next to the corresponding
front edge of the (whole) vessel front panel and
check for correct bends of boxing segments.
(This can also be done with the other strips.)

Apply adhesive to the underside of tabs, then . . .
. . . slide the front panel edge in place, overlapping the flange
(NOTE boxing flanges are on the OUTSIDE of base shape 
which is shown face down in this photo),
matching top edges and also edge angles with
perforation bends, and attach in place.
Working quickly, apply pressure to the edge from
backside as shown, then . . .
. . . continue to position the next edge segments
along corresponding boxing tabs. 
Adjust if needed,
and apply fingertip pressure to secure in place.
16. Position and attach the bottom boxing front end
(single notch) straight edge along perforation line
of front boxing tab. Then . . .
. . . bend segments to match, position and attach
boxing to base's corresponding edge.
17. Repeat Step 16 for the final boxing (back) strip
to join with straight bottom edge overlapping
corresponding flange to perf line, then . . .
. . . bend into position to attach in place.
18. Position the vessel back panel with cut out holes
for finger access into place with edges under
corresponding boxing edge flanges.
BEGIN ATTACHING AT TOE END for easier access
to secure edges to tabs and apply fingertip pressure.
Use the window cut outs in panel and in bottom "sole" 
boxing segment.
NOTE it may also be helpful to use a thin, narrow tool
such as this acrylic ruler to insert into toe to assist
in completing the seams.
19. Continue to work around lower, back and front
panel edges to secure boxing tabs to panel edges.
Allow to dry completely.
20. Position and attach front accent panel assembly
to vessel front, using strap hole as alignment guide . . .
. . . and also matching bottom of accent base at
instep and at heel to vessel bottom edges,
and secure in place.
Repeat for the back accent panel assembly to
back of vessel.
21. Position a boot strap assembly wrapped around
the boot upper edges, and with punch holes of all
layers aligned, and glue in place. Insert and attach
a decorative brad. Repeat for second side and strap.
22. Complete the finishing accents to boot as desired,
including the scalloped button (with tied twine) attached
on top of brad or in place of brad at strap end,
and "howdy" or "giddyup" tags (separate design).
Here is the completed boot front without tag.