
Box
composed of imitation pie slice LID which fits
snugly over triangular BASE.

Pie
details include top wedge with knife slit detail,
side wall “crust” rim, crust
crimps at upper back.
Designed to fit as a set of 6 into companion design
“Pie
Tin 3D Tray”, with relatively simple assembly.

and 3.25” at top tip to crimp seams;
height
.875” tall body and 1.1875” at crimp back.
ASSEMBLY: 1. Identify and cut the shapes:
A box hull LID
B box back panel (crust color)
C lid crust overlay with offset side angle edges
D crust accents left & right
E crust crimp accents (4)
F right end crust crimp accent
G triangle BASE box insert

perforations for wedge, side walls, tabs, and . . .


hull shape with back curved edge centered and
aligned at back tab perforations, with side angled
edges slightly offset within perforation lines,
and glue in place.
 NOTE that bending back tabs up will help align

curved back edge snugly up against perf lines.
 4. Position and attach the crust line accent panels

onto appropriate side wall panels of hull,
with bottom straight edges of both aligned,
back angled edge aligned at back tab perf line,
and top short edge aligned at wall top perf line.

 . . . bending top edge tabs forward slightly.

5. Prepare the back wall shape by adding slight
back curl from side to side, then . . .

Position and attach at first hull side back tab,
adjusted top to bottom so that lower edges align
and top perf edge align.

6. Bend the back panel around to repeat the edge
joining process described in step 5 above,
to complete the second seam.

7. Separate the back tabs from hull and back panel
to apply adhesive between, then . . .

. . . align perforation lines and pinch across tabs
array to complete the curved edge seam.

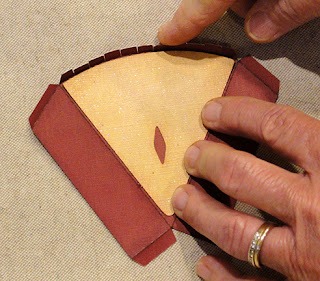
8. Bend the hull tip tab back, then align and
join the tip seam. NOTE it may be helpful
to insert a blade tool such as the one shown in step
behind the seam to provide a press against surface
to join the narrow angle seam.

9. Bend all the crust crimp shapes in half.
Position in order - right end tab even with hull side edge,
apply glue to backside of crimp, wrap over tabs
extension and pinch to attach, holding until secure to dry.
 Repeat the process to position and attach a reg crimp

shape at left hull edge as shown, leaving tips un-glued
to allow adjacent crimp shape to slide underneath.

 As crimps are added, apply glue under tips to allow

Position the middle crimp, centered along tabs
curved edge, with tips remaining un-glued.
Then position mid right side crimp into position
with rounded end slipped under adjacent crimp shape
with narrow tips overlapping and attaching over
end crimp already in place.
Finally, repeat for the mid left side crimp shape.

each to attach securely in overlapped position.
 10. Prepare the BASE shape by bending back on

all perforation lines for wedge panel, side and back
walls and end tabs. NOTE that the back panel of
box base can be identified by the notch.


11. Bend the walls into position, with tabs bend inward,
align and join all three corner seams.

NOTE that the narrowness of the wall angles at
tips may be more easily joined by slipping a spatula
tool blade behind the seam . . .

- with straight of blade pushed up against tab bend -
to provide a press-against
surface to apply pressure to secure seam.

To close the box, insert the BASE into the bottom
opening of the LID - flexing slightly if necessary to fit
back angles inside LID walls, then . . .

. . . push BASE into place until bottom is flush
with hull wall lower edge.

Consider creating a coordinated pie tin tray
to put multiple (up to 6) wedges within . . .

. . . to display, or to give as a multi-container gift.

No comments:
Post a Comment