
Self-standing easel card features multi-fold base decorated
with accent overlays, half snowflake trim.
On marquee at center is shaped tag with
stitching holes panel sized to fit the
penguin with heart
cross stitch design. Stitching diagram is included in cut
file.
Tag measures approx. 3.4” wide x 5” tall.

Step card measures approx. 7”
wide x 6.125” tall to
top of tag when standing.
Select one of the “Labels Pair
Valentine Warm Hugs”
separate designs or another of choosing to feature
at
bottom center, if desired.
Companion envelope sized to fit this larger-than-5x7
card
is available: Env for Oversize 5x7 Card Snowflake Trim.
ASSEMBLY: 1. Identify and cut the shapes:
A card main base shape
B front center accent
C side "step" panel, snowflake overlay, trim strip
(2 sets)
D lower front panel and trim strip
E back main accent panel
F back snowflake overlay & trim strip

H tag backside "buffer" frame
I tag back panel (2 for strength)
J reinforcement hole ring (final design changed to red)
 2. Obtain floss colors for penguin design:

(sample's DMC colors noted)
body - black #310
body inner - white #3865
beak & feet - orange #3853
cheeks - lt pink #761
heart - red #347
heart highlights - deep pink - #3731

 3. Prepare the card main shape by bending back

Obtain blunt-end tapestry needles size no. 24
(mountain fold) on all perforation lines except
the 2 perforations noted here with text as "valley"
folds at lower end of each side step, which are
bent forward. Also let the shaped connected arch
shape at top of front panel release. Crease all folds.

 5. Position and attach lower front panel over

4. Prepare the trim accents:
for sides - center and attach snowflake trim at inward
edge of accent panel, position and attach accent strip
over bottom of snowflake trim, sides and
lower edges aligned;
for back lower - position and attach accent strip over
lower portion of snowflake trim, sides and
lower edges aligned.

corresponding portion of card base, sides and
lower edges aligned.


6. Position center front accent panel over card base
with offset margins at sides and top, abutted at
bottom with lower accent strip.

7. Position and attach the snowflake trim panel assemblies
onto side step panels of card base . . .

. . . with top short end aligned at upper perforation,
side edges aligned.
 8. Position and attach back panel onto back of card

base with offset edges all around.
 NOTE that the backside of accent panel will show

through on underside where the front panel arch is cut.

TAG ASSEMBLY:
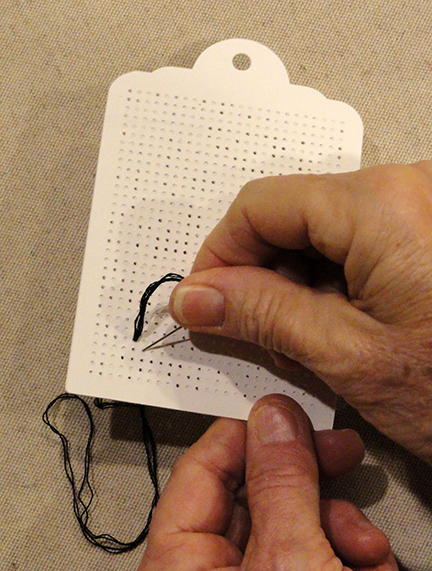
9. Prepare the stitching shapes by poking through all holes
using some suited tool such as this un-bent standard size
paper clip, to make sure that all the "crumbs" are moved
out of the way and brushed off the shapes.

Layer the two cut stitching discs on top of each other
and glue together, taking care . . .

. . . that ALL the holes and cut edges align as
precisely as possible. One way to check for alignment
is to use the paper clip tool to push through corner
and other random holes, and make adjustments as needed.

Once adjustments are made, press the layers on
a flat surface with a heavy flat object such as this large
book volume - possibly with something else heavy
placed on top of it - shown here from a different project.
Leave in place until completely
dry, several hours or over night. This will reduce or
prevent warping or curling of the glued-up shapes.

10. Layer, align all cut edges, and attach the two
tag back shapes. Press under flat weight til dry.

11. Prepare to stitch cross stiches by cutting a 30-32 inch
length of 6-ply floss PENGUIN outer body (black).
Following substeps will describe how to separate single strands
from the 6-ply group to minimize knotting:
A) separate 2 plies by holding the grouped floss length
somewhat firmly between fingers of offhand, isolating one
ply to pull away, then pulling it gently away from others
while the twists of the group begin to bunch up behind it.
B) Place the two plies side by side and line up the ends.
Holding the ends together,
smooth together to create a loop at the half-way point.

C) Thread the ends through
the needle eye. Pull the loop through so that it is . . .


7. Study this diagram to understand how to form
cross stitches for uniform appearance and tension.
NOTE that the RIGHT SLANT stitches are generally
placed across the row first, followed by the LEFT SLANT
stitches placed coming back across the row.

8. For this project, begin at the bottom of the left edge
of Penguin body at the top left hole where
the first cross stitch will be created.
Each square on the pattern chart represents 4 holes that
would be needed to create both the right and left slants.
A) Insert the needle with thread UP from backside
in the TOP LEFT HOLE where the first X will be made.

of the loop end remains, then insert the needle
diagonally to complete the first right slant stitch.
through the loop and . . .

. . . pull the loop tight to remove all slack.
This is the "tying on" process.

the bottom right hole of the next stitch to right
of first stitch.

4 right slant stitches.

 10. Move upward to continue to follow the chart . . .

Return back across the row to add the LEFT
slant stitches to complete the cross stitches.


then left slant stitches.

11. As stitching proceeds, thread length will
eventually be used up. Before length is
unmanageably short, pause when the needle is on
the backside of work as a slant stitch is completed.
Slip needle under 3-4 stitches on the backside, then . . .


to the surface of the work.
This is the "tying off" procedure.

then continue to follow the chart to complete the Penguin
body outline (black) stitches up the left side, across
top of head - catching the left and right eye X stitches
when they are close to the other black stitches.

13. When body outline is completed, load the next
color - beak and feet orange shown here, for example -
and tie on close to where stitches will be completed,
then tie without "floating" or passing thread across
to next area to stitch.

Complete the cheeks, heart body and heart highlights,
then fill in the inner body with white.

14. Finish the Penguin details by tying on 4-floss
load of black to add straight stitches between
bottom rows of beak, and white to complete
zigzag stitches at bottom of arms. Tie off each set.

FINISHING
15. Add glue to backside of "buffer" frame, then
position and attach to stitched tag backside,
taking care to align all of outer and hole cut edges.

15. Position and attach the reinforcement
accent ring on front of tag.

16. Add a ribbon cockade through hole
at tag top if desired.
Position and attach tag to front of card,
aligning tag arch edges the cut-in arch of base.

17. If desired, position and attach a label from
"Labels Pair Valentine Warm Hugs" at center
bottom of front panel.

Here is completed step card.

No comments:
Post a Comment