
Unique
dimensional bow decoration has lattice overlay
loops shape, solid base loops
shape,
double-point ends streamer layer.
All layers are connected with center brad hole.
Large size bow is perfect for decorating paper craft
or floral projects, gifts
and more, measuring
approx. 5.5"
wide x 3.75" tall (with both streamers).

Smaller version is sized to work
as a bowtie
for "Snowman 3D Ball Head" project with
two stem lengths for
easier attachment to head.
ASSEMBLY: 1. Identify and cut the shapes:
A main bow loops
B wavy lattice overlay
C top streamer
D bottom streamer

2. Bend the loops forward slightly at the center dash
cuts near middle and at ends.
Do this for the overlay also.

of main shape, and . . .

. . . to the lattice overlay.

the end punch hole/tab to line up behind
the center front, and glue all layers in place.

the center of the main whole shape, with
center punch holes lined up.
6. Curve each loop toward back as with main loops
shape, to line up the back tabs and punch holes,
and glue all layers together to connect at center only.

7. Position the loops unit at center front of
top streamer with punch holes lined up, and
attach in place (or wait and use brad to connect).

8. Position bottom streamers shape behind
the other assembly, and attach in place.
OR . . .

. . . insert a regular size brad through the center
punch hole to join layers.

9. For the bow tie for Snowman ensemble,
cut the smaller main and overlay shapes,
(omit the lower streamer shape)
and connector stem strip,
then follow steps 2-7 to prepare bow.
Insert the mini brad through all layers,
but don't bend the prongs back yet.

10. Bend the stem ends back at the inner perforations
and forward at the outer perforations as shown
on this picture.

behind the bow assembly with center punch holes
lined up.

bend prongs back toward sides, then bend
the stems inward so that the short segments
of each lay flat next to bow back and glue
to attach.

13. Align the long segments of stem back to back
and glue together.

shortly after the head is attached onto
the post by inserting the stem extension between
head and top rosette layers.

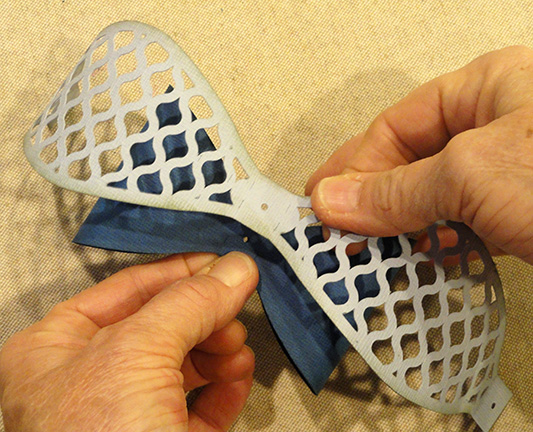
Here is the completed (large) bow.

No comments:
Post a Comment