
fit together to form familiar
snowman ball head,
with dimensional nose, layered oval eyes, and
crooked smile.
Collar ruff is formed of large and smaller pleated
scallop edge
rosettes.

allows head and ruffs to
have additional reinforcement,
a feature that also can connect the snowman head
to "Reel 3D Fancy Box Stand" for
a memorable winter seasonal display
(includes additional elements:
Bow 3D Wavy Lattice Overlay and
Top Hat 3D
Snowflake Mini).
Head with rosette ruffs measures approx.
3.625" diameter
width x 3.625" tall when assembled.
ASSEMBLY: 1. Identify and cut the shapes:
A main upper dome shape
(not shown: top solid "cover")
B & G dome post collar stack (cut 2 sets of 8)
C interior reinforcement disc
D main lower dome shape
E lower dome wedge (cut 7)
F bottom post hole panel
H post tube I carrot nose pyramid
J eyes with white contrast show-thru underlay
K crooked smile
L bottom rosette strip (cut 2 to join)
M top rosette strip (cut 2 to join)
N base & "buffer" discs for rosettes (cut 2)
O rosette securing discs (for use without post;
cut 2 for each rosette)


 5. Repeat the process to overlap, align and glue
the upper segment of the two-part seam.
6. Repeat the process to complete the two-part seams
all along the upper dome section.


 Then repeat for the second segment of the seam.


 16. Insert the bottom tab fully into the lower slot
on front of upper dome, then bend inward
and glue in place to the inside of the head panel.
 17. Rotate the nose shape upward into position
to insert the two tabs into corresponding slots, then
bend tabs outward and glue in place to dome backside.
 19. Prepare the reinforcement disc by bending
flanges inward slightly on the pairs of parallel
perforation lines.
Insert the octagon center into the upper dome
opening . . .


 24. Use a scoring tool to add a crease line,
then bend the unit slightly at line.
(Repeat for both eyes.)

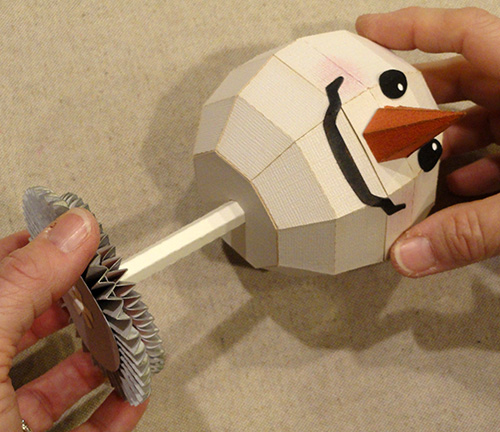
 26. Wrap the tube around the 5/16" dowel to provide
a press-against surface, bringing the straight edge
to overlap the opposite flange to perforation line,
and applying roving pressure up and down the
seam until it is accurately aligned and secure.


 28. Insert the post through one of the "buffer" discs,
bend back the end tabs and attach to the disc underside.


 33. Position and attach the second buffer disc
on top of the bottom rosette.


 . . . then continue to push post
through to the top opening, pausing
with the thickness of the collar inside still visibly
so that . . .


 Also consider adding
the Top Hat 3D Snowflake Trim Mini
design as shown here.


A main upper dome shape
(not shown: top solid "cover")
B & G dome post collar stack (cut 2 sets of 8)
C interior reinforcement disc
D main lower dome shape
E lower dome wedge (cut 7)
F bottom post hole panel
H post tube I carrot nose pyramid
J eyes with white contrast show-thru underlay
K crooked smile
L bottom rosette strip (cut 2 to join)
M top rosette strip (cut 2 to join)
N base & "buffer" discs for rosettes (cut 2)
O rosette securing discs (for use without post;
cut 2 for each rosette)

2. Prepare the collar stacks by layering and gluing
together 8 shapes into a stack, taking care
to match up the interior hexagon opening edges
as precisely as possible.

Use a flat weight object such as this fabric-covered
re-purposed free weight to flatten the stack
while it dries thoroughly (this may take a few hours)
to avoid warping and curling due to the liquid
adhesive.

3. Prepare the main upper dome shape by bending
back on all panel edge and tab perforation lines.

4. Bend the first two wedge sections inward slightly
to bring the left straight edge of the middle segment
to overlap and align with the adjacent segment's tab
perforation line, and glue in place.

the upper segment of the two-part seam.
6. Repeat the process to complete the two-part seams
all along the upper dome section.

7. For the final seam, the dome opposite edges
are brought together to overlap and join each
of the three-part seam edge to tab perforation lines.

8. Bend the top tabs inward, bend octagonal "lid"
into position, adjust the edges to match up with
the perforation lines, and glue each edge to
corresponding tab.

9. Position and attach one of the collar stacks
on the underside of dome lid, taking care to
match up the hexagon opening edges as precisely
as possible. Use a weight if possible during
the glue-drying process.

10. Prepare the main and multiple bottom dome
wedge shapes by bending back on all panel
and tab perforation lines.

11. Begin by aligning the upper (in this image) section
of main and regular wedge segments in a similar
manner to the upper dome, overlapping the straight edge
to the opposite perforation line, aligning ends of
the "segment" accurately, then gluing in place.


12. Complete the final seam in
the same way, then . . .

. . . bend tabs inward, bottom "lid" into place,
adjust and glue in place.

13. Position and attach the bottom hex-opening
"cover" to bottom of dome
(the circle opening was originally included to provide
finger tip access that might be convenient to
the interior of the dome), then . . .

. . . position and attach the collar at the lower dome
hex opening as for upper dome.

14. Prepare the carrot nose shape by first
identifying the bottom tab with the symbol cutout.
Bend back on each of the wedge panel edges
and side flange tab.

15. Form the shape into a cone to overlap
the side straight edge over the opposite tab
to the perforation line, and glue in place.
NOTE it may be helpful to insert a pointed rod tool
such as a knitting needle into the cone to help
provide a "press-against" surface during
the seam gluing process.

on front of upper dome, then bend inward
and glue in place to the inside of the head panel.

to insert the two tabs into corresponding slots, then
bend tabs outward and glue in place to dome backside.

flanges inward slightly on the pairs of parallel
perforation lines.
Insert the octagon center into the upper dome
opening . . .

. . . and ease it evenly into position so that
the dome lower straight edge aligns at the
rounded flange section perf lines all around.
Glue in place.

20. Urge the exposed flanges of the reinforcement
disc outward as far as possible, apply glue to
outward faces of each, then position the lower dome
with panel side seams aligned, and slide it into
position, then hold and apply gentle pressure all around
to secure the two dome halves together securely.

21. Bend the ends of the smile shape back slightly
at the two dash cuts, then position approx. a scant
1.25" below the dome-to-dome-seam, centered
with the dash cuts aligning at the panel seams,
and glue in place.
NOTE: it you plan to apply cheek "rouging",
complete that prior to attaching smile.

22. Layer the offset eye underlays on the back
of each eye front (black), and glue together.

23. Plan the positioning of the eyes pair, with
pupil punch cutouts inward, then hold in place while
marking where a slight bend will help the eye shape
wrap slightly at the seam.

then bend the unit slightly at line.
(Repeat for both eyes.)

25. Prepare the post tube shape by carefully
bending back on each long perforation line.
Also bend the bottom attachment tabs outward.

a press-against surface, bringing the straight edge
to overlap the opposite flange to perforation line,
and applying roving pressure up and down the
seam until it is accurately aligned and secure.

27. Slide the tube so that top plain end and dowel
end are even, then . . .

. . . mark the location of the bottom end
of the post tube, with the bottom tabs bent away.
Remove dowel and cut to size as the mark.

bend back the end tabs and attach to the disc underside.

29. If not already in place, insert the dowel into
the post tube, apply glue near the ends before it
is fully in place, then slide in completely to
attach tube to dowel.

30. Prepare the rosette pleated strips by folding
in accordion fashion.
Recommended: fold the bottom rosette and top rosette
in "opposite" directions.
Bottom - "valley" fold at scallop curve center
(begin with end tabs bending back)
Top - "mountain" fold at scallop curve center
(begin with end tabs bending forward)
This will help them not slide together as easily.

31. Join the pleat strips together using end tab,
and then form a ring to join the second set of ends.

32. Place pleating ring outer tips down around
the post and disc assembly.
Apply quick-grab glue around the base
of the post, then quickly . . .

. . . gather the pleating inward by compressing
the pleats into folded position . . .

. . . concentrating on the inward pleating end,
to push it inward and downward until pleats
are evenly spaces around the hex post
and are held in place by the glue.

Continue to push inward all around the rosette
until secure.

on top of the bottom rosette.

34. Repeat the rosette forming process from step 32
to position and attach the upper rosette around
the post, on top of the bottom rosette.

35. Thread the snowman head onto the post end
and slide downward, fishing the post around as
necessary to fit the post end through the interior
reinforcement disc, then . . .
. . . pause to apply quick grab glue to area
beneath head on top rosette where they will meet . . .

through to the top opening, pausing
with the thickness of the collar inside still visibly
so that . . .

. . . glue can be added to that thick edge,
before sliding the tube completely through to be
flush with the top "lid". Hold in place until secure.

36. Position and attach the top "cover" octagon
to match main head edges and cover the hex opening.

NOTE that the snowman head can be displayed
on the "Candle Stand Display" project.

37. To add the Bow 3D Wavy Lattice Overlay
to the snowman, cut and prepare the smaller bow tie
as described in that tutorial.
Then, as the head is joined to the rosettes stack,
insert the stem extensions between head and
top rosette and attach.

the Top Hat 3D Snowflake Trim Mini
design as shown here.

The ensemble is shown here with
the Reel 3D Fancy Box Stand as a base.

No comments:
Post a Comment