
Is someone’s Halloween too spooky?
Present a
nylon pouf (or festive popcorn ball)
and suddenly prospects might not seem so
grim!
Spider “body” ring made thick by layering shapes
has eight legs slotted
around edge,
with fold up eyes at front.
Arch phrase asks the question,
and
word art “Pouf” (a twist of “poof”) suggests
a bubble bath might make worries disintegrate
–
briefly, at least! Ring measures 4.3” across interior.
Spider measures
approx. 10” wide x 5.75” tall x 5.5” deep.
ASSEMBLY: 1. Identify and cut the shapes:
A pouf ring (3 to layer for thickening & strength)
B pouf ring top layer with eyes extension
D long leg (4 sets of 4 each to layer)
E short leg (4 sets of 4 each to layer)
F eyes contrast overlay (with opt. reverse shape)
G arch plain edge whole support or
halves to glue onto one whole support
(equiv. of 3 whole layers total)
NOTE: halves provided to maximize paper usage.
H arch support with lettering position guide edges
I Spooky Halloween? welded word cutouts
(trim off the question mark symbol if preferred,
then center the two words on plain edge arch)
J & K poof cloud base and accent front
L "POUF!" words base and letter overlays

to dry, including all 8 legs, by stacking and gluing
together, taking care that ALL cut edges are aligned
as precisely as possible, - particularly the slot edges.

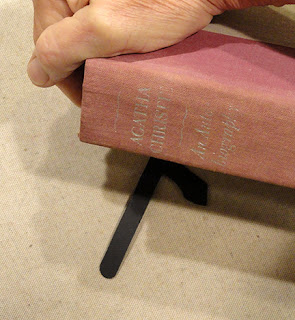
a heavy flat object such as this thick volume.
Consider placing other heavy (non-flat) objects on top
to assist with pressing, which helps prevent warping
or curling. Press until glue is completely dried, which
may require hours or over-night.
aligning cut edge and slot edges as precisely
as possible.
 5. Position the top layer (which includes the eyes
extension) on top of rings stack, and attach in
place, then press until thoroughly dried.
 6. Position and attach the (front) eyes contrast shape
onto the underneath surface of the eyes ring, then . . .

eyes shape as well. Press until dried.
 7. Apply glue to the panel between ring and eyes . . .
 . . . then bend that panel back to attach it to the top
ring surface. NOTE that the eyes should be able
to stand more or less perpendicular to the ring.


8. Layer and attach the arch shapes into a stack.
The sample project arch was composed of a whole
base (back) layer with two pairs of half arches
positioned and attached on top of the arch.
9. Position and attach the front arch layer, in this case
the one with the lettering guide edge. Then . . .

. . . position and attach the Spooky welded word onto
the arch where the letter shape extends above
the left half of arch edge to show where the 'S' goes . . .

. . . then position the Halloween? on the right half
where the edge guide shows the top of '?' goes.
Also position the bottom arch edge of letters along
an imaginary visual line parallel to the inside arch
edge as shown. Glue in place where words touch arch.
Press the arch under flat weight until thoroughly dried.

10. Position and attach the accent cloud on top of
the base shape with tiny offset edge all around.
NOTE that the spikey action marks should more or less
align to give the feeling of explosion. If the spikes
at shape edges seem too fragile, consider cutting
a second base shape to glue to backside of front
cloud shape.

11. Position the individual characters on top of
the base POUF! shape and glue in place.

12. Position the POUF! assembly on top of the cloud
at center as shown. NOTE that the side edges of
word characters should overlap the inward points
of action marks where acute angle cutting may
not be as neat as would otherwise be desired.

13. Complete the final assembly.
NOTE that arch, body and leg slots may have
a tight fit that does not require gluing in place
depending on the card stock thickness used.
Otherwise, neatly apply glue inside slot(s) to
attach in place.
A) Position and slot one side of arch assembly
arm into place, then . . .

. . . gently flex to allow the second side slots
to fit together and attach.

B) Position and attach four legs on each side of
ring body, alternating long and short legs evenly . .

. . .as preferred, and push slots together completely;
glue in place if needed.

C) Squish and manipulate the nylon bath scrubber
to come up under the body ring, and have body ring
hold it securely at about the equator mark.

D) Prepare the backside of POUF! cloud assembly
to stay in place on the nylon pouf by using some kind
of temp adhesive. Here clear foam squares are
positioned and attached in a series. Then . . .

. . . position the assembly between arch and front eyes
and do what can be to attach in place.

Here is the completed Spider Pouf gift.

No comments:
Post a Comment