
Cheery
and unique card with dimensional bee
can be used to convey “hello”, “get well”,
“congratulations”
or “hoping for better times” encouragement.
Front panel includes two
decoration options,
either hand cross-stitched with embroidery floss,
or with
overlay that simulates the stitching.
Slots accept the dimensional bee hull
tabs.

Bee includes semi-transparent wings with optional
heavy thread stitched
vein detail, overlay stripes and tail.
‘Bee’ and ‘Happy’ words suggest sampler
stitching,
with floral decorations complete front decoration.
Sentiment panel also included for card interior.
ASSEMBLY: 1. Identify and cut the shapes:
A accent front with bee body slots (and opt. stitching holes)
B faux cross-stitch overlay panel
C card base with vertical perforation fold
D interior sentiment panel
E bee body hull F bee eyes and antennae
G bee head overlay, body stripes, tail overlay
H bee over wing and under wing
I "Bee Happy" individual letters
J letters base positioning guides (cut to match A)
K upper floral accents with bud overlays
L lover floral accent with bud overlays

panel on the front of the card's front accent panel.
(Skip through the real stitching instructions which
follow in steps 3-4.)
 3. If the alternative real stitched panel is being made,

cut the appropriate stitching hole punched front panel
and use the end of a bent-straight paper clip to push
through and remove any waste punch "chads".
4. Assemble stitching materials:
6-ply cream floss; 24 or 26 gauge tapestry (blunt) needles.
NOTE: the stitching is completed using 3 separated plies.
Match up ends, fold in half to be 6 plies.
Thread the ends (or the loop) through the needle eye,
then pull through so that the loop is the long end,
and the short end that extends approx. 3-4 inches
past needle eye.

4. Study the following stitching illustration.
NOTE that the first "leg" of each cross stitch should be
created with the SAME directional slant. In the illustrations,
this is the 'right' slant.
Second stitches are all made in the LEFT slant.
(FOR THIS PROJECT the cross stitches have a stitch SPACE
in between each stitch, not consecutively stitched as shown here.)

from backside UP, through the first hole of second row.
 B) Pull the thread through until there is a short loop

still remaining below the panel.
C) Insert the needle down through the second hole
of the bottom row, forming the left to right stitch
of the first 'X'.
 D) Pull the thread through, then pass the needle

through the end loop . . .
 . . . and pull the thread up taut. (This is the "anchor"

for the first thread run.)
 This image shows the anchor stitch from the backside.
 E) Begin the next cross stitch - specifically spaced for


this project's design - by moving one stitch to the left
to bring the needle up through third hole of the second row.
 F) Insert the needle down through 4th hole

of first row, to complete the right slant of the second
cross stitch.
G) Continue in this pattern to create the first leg of
all the stitches across the bottom 'row', skipping one
stitch space so that stitches will be spaced.
Here is the first row completed with right slant only.
 H) Insert the needle up through the FINAL hole of

the second row, then down and left to complete
the 'left' slant stitch of the end cross stitch.
I) Continue in this manner to complete the 'X's
of the bottom row.
 J) When stitching reaches the left side of panel

and the first row of spaced X stitches are completed,
move upward to the next row, skip the first SPACE
and begin the first stitch in between the 1st and 2nd stitches
of the bottom row. Continue to complete right then left
stitches of the second row.
I) when loaded thread has been used up, with a short tail
remaining, pause the needle on the backside of work.
Insert the needle under a sequence of 2-3 stitches,
then pull the thread through, and remove the needle.
J) Clip the thread tail close to the surface.
K) Prepare next set of 3 plies (that become 6 plies),
anchor on with the next stitch in the pattern as shown
in steps A-D above. Complete the remaining stitches of pattern
(refer to the thumbnail at top of post as necessary),
tying off and attaching additional needle-loads 'til done.


5. Assemble the components for the floral and
letter/word details, composed of the shapes shown here,
by layering and gluing together:
A) 'pink' buds onto corresponding positions of
leaf/stem units;
B) sepal (bud leaves) onto bottoms of 'pink' buds;
C) 'Bee' and 'Happy' onto positioning bases guide shapes.

6. Locate the base "corner" guide marks cut into
the front panel that will help with positioning of
the word assemblies, then position and attach
each in the corresponding locations.

7. Position and attach the upper side bud stem
units on each side of bee slot locations,
and the lower bud assembly centered below
'Happy' word unit.

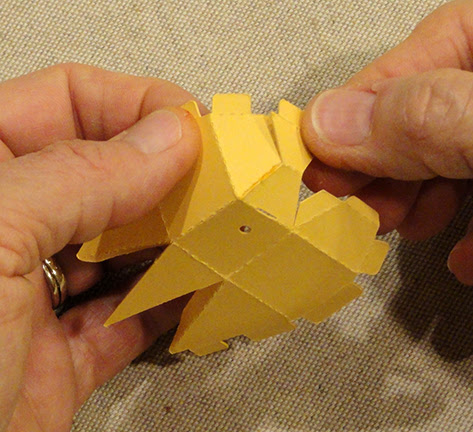
8. Prepare the body dome shape by bending back
on all perforations for body panels, segments and
inner wedge tabs, and forward for edge tabs.

9. Join head end seams by bending segments inward
to overlap head top side straight edge over adjacent
wedge tab to perforation and gluing in place.

10. Bend the snout head end panel downward so that
straight side edge overlaps the adjacent narrow tab
to perforation line, and glue seam.
11. Bend the top and side tail segments inward to
overlap tab and align straight edge at perforation line,
and glue seam.
12. Repeat steps 3-5 for the other side of body.

13. Prepare the body accent, stripes (body top stripe
not shown here; see step 12), and tail/stinger overlay by
bending back of all perforation lines.

14. Prepare the head overlay shape by bending
back on all perforation lines for segments and
narrow wedge tabs at upper sides.

15. Complete each of the two upper side seams
by overlapping the inward straight edge across
the wedge tab to perforation and gluing in place.

16. Apply glue to the underside of the head overlay
then position over head end area of body dome
align perforations and edges, and glue in place.

17. Position and attach the top body accent, aligning
punch hole, front edges with body perforation lines,
and contour perforations.

18. Position and attach the top body stripe on
the adjacent dome panels at panel edges.

19. Position and attach the tail overlay where it
fits the body contours and edges, then . . .

. . . position and attach the mid stripe halfway
between the upper body stripe and tail overlay.

20. Insert antennae tab through head slot, then . . .


21. Position and attach eyes forward on
side head panels.

22. Prepare the underwing by partially bending along
the medium length perforation lines. This will give
the wings assembly some shape and "lift".

(Follow these next steps ONLY if adding stitching
detail to the optional punch holes wing shape.)
23. A) Study the following stitching detail illustration
that indicates where the stitching thread will connect
punch holes. NOTE that the semi-transparent vellum
that is recommended will allow thread passes on
the underneath side to be slightly visible from face side.

B) Refer to the following stitching hole numbered diagram
as the following stitching steps are described.

C) Thread a 20" length of button thread (thicker) on
a sewing needle that will fit through the stitching holes.

D) Hold a short tail on top of the wing at the center
brad hole, then insert the needle DOWN through base hole #1,
at bottom of array, and pull thread through.

E) Stitch UP through hole #3, then DOWN
through hole #2 to complete the first "stitch" line.
Pull up thread completely between each stitch
insertion, then finger press thread to encourage it
to stay straight, flat, and avoid loopy-ness that shows
through wing.

F) Stitch UP through hole #4, then DOWN through
hole #2.
G) Stitch up through hole #5, then . . .

. . . DOWN thru hole #6; UP thru hole #5,
then DOWN thru hole #7; UP thru hole #5;
DOWN thru hole #8.
H) UP thru hole #9, then . . .

. . . DOWN thru #8; UP thru #10; DOWN thru #8
I) UP thru #11.

J) Complete the center stitching by stitching DOWN
thru #8, UP thru #5, DOWN thru #2.

K) Complete the first wing stitching run by returning
needle and thread UP thru center punch hole.
L) Repeat steps D-K to complete stitching on second
wing. With thread tails at center, apply a dab of glue
to secure them neatly near center hole. Wait until
glue dries, then . . .

. . . trim excess even with top edge of wing.
(NOTE: tails should be further secured and hidden
by wing-to-body brad insertion.)

24. Layer over wing atop under wing, center
with brad punch holes aligned, adjust for balance,
then secure in place with a dab of glue near punch hole.
25. Position wing assembly over body assembly
so that holes align, then insert a black nail head brad
through all layers, and bend prongs back on inside
of body dome.

26. Position the bee hull assembly over the front card
panel with tabs aligned at corresponding slots,
and insert tabs through slots.

On backside of panel, bend tabs outward
(taking care that each is worked through the slot
fully so that perforation line aligns at slot edge),
and glue each in place.

27. Prepare the front card base by bending back on
vertical center perforation line.
Open, then position (centered) sentiment panel on
inside back panel and attach in place.

28. Position the front panel centered over front portion
of folded card base, and attach in place.

Here is the completed card.

That is so stinking cute! I love it!
ReplyDeleteReally enjoyed putting this card together and really liked the the final product- Thank you so much!
ReplyDelete