
An array of "natural" sprigs -
all made out of card stock paper -
can be built and used to adorn unique gift box or
create festive home decoration projects.
Elements included are (clockwise from upper left)
evergreen sprig, cedar sprigs, ponderosa sprig,
boxwood sprig, and miniature pine cone.

Shown here is a centerpiece tray with
narrow 3D LED candles that includes
all of the elements shown above
(plus some additional embellishments of
teardrop and globe berry pick wires,
curly twigs and woven ribbon bow.)
More assembly details can be found in another post
in this blog, by following this LINK .
Each element will be shown in the assembly steps
in order this tutorial:
Boxwood sprig: Step 1
Evergreen sprig: Step 9
Ponderosa sprig: Step 19
Pine Cone: Step 23
Cedar sprigs: Step 35
BOXWOOD SPRIG
1. Identify and cut the shapes for one sprig:
stem shape (3)
lead, middle and half end strips
(for shorter sprig, omit the half strip)
 2. Layer and stack the 3 stem shapes,
and glue together.
 Consider placing the stack
under a flat heavy object while the glue dries
to help prevent curling or warping.


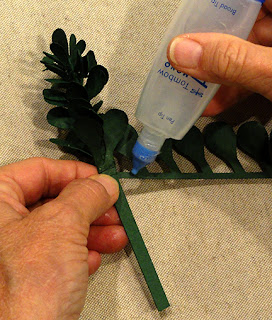
 6. Apply glue to the face strip for a 1-2 inch length
ahead of the part of strip already attached,
then begin to wrap and attach the strip to the stem,
working in a very shallow spiral direction so
that the leaves offset downward slightly.

the wrapping continues.
 8. Continue the spiral wrapping until
all of the leaf strips combined length
is attached to stem. NOTE there should be
an inch and more of stems that remain
unwrapped as the attachment step.
Exposed stem end can be trimmed
shorted as project and attachment needs
required.


 10. Layer and stack the 3 stem shapes,
and glue together.
Consider placing the stack
under a flat heavy object while the glue dries
to help prevent curling or warping.


 15. Add glue to the base strip a little ahead
of the current wrapping, then wrap the needles
strip snugly around the stem so that 1 or two circuits
wrap pretty much on top of previous, then . . .
 . . . angle downward slightly in spiral formation,
then complete 1-2 wraps in place similar
to previous in-place wraps.

 17. Shape the needle by curling outward with
use of a stylus shaft or equivalent.

 18. If desired, use acrylic decorative paint
and tiny paint brush to add white paint
to needle tips in random fashion.

PONDEROSA PINE SPRIG
19. Identify and cut the shapes:
stem shape (3)
needles strip
1. Identify and cut the shapes for one sprig:
stem shape (3)
lead, middle and half end strips
(for shorter sprig, omit the half strip)

and glue together.

under a flat heavy object while the glue dries
to help prevent curling or warping.

3. Shape each of the boxwood leaf extensions
by pressing the center face of each in a circular path
while the leaf extension is on a padded surface.
NOTE: the model shown here is being shaped
by the largest ball tip stylus with a shaping mat
by McGill.

4. Place the strips in connecting order,
then overlap the base strip portion of strips to be
joined and glue together, keeping the strips level
and in line.

5. Begin by positioning the top lead leaf face inward
over the lobe top end of the stem unit, and gluing
in place. Hold until glue is secure.

ahead of the part of strip already attached,
then begin to wrap and attach the strip to the stem,
working in a very shallow spiral direction so
that the leaves offset downward slightly.

7. Continue to wrap as tightly as card stock strip
will allow, adding more glue to the strip asthe wrapping continues.

all of the leaf strips combined length
is attached to stem. NOTE there should be
an inch and more of stems that remain
unwrapped as the attachment step.
Exposed stem end can be trimmed
shorted as project and attachment needs
required.

When winding is complete, and glue
mostly secure, work through the strata
of leaves and twist or otherwise adjust
for the best presentation.

EVERGREEN SPRIG
9. Identify and cut the shapes:
pointed stem shape (3)
spiky needles shapes: lead strip, middle strip shown.
For long sprig, add the half end strip too.

and glue together.
Consider placing the stack
under a flat heavy object while the glue dries
to help prevent curling or warping.

11. Identify the lead strip which has no attachment strip
"tab" at the left end, and lead needles are
shortest of all three strips.

12. Overlap and join strips to form a single length.

13. Add outward curl to the needles along
the attached strip by using a stylus shaft pressed
to finger while sliding tool back and outward
across needle top half.
NOTE curling will progress quickly if three or four
needles are held on stylus shaft at the same time,
then moving on to next set, etc.

14. Line up the lead end needle over the matching
top tip of the stem unit and glue in place.
Allow to dry until secure.

of the current wrapping, then wrap the needles
strip snugly around the stem so that 1 or two circuits
wrap pretty much on top of previous, then . . .

then complete 1-2 wraps in place similar
to previous in-place wraps.

16. Continue in this pattern, adding adhesive for 1-3 inches,
then angling downward slightly
to wrap in place, until the strip of needles has been
completely wrapped and attached to stem.
Secure the end in place.

use of a stylus shaft or equivalent.

Needles can be further shapes by
"fluffing" downward throughout sprig.

and tiny paint brush to add white paint
to needle tips in random fashion.

PONDEROSA PINE SPRIG
19. Identify and cut the shapes:
stem shape (3)
needles strip

20. Layer and glue the three stem strips together.
Consider pressing under a flat heavy weight
until adhesive is completely dried.

21. Position the lead petal over the top of stem
strip unit with tips aligned, and glue the base
of strip needle to stem.

22. Add glue to strip, wrap the needles strip
snugly around the stem
in stacked fashion for 1-2 wraps, then . . .

. . . add glue to another section of the strip . . .

to overlap to center of previous wraps,
and wrap again for 2 circuits or so.
Continue to wrap, then adjust downward,
wrap, etc., until entire needles strip is attached.
Securely attach the end to the stem.

Here is the completed ponderosa sprig.

23. It is important to add the tiers to the triangle
stem in correct order, so compare the cutting
mat arrangement to the program screen
while removing them and carefully organize
each pine cone set in order.
 NOTE each tier has
a center triangle opening (shape 2)
or a triangle perforation and cut arrangement
the determines its rotation and offset position on the stem.
This image of petal shapes, using #7 and #8 as examples
will demonstrate this.
SHAPE #7: triangle points at middle of top petal
SHAPE #8: triangle points between top two petals
If the tiers get out of order, checking the orientation
of the center triangle array may help to get them
back into correct order.

24. Prepare the center stem unit by bending back
on vertical perforation lines, and bending
triangle tabs on "handle" end inward.
 Also use stylus or similar tool to add
a little backward curl to the end tips
stem in correct order, so compare the cutting
mat arrangement to the program screen
while removing them and carefully organize
each pine cone set in order.

a center triangle opening (shape 2)
or a triangle perforation and cut arrangement
the determines its rotation and offset position on the stem.
This image of petal shapes, using #7 and #8 as examples
will demonstrate this.
SHAPE #7: triangle points at middle of top petal
SHAPE #8: triangle points between top two petals
If the tiers get out of order, checking the orientation
of the center triangle array may help to get them
back into correct order.

24. Prepare the center stem unit by bending back
on vertical perforation lines, and bending
triangle tabs on "handle" end inward.

a little backward curl to the end tips

Also use the end of a tool such as this spatula
to press downward to open up the triangle & tabs
array at center of shapes 3-13.

25. Form the stem into a triangle tube to
overlap the lead "handle" edge over
the flange tab opposite, and glue the seam.

Add adhesive between the two "handles"
to align and attach them together.

cover the tube top opening,
and glue in place.

26. Prepare the add-on stem shape by
bending the end tab forward/under, then . . .

. . . position the add-on shaft over
the previously-attached "handles", with
the bottom tab resting on the triangle tab
"platform", and glue handle and end tab
in place.
NOTE that in this image, the add-on strip
needs to get rotated 180 degrees so that
the end tab faced away from the main stem.

Attach add-on shaft to previously-attached stems.

of shapes 2-5.
Position tier #2 face up below the stem tip,
aligning the triangle shaft
with the triangle opening . . .

. . . and slide the tier up as far as possible to rest
just below the handles spread of bulb shaping.
NOTE the bottom tab of add-on handle shape
will help with positioning by acting as a "stop".
Add a bit of adhesive around underside at
opening edges to help attach this shape to stem.

28. Continue to add tiers #3 and #4.
29. Prepare the spacer strips by bending back
on perf cuts to form three-part bracket.

30. Position and attach the spacer strip to hug
the stem right next to the previously-positioned
tier shape. Hold in place until securely attached.

31. Add curl to each "petal" of the remaining tier shapes,
using a stylus (shown) or similar tool.

perf lines at base.

32. Add the remaining tiers in order onto stem,
first applying a little adhesive around the top
of the previously-attached spacer strip bottom edge,
sliding the tier shape up snugly to the spacer strip.
As tiers are added, continue to encourage
a downward curl to petal shapes.

33. Prepare the tip shape by bending on vertical
perforation lines. Wrap the tip shape around
the end of the stem, snugly below tier #13,
and glue in place.

34. If desired, use a tool shaft to add a little
curl to the stem top end.

35. Become familiar with the various shapes
included in the Cedar Sprigs file.
Top row: short sprigs (cut from two green shades
for the Centerpiece project)
Middle row: left & right outward curve
Bottom row: straight center sprig

to be completed.
However, for more realism and "dimension",
use stylus shaft to add upward and downward
curl along the outer edge of shape,
in random order.

Here are the greenery shapes used
in combination for this seasonal centerpiece project.
For details of this project, go HERE.
Scroll past the centerpiece tray assembly steps
to find the layout of the elements used for
the centerpiece, and beyond for assembly details.

No comments:
Post a Comment