
Dimensional body hull is formed from
one panel
with wedge tabs and angled seams.
Tiny 3D ears attach at hull top,
with tummy accents
and detailed face.
Wing combined shape has "vein" edge overlays
and attaches to
the back hatch cover with brads.
Optional hex stub can be added to bottom panel
to allow Bat 3D Figure to sit atop
the Candle Stand 3D for Display project.
Measures
approx. 4.125" wide x 2.5" deep x 4.75" tall
with 10.75"
wing span.
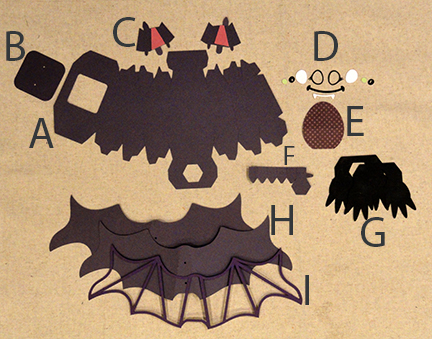
ASSEMBLY: 1. Identify and cut the shapes:
A main hull body shape B back hull cover
C ears with contrast inner ear shapes
D facial features: eye overlays; eye whites;
pupils with contrast underlay show-thru;
E tummy overlay F opt. stub stem for candle display
G feet unit and build up layer
H wing base, duplicate layer for strength
I wing vein overlay (opt. back duplicate not shown)

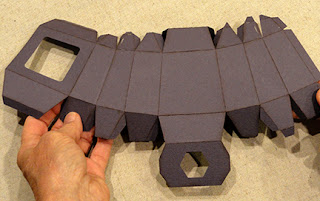 3. Form the hull into a tube to overlap straight
back side edge over corresponding long tab,
adjust for top to bottom alignment, and join seam.
 4. Bend the top sections inward to align each
straight seam edge over adjacent wedge tab
to perforation line, and join seams on both
left and right upper sides.

 . . . bend the "lid" panel into position to align
with back long tab perf line and join.
Adjust to position and join lid side edges
with corresponding side panel top tabs
across both sides.

 . . . and bending bottom panel into position
to align and join to bottom flanges.


 9. Bend top panel across to position and
attach tab on outside of opposite wall.

 11. Position each ear (outer lower edge slants down)
at top side of head and insert bottom tabs into
corresponding slots.
 On hull inside, bend tabs back and
glue in place to interior hull surfaces,
accessing tabs through hull openings.

 13. Form the stub into a tube to overlap straight
side edge over opposite tab and join seam.


 . . . then insert through bottom hex opening
and push through completely until hull opening
edges align at top tab perf lines, and glue tabs
in place on backside of hull bottom panel.

 17. Position (centered) over hull front with
perf line and hull bend angle, and attach in place.

 1) position "whites" under eye overlays and attach;
2) position and attach pupils over contrast underlays;
3) position teeth behind smile;
 4) position pupil units over whites and attach;


 21. If wing shape is doubled for strength,
align and attach now.

 23. Transfer the main wing shape bends at
perforation lines to the vein shapes
which also contain perf cuts to allow this.

 Position and attach decorative brads (or studs)
at punch holes.


 27. Position under hull with back and side edges
aligned with bottom panel edges,
and glue in place.
 If preparing bat with optional bottom stub in place,
slip the feet hex opening over the stubb
and glue in place.


 Also NOTE that this bat can be used
with the "Box 3D Ten Sided" design
in place of the "Cat 3D Head Model",
using the box top panel with the hex hole
opening as described in that project's tutorial
which can be followed HERE .

A main hull body shape B back hull cover
C ears with contrast inner ear shapes
D facial features: eye overlays; eye whites;
pupils with contrast underlay show-thru;
E tummy overlay F opt. stub stem for candle display
G feet unit and build up layer
H wing base, duplicate layer for strength
I wing vein overlay (opt. back duplicate not shown)
2. Prepare the main hull shape by bending back
on all panel, wedge tab and flange perforation lines.

back side edge over corresponding long tab,
adjust for top to bottom alignment, and join seam.

straight seam edge over adjacent wedge tab
to perforation line, and join seams on both
left and right upper sides.

5. Complete the final left and
right front seams, then . . .

with back long tab perf line and join.
Adjust to position and join lid side edges
with corresponding side panel top tabs
across both sides.

6. Repeat the wedge seam assembly around
bottom sides in similar manner, finally completing
the front side seams . . .

to align and join to bottom flanges.

7. Prepare the dimensional ear shapes by
bending forward at left and right perf lines
near center panel, bending top panel and tab
forward, side walls and bottom tabs back.

8. Position and attach inner ear shapes each over
center panel or corresponding ear.

attach tab on outside of opposite wall.

10. Bend each side wall back and attach in place.

at top side of head and insert bottom tabs into
corresponding slots.

glue in place to interior hull surfaces,
accessing tabs through hull openings.

12. Prepare the optional stub shape by bending
back on all panel and tab lines, except bend
the "straight" top tabs forward.

side edge over opposite tab and join seam.

14. Bend bottom wedge tabs inward to perpendicular,
then bend top "lid" panel down over them,
adjust for alignment and glue in place.

15. Insert stub through back opening . . .

and push through completely until hull opening
edges align at top tab perf lines, and glue tabs
in place on backside of hull bottom panel.

16. Prepare the tummy overlay by bending
back on perforation line.

perf line and hull bend angle, and attach in place.

18. Prepare the face features:

2) position and attach pupils over contrast underlays;
3) position teeth behind smile;


19. Position and attach eyes and smile
above tummy on front panel.

20. Prepare wing shapes by bending back
on perforation lines.
(NOTE this wing is shown from backside)

align and attach now.

22. Position contrast "vein" overlay onto front of
wings assembly, and optionally also onto back.

perforation lines to the vein shapes
which also contain perf cuts to allow this.

24. Align back cover shape face side to front face
side of wing assembly, with punch holes aligned,
and glue together ONLY the areas that overlap.
NOTE: cover panel in this image shows backside.

at punch holes.

25. Position the back cover with attached wings
over the hull opening, center side to side
and top to bottom over opening, and glue in place.
NOTE: quick grab glue such as Fabri-Tack or
hot melt glue is recommended to secure
wings and cover.

26. Layer feet shapes and attach together.

aligned with bottom panel edges,
and glue in place.

slip the feet hex opening over the stubb
and glue in place.

Here is the completed bat figure.

To use the bat with Candle Stand Display,
simply slot the bottom stub into the hex
recess of candle stand platform.

Shown here on stand.

with the "Box 3D Ten Sided" design
in place of the "Cat 3D Head Model",
using the box top panel with the hex hole
opening as described in that project's tutorial
which can be followed HERE .

No comments:
Post a Comment