Showing posts with label Bat. Show all posts

Thursday, October 7, 2021

Bat Flapping Wings Clothespin


Use a standard wooden “spring” clothespin 
(approx. 3.25” long x .5” tip height x .375” tip width) 
to build a miniature bat. 
Watch as its wings flap with the pin’s press-n-release action. 
The bat is fun by itself, even for school-age child’s fingers, 
but spookier when it can flap in front of 
the eerie halo moon background. 

Bat measures approx. 3.75” wingspan x 
1.5” body top to bottom. 

ASSEMBLY: 1. Identify and cut the shapes:
A body with ears (top layer)
B under body (with bend-over tip)
C wings main shape with center area perforation lines
D & E over wings left & right
F mechanism connector strip
G & H under wings left & right
I opt. moon base
J opt. eerie halo ring    
K opt. bat opening reinforcement ring
L opt. backside "handle"
2. Prepare under body by bending back at tip
perforation line. Then . . . 
. . . position on top of clothespin tip with sides even
with pin sides, and tip bend at pin ridge, 
and attach in place with
bend-over tip attached to front "nose".
3. Position and attach top body on top of
under body shape, tail and sides of each
matched, ears extending beyond pin front edge.
4. Prepare mechanism strip by bending back
at near-center perforations, and bend forward
at end tab perforations.
5. Identify the guide mark at top of head shape
which will assist in placement of mech strip.
Position strip under pin with center panel
perforations aligned at pin corners, AND . . .
. . . top edge aligned with guide mark on head.
(One way to check this position is to fold the strip
ends up along sides of pin where they can be
aligned at guidemark.)
Glue in place ONLY at bottom panel - side "arms"
of strip remain unattached.
6. Prepare the main wings shape by bending forward
on center pair of perforation lines, and bending
back on outward pair of perforation lines. 
7. Position the center of main wings over the center
of pin, with center perforations aligned at pin sides,
and top edge align just below guide mark. 
Turn the bat/pin face down to view the mech strip
to verify positioning of main wing: trip should
be aligned so that it would be hidden from TOP,
in bottom-up view surrounded top and bottom by wing.
Glue center portion in place on top of pin. 
8. Apply glue on wing top panel, then . . . 
. . . bend outward perforation folds in to meet
at center, and press (and hold) in place to
glue in place. Wings should still be able to bend
up to vertical position at the center "seam".
9. Position and attach the overwings on top of
corresponding wing, with slight offset at upper
an lower edges. NOTE that straight edges should
meet at centerline.
10. Bend the wings up to full vertical position with
faces touching. Bend mech strip up into position
on each side.
Carefully bend tip tabs back to apply glue,
then re-position and attach in place,
on each side.
11. Position and attach each underwing,
aligning cutout at inner edge around mech strip.
Bat is now completely assembled, so flapping action can
be produced by pressing on pin tails:
left - closed with wings together vertical
center - half pressed with wings half open
right - fully pressed with wings full open.
12. Assemble the optional moon backdrop by positioning eerie 
halo ring shape within edge of moon base.
(NOTE the sample project moon has been highly
shaded and accented with distress ink.)
Also position and attach the hole reinforcement ring
on backside with inner hole edges aligned precisely.
13. Prepare the optional handle by bending back
 on center perforation, and forward at end tabs.
14. Apply glue to one of the half panel inside surface,
then fold together, align cut edges, and press
until fully attached in place, as shown, with tabs
extended.
15. Position and attach the handle toward the top
of moon backside, on side where most convenient
for non-dominant hand.
16. To insert the bat into position in front of moon,
compress pin clips and slide through cutout hole,
then release when moon edge is approx. at
pin spring position.
Operate the bat's flapping motion from behind moon.
Here is a view from above.

Sunday, October 14, 2018

Bat Chunky 3D Figure


Dimensional body hull is formed from one panel 
with wedge tabs and angled seams. 
Tiny 3D ears attach at hull top, with tummy accents 
and detailed face. 
Wing combined shape has  "vein" edge overlays 
and attaches to the back hatch cover with brads. 
Optional hex stub can be added to bottom panel 
to allow Bat 3D Figure to sit atop 
the Candle Stand 3D for Display project. 
Measures approx. 4.125" wide x 2.5" deep x 4.75" tall 
with 10.75" wing span. 

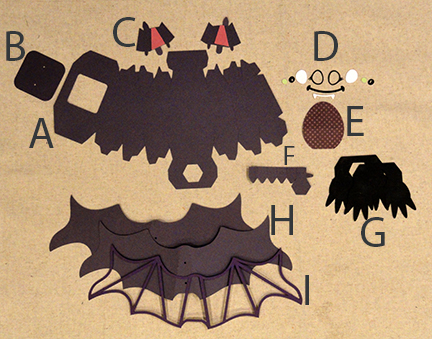
ASSEMBLY: 1. Identify and cut the shapes:
A main hull body shape   B back hull cover
C ears with contrast inner ear shapes
D facial features: eye overlays; eye whites;
pupils with contrast underlay show-thru;
E tummy overlay   F opt. stub stem for candle display
G feet unit and build up layer
H wing base, duplicate layer for strength
I wing vein overlay (opt. back duplicate not shown)
2. Prepare the main hull shape by bending back
on all panel, wedge tab and flange perforation lines.
3. Form the hull into a tube to overlap straight
back side edge over corresponding long tab,
adjust for top to bottom alignment, and join seam.
4. Bend the top sections inward to align each
straight seam edge over adjacent wedge tab
to perforation line, and join seams on both
left and right upper sides.
5. Complete the final left and 
right front seams, then . . .
. . . bend the "lid" panel into position to align
with back long tab perf line and join.
Adjust to position and join lid side edges
with corresponding side panel top tabs
across both sides.
6. Repeat the wedge seam assembly around
bottom sides in similar manner, finally completing
the front side seams . . . 
. . . and bending bottom panel into position
to align and join to bottom flanges.
7. Prepare the dimensional ear shapes by
bending forward at left and right perf lines
near center panel, bending top panel and tab
forward, side walls and bottom tabs back.
8. Position and attach inner ear shapes each over
center panel or corresponding ear.
9. Bend top panel across to position and
attach tab on outside of opposite wall.
10. Bend each side wall back and attach in place.
11. Position each ear (outer lower edge slants down)
at top side of head and insert bottom tabs into
corresponding slots.
On hull inside, bend tabs back and
glue in place to interior hull surfaces,
accessing tabs through hull openings.
12. Prepare the optional stub shape by bending
back on all panel and tab lines, except bend
the "straight" top tabs forward.
13. Form the stub into a tube to overlap straight
side edge over opposite tab and join seam.
14. Bend bottom wedge tabs inward to perpendicular,
then bend top "lid" panel down over them,
adjust for alignment and glue in place.
15. Insert stub through back opening . . . 
. . . then insert through bottom hex opening
and push through completely until hull opening
edges align at top tab perf lines, and glue tabs
in place on backside of hull bottom panel.
16. Prepare the tummy overlay by bending
back on perforation line.
17. Position (centered) over hull front with
perf line and hull bend angle, and attach in place.
18. Prepare the face features:
1) position "whites" under eye overlays and attach;
2) position and attach pupils over contrast underlays;
3) position teeth behind smile;
4) position pupil units over whites and attach;
19. Position and attach eyes and smile
above tummy on front panel.
20. Prepare wing shapes by bending back
on perforation lines.
(NOTE this wing is shown from backside)
21. If wing shape is doubled for strength,
align and attach now.
22. Position contrast "vein" overlay onto front of
wings assembly, and optionally also onto back.
23. Transfer the main wing shape bends at
perforation lines to the vein shapes
which also contain perf cuts to allow this.
24. Align back cover shape face side to front face
side of wing assembly, with punch holes aligned,
and glue together ONLY the areas that overlap.
NOTE: cover panel in this image shows backside.
Position and attach decorative brads (or studs)
at punch holes.
25. Position the back cover with attached wings
over the hull opening, center side to side
and top to bottom over opening, and glue in place.
NOTE: quick grab glue such as Fabri-Tack or
hot melt glue is recommended to secure
wings and cover.
26. Layer feet shapes and attach together.
 27. Position under hull with back and side edges
aligned with bottom panel edges,
and glue in place.
 If preparing bat with optional bottom stub in place,
slip the feet hex opening over the stubb
and glue in place.
Here is the completed bat figure.

To use the bat with Candle Stand Display,
simply slot the bottom stub into the hex
recess of candle stand platform.
Shown here on stand.
Also NOTE that this bat can be used
with the "Box 3D Ten Sided" design
in place of the "Cat 3D Head Model",
using the box top panel with the hex hole
opening as described in that project's tutorial
which can be followed HERE .