
Here's a Halloween project with a vintage feel -
at least that was the aim, geared to the experienced crafter.
Dimensional black cat head (model is grey-ish instead) is a box
that has dimensional ear and cheek add-ons,
with side extensions, layered eyes, tongue and whiskers.

a colorful ribbon bow tie dresses him up.
A rounded-tip pleat rosette serves as its base.
(Lid optional shapes included with hex cutout
to accept the cat head neck post end,
as alternative without rosette.)
(Lid optional shapes included with hex cutout
to accept the cat head neck post end,
as alternative without rosette.)

Below, a ten-sided "round" box with lid acts
as the cat's base. Box has optional doily for lid,
with accents for lid rim and box sides.
Measures approx. 5.5" tall x 4.5" wide
x 3.125" deep.
NOTE: If you purchased and downloaded this design
from Silhouette America or SnapDragon Snippets
prior to 9-28-2018, you will need to
RE-DOWNLOAD
the corrected copy.
NOTE: If you purchased and downloaded this design
from Silhouette America or SnapDragon Snippets
prior to 9-28-2018, you will need to
RE-DOWNLOAD
the corrected copy.
ASSEMBLY: 1. Identify and cut the shapes:
A main hull head shape B trap door cover
C outer ears left and right
D inner ears left and right
E neck post with closed bottom
F neck post interior support rectangle frame
G neck post interior support struts (2)
H alternative neck post shape with open bottom
with bottom opening cover (use with box lid,
without rosette)
I dimensional nose
J check "cups" left and right
K jowl extensions
L layered nose accents
M eyebrows left & right
N eye assembly left and right
O tongue
P rosette pleated strips (2)
Q rosette centers (2)
 BOX SHAPES:
R lid main shape S lid rim strips (2)
T lid rim accent shapes (5)
U lid offset accent V lid doily shape
W base bottom ('X' at center)
X base outer bottom (tiny notch at edge)
Y base side wall strips (2)
Z side wall accent strips (5)


 . . . until the front/bottom panel segment is
positioned . . .


 7. Form the neck shape into a tube to overlap
straight edge over opposite tab to perf line
and glue seam.


 B) bend the rectangle frame back on all vertical
perf lines to form the frame, then overlap end
over opposite tab and glue the seam.
C) insert the 'X' struts corner-to-corner
inside the frame, and . . .
 . . . push together until all top
and bottom edges of all are even.
 11. Insert the support unit into the neck post
interior between two parallel walls . . .

 12. Prepare the insert the neck post into the bottom
of the head assembly by applying adhesive to
the face side of the bottom tabs.

 . . . insert bottom end out through hex opening,
and push completely through to tabs.
Glue tabs in place on the interior bottom panel.

 14. Bend top wedge tabs inward, bend top "lid"
down over tabs, adjust so that perf lines/bends
line up with lid edges, and glue in place.


 Insert tabs into corresponding slots, then . . .


 A) orient the eye main base shape with
perforation line roughly vertical, narrowest portion
outward, and bend back on perf line.
 B) position and glue pupil circle, centered, over
eye base circle, and transfer the perf bend to it.
 C) layer together: lid accent over lid base;
nose accent over nose accent base;
eye slit with highlight over slit base

 E) attach eye slit assembly centered below lid


 26. Position the nose assembly over front of head
so that tabs can insert into the slots, then push
tabs all the way through . . .


 28. Bend the eyebrow at perf dash, then . . .
 . . . position over eye assembly, with bend over
head ridge, and glue in place.


 C) use darning needle tip to pre-punch a hole
through all layers behind the cheek shape;
D) insert needle point through head trap door
and through one of the whisker holes . . .
 . . . and pull all the way through until knot catches
behind face.
 E) trim whiskers roughly to size; final trim comes later;
F) repeat for all whisker holes on both sides of face;


 34. Form the long strip into a ring to bring free ends
together and complete second seam.

 . . . pleats are as tightly narrowed as possible.
Hold in place . . .

 . . . attach cover circle, then continue to force
pleats inward to smallest circle possible,
with evenly spaced pleats, until glue cools
and circle is secure.
 On backside, apply more hot melt glue to
attach backside circle cover.

 37. Align side edges of the two panels to
overlap the straight edge (shown on right here)
over the side flange tab opposite to perf line,
adjust for top-to-bottom alignment, then glue seam.


 Identify the interior box bottom panel by
locating the small 'X' cut into the center.
 Add glue to the inside face of each of the bottom
tabs, then . . .

 Apply finger tip pressure along each edge until
the bottom panel is securely in place.
 41. Position and attach the outer bottom panel
(with notch) on the bottom of the hull to conceal
the tab construction.

 43. Prepare the hull side accent shapes by
bending each back at the vertical perf line.


 46. Join the two sections by attaching ONE end
in similar manner as for hull walls.


 49. Bend the rim side tabs back inward and
glue each in place.


 52. Position and attach the doily accent shape.


 Or, for a more integrally connected head,
the cat can be built with the tab-bottomed neck
(at this point in assembly, the neck would be
attached to head; this is intended as
demonstration only).
The neck post bottom tabs would be inserted
through the hex cutout opening . . .

 Conceal the post opening by placing the circle shape
over the tabs and opening, attaching in place.


A main hull head shape B trap door cover
C outer ears left and right
D inner ears left and right
E neck post with closed bottom
F neck post interior support rectangle frame
G neck post interior support struts (2)
H alternative neck post shape with open bottom
with bottom opening cover (use with box lid,
without rosette)
I dimensional nose
J check "cups" left and right
K jowl extensions
L layered nose accents
M eyebrows left & right
N eye assembly left and right
O tongue
P rosette pleated strips (2)
Q rosette centers (2)

R lid main shape S lid rim strips (2)
T lid rim accent shapes (5)
U lid offset accent V lid doily shape
W base bottom ('X' at center)
X base outer bottom (tiny notch at edge)
Y base side wall strips (2)
Z side wall accent strips (5)

2. Prepare the main head hull shape by bending
back on all panel and tab perforation lines.

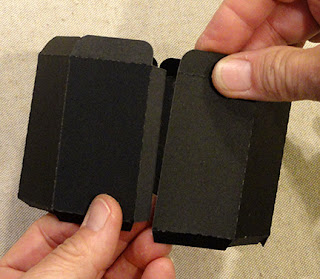
3. Form the hull into a tube shape to bring
the back straight side edge to overlap the opposite
back-side tab to perf line, adjust for top and bottom,
and glue in place.

4. Bend the top wall segments inward to align
the straight edges to overlap the adjacent tabs
to perf lines, and glue seam.
Continue to work from back to front along both
sides to align and glue all angled seams, until . . .

. . . the final two side-front seams can be completed
in more or less one action.
Bend all top segment tabs inward at perpendicular angle.
Bend the top panel (with eye slots) into position,
adjust edges and segments as necessary
to align top panel edges with tab perf lines.
Use the trap door to access seam to assist gluing.

5. Repeat the segment seam joining process
to complete the seams along the bottom of the hull . . .

positioned . . .

. . . and attached, adjusting as necessary.

6. Prepare the neck post shape by bending back
on all perforation lines.
(NOTE the model uses this shape with closed bottom;
optional open bottom can be substituted to
allow post bottom tabs to be inserted through opt. lid
shape hex opening - see Step 53 middle.)

straight edge over opposite tab to perf line
and glue seam.

9. Bend bottom wedge tabs inward
to perpendicular angle, then bend bottom "lid"
into position to glue in place.

10. Prepare the interior support shapes:
A) position 'X' strut strips with up or down slots,
then interlock them and push fully down.

perf lines to form the frame, then overlap end
over opposite tab and glue the seam.
C) insert the 'X' struts corner-to-corner
inside the frame, and . . .

and bottom edges of all are even.

interior between two parallel walls . . .

. . . and push together until top edges (excluding tabs)
are even as shown.

of the head assembly by applying adhesive to
the face side of the bottom tabs.

Position the neck post into head interior through
back trap door, then . . .

and push completely through to tabs.
Glue tabs in place on the interior bottom panel.

13. Prepare the ear shapes by bending back
on all panel and tab perforation lines.

down over tabs, adjust so that perf lines/bends
line up with lid edges, and glue in place.

15. Prepare the inner ear as shown, by bending
forward on long angled perf lines, narrow edge flanges,
and bottom edge rounded tabs.

16. Prepare the attach the inner ear to
corresponding outer ear by noting the outer
side tab (outer ear) and longer side wall (inner)
which will correspond to each other when
assembled correctly.

Position inner ear into front cavity of outer ear
(wrong sides of paper together) . . .

. . . and line up flange long edge at outer ear side long edge
for both sides, with "rounded" top tabs also aligning
at inner ear under "lid". Glue flanges/tabs in place.

Bend bottom tabs upward/outward.

17. Prepare the attach the each to the head hull
by applying glue to the inside face of curved portions
of center two panels of outer ear.

Position ear assembly with longer SIDE extension
tab toward head side panel slot, shorter TOP tab
lining up with top-of-head slots.


. . . urge the back panels over the corresponding
panels of head back, and glue in place.
Also reach into head through trap door to
attach tabs to head inner walls.
Repeat for both ears.

Also apply a dab of glue at the bottom portion
of ear above side tab (between head and ear wall),
then apply pressure to attach the two layers.

18. Prepare face feature components
by first laying out the shapes.
Prepare left and right set of eyes.

perforation line roughly vertical, narrowest portion
outward, and bend back on perf line.

eye base circle, and transfer the perf bend to it.

nose accent over nose accent base;
eye slit with highlight over slit base

D) layer lid assembly over top of eye circles assembly
and attach; transfer vertical bend to all layers.


19. Prepare jowl extensions by bending back
on perforation.
Position over front of lower head, with slot and
partial slot lined up with corresponding slots on head;
glue in place where shapes touch.

20. Prepare the cheek "cups" by bending back on
perforation lines. Form a pyramid or cup shape by pivoting
and bending at perf lines, to bring the straight
panel edge to overlap the opposite tab perf line;
glue tab in place.

21. Position over the lower cheek "point" of head
on top of the jowl, aligning the front lower nose slot;
glue in place.

22. With both cheeks and jowl extensions in place,
position and attach the top of the tongue in place
between and below.
Add a little curl to tongue before attaching.

23. Prepare the dimensional nose shape
by bending back on panel perf lines, bend side
and bottom tabs outward.

24. Bend the side and bottom panels inward
slightly to overlap straight edge over wedge tab
to perf line and glue seam; repeat for opposite seam.

25. Position and attach nose accent assembly.

so that tabs can insert into the slots, then push
tabs all the way through . . .

. . . and bend tabs back inside head and glue in place.

27. Position the appropriate eye assembly
with bend corresponding to
the head ridge, with eye bottom touching
top of jowl, and glue in place.


head ridge, and glue in place.

29. Position the trap door cover at back of head
and glue over the trap door opening.
UNLESS
you plan to attach twine whiskers;
delay attachment of cover in that case.

30. Twine or perle cotton whisker addition will be
shown next. As alternative, consider inking the whisker
punch holes with marker to accent them.
OR . . .

use a darning needle and soft twine or perl cotton yarn:
A) cut a length of twine, thread onto darning needle,
and tie a knot at tail end;

B) add a dab of glue to the knot;

through all layers behind the cheek shape;
D) insert needle point through head trap door
and through one of the whisker holes . . .

behind face.

F) repeat for all whisker holes on both sides of face;

31. Position and attach the trap door on head back.

ROSETTE
32. Prepare the rosette accordion strips by
beginning at the half-arch tip end (right in photo)
to bend in "valley" fold, then alternate mountain/valley
folds until entire strip is folded.

33. Join the two strips by overlapping the whole arch tip
end over the half tip end, and glue the joint.

together and complete second seam.

35. Begin to form rosette by flattening the accordion
ring onto work surface, arched tip ends outward,
and gently force the sides inward to narrow
the center circle, until . . .

Hold in place . . .

. . . as hot melt glue in applied in ring around
center opening, then quickly . . .

pleats inward to smallest circle possible,
with evenly spaced pleats, until glue cools
and circle is secure.

attach backside circle cover.

BOX ASSEMBLY
36. Prepare the box hull side wall panels by
bending back on all panel, tab and side flange
perforation lines.

overlap the straight edge (shown on right here)
over the side flange tab opposite to perf line,
adjust for top-to-bottom alignment, then glue seam.

38. Form the walls assembly into a ring to bring
remaining wall side edges together to complete
the second side seam.

39. Bend the bottom tabs inward at
perpendicular angle.

40. Identify the box exterior bottom panel
by locating the small partial circle notch
on one edge; set this one aside.

locating the small 'X' cut into the center.

tabs, then . . .

. . . insert the interior box bottom into the hull
and slide it down into position so that each
straight edge seats snugly along a segment bend.

the bottom panel is securely in place.

(with notch) on the bottom of the hull to conceal
the tab construction.

42. Bend the upper hull tabs inward and glue
each to the inside surface of the hull.

bending each back at the vertical perf line.

44. Attach each panel centered with perf line angle
matched to an angle of hull, with approx. .12" offset
margin at sides and bottom.
(The upper portion is left "free" to allow
the lid to fit snugly."

45. Prepare the lid rim panels by bending back
on all perforation lines.

in similar manner as for hull walls.

47. Position a top panel edge along first segment
of the rim assembly, taking care that the edges
match up "corner to corner" as accurately as possible,
and glue in place.

48. Continue to bend the rim strip to align the strip
to position and join each subsequent segment
to corresponding top panel edge until the final
segment only remains.
Position it and the final end seam (under-lapped)
in one step to join both to the appropriate edges.

glue each in place.

50. Prepare rim accent shapes by bending back
at center perf line, then . . .

. . . position each with perf angle aligned at
rim angle, with upper edges also aligned.

51. Position and attach the top accent panel.


Fit the lid over the base to complete the box.
(This is a snug fit.)

OPTIONS FOR ATTACHING CAT HEAD:
53. Head with closed bottom neck can be
hot-melt glued directly onto the center of lid
as shown here.

the cat can be built with the tab-bottomed neck
(at this point in assembly, the neck would be
attached to head; this is intended as
demonstration only).
The neck post bottom tabs would be inserted
through the hex cutout opening . . .

. . . and tabs would be bent outward and
attached to underside of lid.
(NOTE: this connection IS NOT possible when
also using the rosette base.)

over the tabs and opening, attaching in place.

54. The model is shown with the cat base rosette
positioned and hot-melt glued to the lid, then
the closed-bottom neck of cat head is hot glued
at the center.

Here is the rosette version in place,
ready to have ribbon bow tie attached at neck.


No comments:
Post a Comment