Six-sided acorn form can be built as closed, flat-bottomed
hull base to allow it to stand with weighted fill inside,
or with open bottom where the hexagon stub
can be attached then fitted into the top recess
of the Candle 3D Stand Display.
A taller hex stub version includes bottom "collar"
to create a "reveal" where ribbon
can be tied under the acorn box.
of the Candle 3D Stand Display.
A taller hex stub version includes bottom "collar"
to create a "reveal" where ribbon
can be tied under the acorn box.

Lid with leaves and vine curl fits snugly onto
top of hull, or can be glued in place as a finial.
Measures approx. 5.75" tall x 4.75" wide x 4.5" deep.

The model project includes
the extra tall hex stub which provides
the extra tall hex stub which provides
a "reveal"
where coordinated ribbon is tied.
Consider using the coordinated "Fringe Candle Ring"
that also fits onto Candle Stand, shown here.

ASSEMBLY: 1. Identify and cut the shapes:
(sample shown for tall hex stub)
A hull shape (6) B hull reinforcement ring
C tall stub D stub ring (5-6) E tab ring (1)
F cap/lid main shape (3 with top stem slots; 3 without)
G cap overlay accents (6)
H dimensional cap rim strips (2)
I cap base hexagon J cap base underside cover
K dimensional stem shape

2. This acorn 3D box is similar to another acorn box.
Go to the tutorial for that box HERE, and follow
steps 2-11 to complete the hull using
the hull "open bottom" shapes needed for
the sample finial acorn box,
then return for more assembly steps.
IF PREPARING THE FREE STANDING BOX,
complete the six side seams, then bend
the bottom end tabs inward, bend the bottom hexagon
"cap" into position, adjust and glue in place.
(When box is complete, fill bottom of acorn box hull
with loose weight fill such as rice, beans, poly pellets,
etc., to allow it to stand.)

3. If using the stub, as does the sample project,
prepare the stub shape by bending back on all perf
lines, except bend top tabs forward.
TO PREPARE REG. (short) STUB,
follow steps 4 & 5, 10 & 11.
4. Taller stub for ribbon tying:
Form the stub shape into a tube to align
straight shape to overlap opposite side tab,
and join side seam.

into position, adjust the tube so that hex cap
edges match up to tab perf edges, and
glue in place.

6. Prepare the stub ring top shape by bending
interior tabs forward/outward.

7. Prepare the ring build up by layering and gluing
together the 5-6 plain hex rings
with outer edges lined up
as precisely as possible.
8. Position and attach top ring shape on top
of the stack with outer edges aligned.

9. "Test" the stop ring by inserting stub bottom end
through opening, keeping top shape interior tabs
bent outward and out of the way.

Position and insert the stub bottom end into
the candle stand recess and push fully in,
allowing the ring to adjust and slide upward.

with a fine tip pencil.

10. Apply glue to the stub top tab face surface, then . . .

. . . insert stub through top of hull, to fit through
bottom opening, with opening edges aligned
exactly at the stub tab perf lines,
and attach tabs to corresponding inner wall panels
until each is secure.
11. Re-insert the ring collar onto the stub,
adjust so that tab top edges align at pencil marks,
and glue ring and tabs in place.

12. Return to the other Acorn tutorial HERE
to follow steps 12-38 to complete the acorn box.

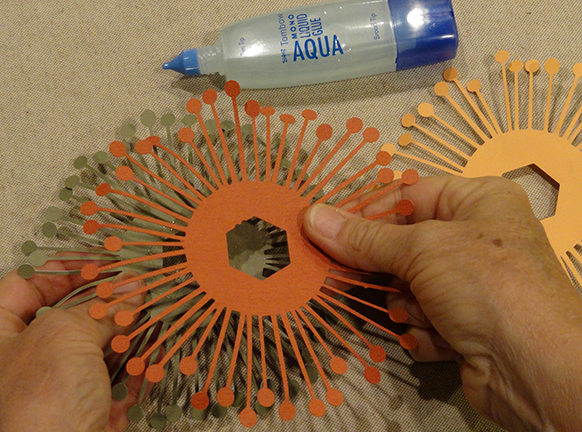
13. Consider preparing the three-layer
fringe candle ring by cutting the three shapes
as shown here with the hexagon center opening for
the Candle Stand display

NOTE that the bottom layer(s) include
a single half circle notch along the inside
opening edge, and the middle layer(s)
include a double notch.

Add a little random curl to the spikes.

14. To achieve the desired orientation for
best fringe alignment, simply match the edges
of the large (or small) hexagon center openings.
15. Position the fringe ring onto the candle stand
and attach with temporary tape, if desired.

Then position the acorn so that stub hex shape
matches the hex recess in the candle stand platform,
and insert.

Here's the finished project.

No comments:
Post a Comment