Showing posts with label acorn 3d box. Show all posts

Monday, October 29, 2018

Acorn Chunky 3D Finial for Candle Stand

Six-sided acorn form can be built as closed, flat-bottomed  
hull base to allow it to stand with weighted fill inside,
or with open bottom where the hexagon stub
can be attached then fitted into the top recess 
of the Candle 3D Stand Display.
A taller hex stub version includes bottom "collar"
to create a "reveal" where ribbon 
can be tied under the acorn box. 
Lid with leaves and vine curl fits snugly onto
top of hull, or can be glued in place as a finial.
Measures approx. 5.75" tall x 4.75" wide x 4.5" deep.
The model project includes
the extra tall hex stub which provides
 a "reveal" where coordinated ribbon is tied. 
Consider using the coordinated "Fringe Candle Ring" 
that also fits onto Candle Stand, shown here. 


ASSEMBLY: 1. Identify and cut the shapes:
(sample shown for tall hex stub)
A hull shape (6)   B hull reinforcement ring
C tall stub       D stub ring (5-6)      E tab ring (1)
F cap/lid main shape (3 with top stem slots; 3 without)
G cap overlay accents (6)
H dimensional cap rim strips (2)
I cap base hexagon    J cap base underside cover
K dimensional stem shape 
2. This acorn 3D box is similar to another acorn box.
Go to the tutorial for that box HERE, and follow
steps 2-11 to complete the hull using
the hull "open bottom" shapes needed for
the sample finial acorn box,
then return for more assembly steps.
IF PREPARING THE FREE STANDING BOX,
complete the six side seams, then bend
the bottom end tabs inward, bend the bottom hexagon
"cap" into position, adjust and glue in place.
(When box is complete, fill bottom of acorn box hull
with loose weight fill such as rice, beans, poly pellets,
etc., to allow it to stand.)
3. If using the stub, as does the sample project,
prepare the stub shape by bending back on all perf
lines, except bend top tabs forward.

TO PREPARE  REG. (short) STUB,
follow steps 4 & 5, 10 & 11.

4. Taller stub for ribbon tying:
Form the stub shape into a tube to align
straight shape to overlap opposite side tab,
and join side seam.
5. Bend hex tabs inward, and bend the top hex "cap" 
into position, adjust the tube so that hex cap
edges match up to tab perf edges, and
glue in place.
6. Prepare the stub ring top shape by bending
interior tabs forward/outward.
7. Prepare the ring build up by layering and gluing
together the 5-6 plain hex rings
with outer edges lined up
as precisely as possible.
8. Position and attach top ring shape on top
of the stack with outer edges aligned.
9. "Test" the stop ring by inserting stub bottom end
through opening, keeping top shape interior tabs
bent outward and out of the way.
Position and insert the stub bottom end into
the candle stand recess and push fully in,
allowing the ring to adjust and slide upward.
Mark the top edges of each of the tabs
with a fine tip pencil.
10. Apply glue to the stub top tab face surface, then . . .

. . . insert stub through top of hull, to fit through
bottom opening, with opening edges aligned
exactly at the stub tab perf lines,
and attach tabs to corresponding inner wall panels
until each is secure.
11. Re-insert the ring collar onto the stub,
adjust so that tab top edges align at pencil marks,
and glue ring and tabs in place.
12. Return to the other Acorn tutorial HERE
to follow steps 12-38 to complete the acorn box.
13. Consider preparing the three-layer
fringe candle ring by cutting the three shapes
as shown here with the hexagon center opening for
the Candle Stand display
NOTE that the bottom layer(s) include
a single half circle notch along the inside
opening edge, and the middle layer(s)
include a double notch.
Add a little random curl to the spikes.
14. To achieve the desired orientation for
best fringe alignment, simply match the edges
of the large (or small) hexagon center openings. 
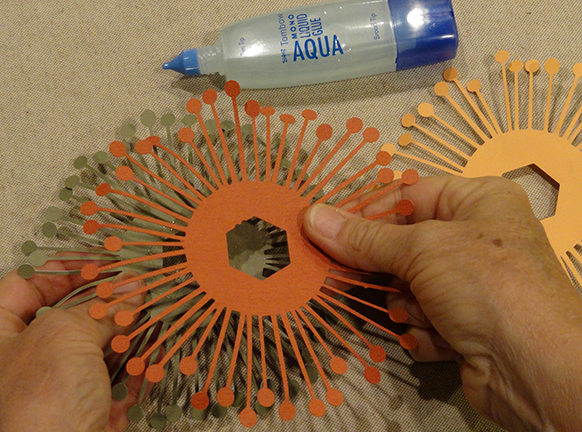
15. Position the fringe ring onto the candle stand
and attach with temporary tape, if desired.
Then position the acorn so that stub hex shape
matches the hex recess in the candle stand platform,
and insert.
Here's the finished project.


Saturday, October 25, 2014

Acorn 3d Box Assembly Guide

Re-creating one of Nature's autumn beauties
is this paper craft dimensional acorn.
Construct base and lid with leaves and spiral flourish
 from cardstock, then adorn with ribbon
or any other embellishments.
Purchase and download the svg cut file,
available from Silhouette America's online store,
SVG Attic, and SnapDragonSnippets.com.


ASSEMBLY GUIDE:
1. Identify and cut the shapes.
A base (lower portion) body wedge (6)
B base rim reinforcing hex ring
C lid wedges (6; 3 with slot, 3 w/o)
D stem shape
E lid built-out rim shape (2)
F lid bottom platform with slots
G platform hole cover
H lid decor overlay shape (6)
I small leaf with 2 decor shape overlays
J large leaf
K spiral accent shape

2. Prepare the base body wedge shape by folding on horizontal perforation lines slightly inward, top tab perf line outward. Fold right side tabs back. Be sure to give the pointed end tab perf line a good pinch to make sure that the edge is folded all the way to the tip.


3. Align one base wedge shape straight edge (on right here) with a second shape so that edge overlaps tab to the perforation line exactly. Each of the tab levels will be joined in a separate step. I like to start at the top where the longest edges will be glued together first.

Apply adhesive to the tab, then overlap, align and hold in place. Make sure that the top and bottom of the sections being aligned and joined also line up as exactly as possible. Apply pressure until secured (here and throughout).

NOTE that the top tab and narrow sections are not  glued to anything at this point.


4. Bend the next sections below slightly on their cross perforations until the straight edge on the right lines up with the perforation line on the left. Apply adhesive, overlap and attach this edge.

5. Continue working in this fashion, one section level at a time, until all the sections are joined to complete the first seam of this pair of wedges.


6. Repeat the process of steps 3-5 to add a third section to the acorn bottom. This completes one half of the acorn base.

7. Repeat the process of steps 3-6 to complete the second half of the acorn base.


8. Prepare and join the base halves.

Here you can see how the two half edges will align in the same manner as the wedges were being joined previously.

When one side (half of the complete seam) is attached, the configuration at the tip will be a "spiral" (where the tab edge of the second half will seemingly be on the opposite side from the first half, though in reality it is the same order as for all wedge seams). You can see what the end product should look like in the bottom view included as the second image in this post, above.


9. Apply glue to each narrow rim section at the base vessel's opening edge. DO NOT apply adhesive to the tabs at the edge . . . 


. . . then fold each wedge rim back into place on the inside of the vessel and hold in place, applying pressure along each edge until it is secure.


11. Prepare to add the rim reinforcing hex ring by making sure all of the rim tabs are folded outward into the interior of the vessel's space, at a right angle to the rim.

Apply adhesive to the face side (top surface) of each of the tabs . . . 


. . . then insert the hex ring into the recess. "Squash" the vessel's hex shape very slightly as needed so that the ring seats properly and completely . . . 


. . . then use finger pressure along each "seam" to make sure the ring attaches completely.


12. Prepare the lid wedge sections by folding cross perforations back slightly, and tabs back, as in step 2 for the base portion. 

NOTE that the bottom of this shape includes a long tab that will insert through a slot in the lid bottom platform, to be folded back to form flanges that help hold the lid onto the base. These include perforations, but it may be helpful to leave these perf lines unfolded at this stage.


13. Fold and pinch the tip tabs to make sure that the crease extends completely to the point.

NOTE that there are two lid wedge shapes that will be alternated in the assembly.

Shape 1 Slot wedge: three of the cut shapes should include the tiny slot that will accept the stem assembly bottom tabs.

Shape 2 Plain wedge: three of the cut shapes do not have slots, but have a notched top tab, cut so that when assembled the slots will still be open to accept the tabs.


14. Align and glue together the first two lid wedges that will be joined. I like to start at the bottom to align and attach the first sections or levels. (NOTE that the slot on these shapes falls along a perforation line that defines a level.)


15. Bend the wedges slightly to align and attach each of the sections in turn, in a manner similar to what was done for the base vessel, until the seam is complete from lower edge to tip.


MAKE SURE THAT YOU ARE ALTERNATING THE SHAPE 1 AND SHAPE 2 WEDGES!

16. Align and add a third wedge to complete the first half of the lid.

17. Repeat the process to join three more wedges to complete the second half.


18. Prepare to join the lid halves. Here you can see how the side edges will line up, however, as can be seen in the next screen, it may be easier to begin at the top center.

NOTE: This is the trickiest part of the acorn's assembly, and will require some careful manipulation and patience as the adhesive cures and the edges attach as needed.


19. Apply adhesive to the two tip end sections. Line up the two halves' edges, the tab of one wedge under the straight edge of the adjacent wedge, with the center tips aligned. 


To do this, as is required by the lid's rounded dome shape, the top center may need to be "pushed downward" slightly. Hold edges until they are secure.
20. Continue to align and join the sections downward along each seam until the entire edges of both halves are joined to complete the dome.


21. Prepare the stem shape by folding tabs inward (except  leave bottom tabs straight and unfolded at this point), vertical perforation lines slightly inward, hex top shape downward.

22. Form the shape into a sort of tube to bring the side tab into line with the opposite straight edge. Apply adhesive to the face side of the tab, then slide it behind the straight edge so that perf line and edge align. Make sure tops and bottoms line up. Apply pressure until glue is set.


23. Fold the top tabs inward at horizontal position, apply adhesive to each tab face, then fold top hex shape down over them. Squash tube slightly to make sure that edges align with hex then hold in place until secure.

It may be helpful to insert pinky finger or other tool such as the new eraser end of a school pencil into the stem shape to help apply pressure to join these edges.


24. Insert each of the end tabs into the wedge slots, and work the stem shape down until it seats completely flush against the dome.


25. On the inside of dome, fold the tabs outward flat against the inside surface and glue in place.
26. Prepare the built up rim shapes by folding as shown, long horizontal and short vertical perforation lines inward (mountain folds), top smaller tabs outward (valley folds), and end tab back.


27. Insert the top tabs of one rim shape into the corresponding slots in three lid wedge sections, working one at a time . . .


. . . to make sure that the "miter" intermediate angle edges overlap the adjacent triangular "miter tab" at the corners.

If you wish, and if it seems possible and not too messy, you may wish to add a dot of adhesive to the triangular tab before it is overlapped.

On the inside of the dome, fold the tab upward and glue in place securely.


28. Attach the second rim shape to the first by sliding the end tab under the straight end edge of respective rims shapes and gluing in place.


29. Continue inserting tabs in slots, overlapping corner tabs, gluing tabs on the inside, etc. until nearly all segments of rim are in place.


30. As the final segment of the rim is positioned and attached, the second end-to-end tab will also be attached. Apply adhesive to end tab (and tiny angle miter tab, too, if desired) then insert, adjust, and hold until edges are securely joined.


31. Fold the rim's six lower flanges/tabs outward to be out of the way. Position and insert the lid wedge lower tabs through slots on the platform hex shape (should be face out), and slide the platform down until it seats fully into place.


32. Fold and each of the flanges toward the center so that the hex platform edge is fully seated against the flange's perf line and fold angle, and glue in place.

NOTE: This step may take some patience and care to accomplish on all six edges, since the pressure that can be applied comes from pushing against the existing construction, both inward and also downward from the built up rim's upper angle.


33. Fold the extended tabs/flanges to prepare to be glued in place. The perforation line closest to the platform is folded inward (mountain fold), and the outer fold (for tab) is folded outward (valley fold). Unfold.

Apply glue to the middle section of each flange as is shown here, and also to the tab, then . . .


. . . re-fold into position, glue the upright sections together to create the flange. Glue the tab to the platform surface. For tab gluing, it will be helpful to insert finger into center opening to apply pressure behind the tab attachment area.


34. Apply adhesive to the backside edges of the hex opening cover, then position and attach by applying whatever pressure you can between the two surfaces being joined.


35. Fold each accent wedge shape slightly at perforation lines (including the dashes that may fall in the petal shapes). Apply glue to the backside, position centered within each wedge with bottom straight edge at rim/dome crease, and attach.

NOTE: if you want the cutouts to have more dimension, leave them glue free so they will "pop" away from the dome surface slightly.


36. Join the decor half shapes to the smaller leaf. Before the glue dries completely, use a tool to add some curl to the leaf. Also add curl to the large leaf, and to the spring shape.


37. Glue the tips of large leaf, small leaf and spiral (in order) next to the stem on one wedge.


38. Place the lid over the base opening so that flanges slide inside the rim edges. 

If you WILL NOT be using this as a box that can open, you may choose to apply glue to the flange outer edges and glue the lid in place.


Add a ribbon knot and bow to the stem if desired.


And here is your finished product.