Here's a little sweetheart to follow in the tradition
of other canister designs in the SnapDragon Snippets portfolio.
Raggedy Andy can send "be my Valentine" sentiments
as well as providing a gift box that doubles as decor for
"welcoming to baby", "Happy Birthday" and many other occasions.
Dimensional "sailor" hat fits onto the card stock canister
by means of added flange strips.
Detailed face has cut-out layers that eliminate
many tiny shapes to otherwise glue in place.
Other features include: "fringe" hair, safety-pinned heart,
built-up buttons with "X" stitching, cross-over sailor collar.

ASSEMBLY:
1. Identify and cut the shapes:
A canister tube
B top opening rim
C bottom opening rim and cover
D hat crown wedges (2 x 4 unique shapes)
E hat brim
F hat connection tabs
G pants shapes, buttons, rims, thread Xs
H shirt shapes
I collar shapes, contrast, knot & contr
J face layers
K hair top and bottom layers
L features (eyebrows, eyes, nose, mouth)
M heart layers, LUV, safety pin (3)

2. Refer to the canister construction shapes at THIS previous canister assembly guide, to complete steps 2 - 6, then return for the unique assembly for Raggedy Andy.

3. Layer the pants, left side over right side. Bend slightly on the vertical perforation lines. Attach at the bottom front of the canister tube.


4. Layer the left collar tie over the tie ends contrast shape so that the tie end edges align.
Layer the right tie end in similar fashion.

Layer the knot face shape over the knot contrast shape.
Position and attach at the center of the collar ties assembly.

5. Fold the collar "inset" and shirt front back slightly on the vertical lines. Attach the inset at the top of the shirt front, centered and with perf lines aligned.
6. Fold the collar ties back slightly on the short perf lines. Attach the ties assembly at the top of the shirt front unit, centered and with perf lines aligned.

7. Assemble the built up buttons. Insert the ends of the "X" shape into the the holes of the front button base shape. Glue a second base shape behind the first. Glue 2 rim ring shapes to the top of the base shape.
Complete 2 buttons. Attach at the top of the pants section, at the perf lines.

8. Layer the three head/face shapes: white on the bottom (see thru for eyes), black in the middle (see thru for eye accents), fleshtone on top.
 Assemble and attach the eye layers (black pupil over white highlight contrast; pupil over colored/blue iris oval) inside eye cutout.
Assemble mouth unit by centering tiny heart with cheek ovals at the sides. Attach unit at center near very bottom face edge.
Attach nose at center, eyebrows over eyes. Add "blush" powder cheek accents, pen-dot freckles as desired.

Assemble mouth unit by centering tiny heart with cheek ovals at the sides. Attach unit at center near very bottom face edge.
Attach nose at center, eyebrows over eyes. Add "blush" powder cheek accents, pen-dot freckles as desired.
9. Prepare the 2 hair sections by folding the "bangs/fringe" portions forward at the perforation lines.
Add some "random" curl to the ends of each strand by pulling between tool shaft and finger with pressure applied. (Try curling alternating strands forward or backward to give Andy a rag-doll tousled look.)

10. Layer and join the shorter top hair section over the bottom section, centered, and with bands perf lines aligned.
11. Center and attach the head assembly. Add glue under the bands hair layers to help direct them in desired downward position . . .

. . . then fold down and apply finger pressure along the creases until the fold is secured.

12. Position, center and attach the head/hair unit at the top of the canister (bands fold edge even with canister top rim).

13. Prepare the heart/pin unit by first inserting the lower wire pin point through both cutouts in top heart layer and sliding through to center it.
Glue the larger heart behind the smaller heart.
Layer the pin wire top section over the lower with "ring" right ends aligned. Attach the clip end over the matching shape on left end.
Attach "LUV" over the heart.
 14. Identify the four hat crown wedge shapes: L(eft), C(enter), R(ight), S(ide).
These four unique shapes will join to compose a hat crown half. Prepare 2 halves.

15. Prepare the crown wedges by folding left side tabs back, folding back slightly on section perforation lines.
16. Join the wedges in order (L-C-R-S). Join the straight left side edge of lower section overlapped at its corresponding neighbor's lower tab, then bend the middle section edge to match perforation, then top.
Add the third section in similar fashion, and then the fourth to create a half crown.

17. Bring the two half crown sections together and join the corresponding section straight edges and section tabs as done in step 16 for individual wedges.
NOTE: it may prove helpful to start either at the bottom and join to lowest sections on both sides.

Add some "random" curl to the ends of each strand by pulling between tool shaft and finger with pressure applied. (Try curling alternating strands forward or backward to give Andy a rag-doll tousled look.)
10. Layer and join the shorter top hair section over the bottom section, centered, and with bands perf lines aligned.
11. Center and attach the head assembly. Add glue under the bands hair layers to help direct them in desired downward position . . .
. . . then fold down and apply finger pressure along the creases until the fold is secured.
12. Position, center and attach the head/hair unit at the top of the canister (bands fold edge even with canister top rim).
13. Prepare the heart/pin unit by first inserting the lower wire pin point through both cutouts in top heart layer and sliding through to center it.
Glue the larger heart behind the smaller heart.
Layer the pin wire top section over the lower with "ring" right ends aligned. Attach the clip end over the matching shape on left end.
Attach "LUV" over the heart.
These four unique shapes will join to compose a hat crown half. Prepare 2 halves.
15. Prepare the crown wedges by folding left side tabs back, folding back slightly on section perforation lines.
16. Join the wedges in order (L-C-R-S). Join the straight left side edge of lower section overlapped at its corresponding neighbor's lower tab, then bend the middle section edge to match perforation, then top.
Add the third section in similar fashion, and then the fourth to create a half crown.
17. Bring the two half crown sections together and join the corresponding section straight edges and section tabs as done in step 16 for individual wedges.
NOTE: it may prove helpful to start either at the bottom and join to lowest sections on both sides.
As the halves are joined, apply pressure toward the top center to help the center "smoke hole" to close as completely as possible.

18. Prepare the brim section by folding lower tabs and top flanges back, and fold vertical sections back.
Form the shape into a "tube", overlap straight side edge to opposite tab perf line and join.

19. Fold the top flanges back and glue in place.

20. Orient the crown and brim units so that the wider front sections line up. Insert the crown assembly into the top of the brim until the lower edge lines up the crown lower tab perf lines.
18. Prepare the brim section by folding lower tabs and top flanges back, and fold vertical sections back.
Form the shape into a "tube", overlap straight side edge to opposite tab perf line and join.
19. Fold the top flanges back and glue in place.
20. Orient the crown and brim units so that the wider front sections line up. Insert the crown assembly into the top of the brim until the lower edge lines up the crown lower tab perf lines.

21. Fold the tabs back and glue in place against the inside of the crown. Make sure each segment of both edges line up properly as they are being attached.

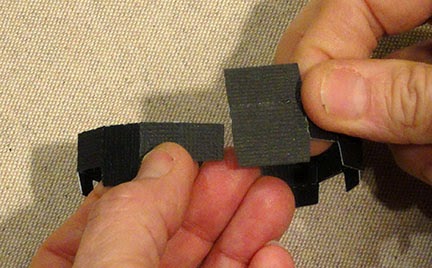
22. Identify the connection tabs with sizes that correspond to the edge lengths of crown/brim opening. Star is center, circle is for L & R, S is for side.

23. Fold each tab and glue the smaller portion behind the face section.
24. Insert prepared tabs into the hat opening behind the section they are sized for, applying adhesive to the top 1/2" only, in the area where the symbols are.
Push the tab fold edge down . . .

. . . until only a generous 1/4" is exposed.
Repeat this process for all 8 tabs.
Allow tabs to "cure" or dry until secure.

Place the hat on the canister, gently applying pressure to "re-shape" the octagon oval to match up with the canister opening, with each of the connector tabs sliding behind the corresponding rim edge.
Push the hat into place until the brim lower edge abuts at the canister rim.
Here is the completed Raggedy Andy canister project.