Showing posts with label star ornaments. Show all posts

Sunday, December 1, 2024

Fan Star Ornament Three Variations

 
Consider these three fan form large star variations
(Diamond Points, Sawtooth Swirls & Snowflake)
then create some festive decorations.
Hang a dimensional ornament from a peg,
under a chandelier, or as a swag focal point.
Each is assembled from 6 (or more if changed size
or paper thickness required that) star point sections,
fold into a doubled point unit and assembled units into
a 360 degree "fan" to create a visually interesting form.
Hide the intersections on front and back by
centering a smaller embellishment shape.
Add a stud or jewel if desired.
Hanging loop can be attached when including
the two alternate point sections that include hang hole.
Use 12x12 paper stock for most efficient cutting,
two per sheet; 65 lb weight paper or lighter
recommended.

Diamond Points star ornament measures
approx. 10.5" wide x 9.25" tall  2.25" deep.
Sawtooth Swirls star ornament measures
approx. 9.125" wide x 8.375" tall x 2.5" deep.

Snowflake fan star ornament measures
approx. 9.5" wide x 8.375" tall x 3.75" deep.
The assembly of these three star variations follows
the Snowflake Crystal Fan ornament process exactly,
though these three designs are somewhat larger. 
Please follow this LINK to view the assembly steps.


Saturday, November 16, 2024

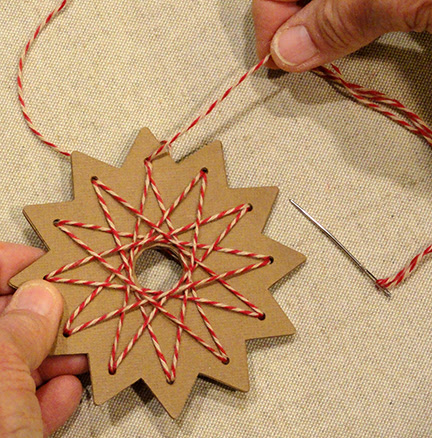
Stars Lacing Ornaments 9 and 12 Points

Here is a creative way for kids and grownups to share 
Christmas or winter decorating fun with these "gingerbread"
star lacing ornaments. Select 9 or 12 point designs.
Cut 8-9 layers star shapes from card stock and stack, 
glue and press flat while drying overnight to create 
a rigid form sturdy enough for lacing. 
Thread twine or string onto a blunt (tapestry) needle, 
then follow the tutorial stitching guide to produce 
the string-art style lacing shown in the thumbnail images. 
Or stitcher can plan and discover their own design. 
Add twine loop or decorative hook at the selected top (#1) hole. 
Make this a fun family activity to prepare ornaments 
for a tree or swag or to hang on pegs. 
Stars measures approx. 4” in diameter (without hanging loop). 

INITIAL PREPARATION & ASSEMBLY:
1. Cut the star shapes for your selected project:
for the 12 point star A, cut 8-9 shapes to layer, glue
for the 9 point star B, cut 8-9 shapes to layer, glue
For either star, it is possible to cut up to 9 shapes
from a single sheet of 12x12 stock.

Also shown is twine.
For 12 point star, cut a length 2.75 to 3 yards long.
For 9 point star, cut a length 2.5 to 2.75 yards long.

NOTE that the stitching order & placement diagrams
are BOTH shown near the beginning of this post.
After that, the12 point project will be described first,
but the process is very similar for both.

2. Layer the cut shapes, one by one, and glue together,
taking care that ALL cut shapes align as precisely
as possible, particularly at punch holes. Immediately . . .
. . . press under a heavy flat weight such as this thick
book volume, with something else heavy placed on
top of it, and leave in place for several hours or
over night until the glue has completely dried.
Pressing like this is essential to help the liquid-glued
up shape stay flat, to avoid warping or curling.

3. Refer to the diagram during following 
lacing steps.
NOTE that the green lines indicate lacing that is
on the FRONT of the star, and red dashed lines
indicate lacing that passes across the BACK.

Needle and twine will ALWAYS pass down from
the FRONT of the star and up from the BACK.

STITCHING GUIDE FOR 12 POINT STAR
Once the first run of stitches A-L are completed,
the lacing will end with twine ON TOP of the work.
Complete the lacing by working in reverse order
to complete L-A to finish the star.

STITCHING GUIDE (PART 1 AND PART 2) 
FOR 9 POINT STAR


4. Thread up the recommended length twine on a large
eye blunt end tapestry needle.
A) locate the top point of the star (green arrow on diagram) 
and insert the needle UP from backside through hole #1;
leave a 7" tail to tie hanging loop while pulling
twine length fully through to front.
B) Pass the needle down through hole #2;
pull twine through until stitch is flat 
(here and throughout).
C) Pass needle and twine across to backside to 
hole #3 and insert UP to front of work.
D) Insert needle through hole #4 . . .
. . . then across back to #5, then continue in same
manner to complete the remaining stitches . . .
. . . through #12. Twine and needle will be on front
of the work.
E) Now work in reverse order to repeat stitches,
NOTING that for this second run, the green stitches
of the diagram will lie on the back and the red dashed
stitches will lie on the front. 
The second run will complete the star shape
on the front and also on the back of star.
5. Trim excess ends even with enough left in place
to tie desired length loop.
6. If desired, thread a small bead onto both ends
and slide down to rest over star top tip. (Otherwise,
tie ends in a knot near top point.) Tie knot near
twine ends.
To minimize twine unraveling, paint tips with clear
fingernail polish and allow to dry.

9 POINT STAR
7. Follow similar procedure as for 12 point star, with
length of twine (model uses double perle cotton)
threaded onto tapestry needle.
Begin at hole #1 to come UP from back, following 
Part 1 to complete through stitch #10, then
follow Part 2 to complete the lacing through #19.
8. Trim ends, add bead or tie knots, etc.
to complete the star.
Here are both of the completed star ornaments.

Thursday, June 8, 2017

Dimensional Star Ornaments for Tree


Variations make even more fun
with four different star files to download,
cutting main star shape from favorite
red-white-blue paper prints, or overlays
to create 5-point patchwork, divided halves,
or flag variations.
Main star shape has perforations that allow 
the "arms" to be shaped with a center crest, 
and a valley short fold in between arms. 
Edge flange tabs fit and attach under 
the inner edge of the star-outline rim arms 
to hold the dimensional form. 
Mount the rim and star assembly onto a star base, 
then attach to the top hole-punched hanger base. 

Designed as companion design to 
"Stars Tree Display Stand" to hang with twine ties 
from the notches of each arm
(view the tutorial for that project HERE). 
Measures approx. 2.25" wide x 3.5" wide; 
hanger adds extra .375" to height. 

ASSEMBLY: 1. Identify and cut the shapes:
Each star ornament is built with
these main four shapes.
(This is the basic star.)
A main star with perforations and tabs
B star rim
C star base
D star back with hanger top
2. Bend forward all the edge flange tabs
around the star points of the MAIN shape.
3. Bend back on ALL the perforation lines
all the way across the shape, 
point to valley.
4. Re-direct the short portion of the fold - 
from the center to the "valley" point
between star "arms, working all around
the stars for each of the arms.
5. Work the star into its dimensional shape
with raised center by placing on flat surface
with edge flanges flat, then apply slow inward
pressure to push the short fold areas
toward the center, while at the same time
pushing inward from each side of the star arms.
(This image uses a TEST main star,
not the red polkadot model.)
6. With star main shape in dimensional form,
position the star rim over the top . . . 
. . . aligning the tall point perforations
at the inner angle of the rim . . . 
. . . and mid (short) perforation line aligned
at the inner point of the rim.
Adjust for alignment of perforation lines
as described above, then attach the rim
shape to flange tabs securely,
applying pressure to the rim all around.
7. Position and attach the star front/rim onto
the base star shape, matching all outer
cut edges as precisely as possible.
8. Position and attach the backside of the star base
to the "front" of the hanger star shape,
matching the edges that correspond.
FLAG STAR VARIATION
9. For this variation, the same four main shapes
are cut, PLUS the three-segment starry field
shape (blue) and three narrow facet shapes (red).
The "white" main perforated star shape
at center of this image will act as the "white stripes"
for this flag variation. Or, four "white" narrow
facet shapes could be cut to cover
the main base shape for "white stripes".
Prepare the center star and rim as described
in step 6 above, then prepare the starry
segment by bending short perf line as "valley"
fold, and long thru-point line as "mountain" fold.
Position and attach over the upper left 
quadrant as shown.
Position and attach the narrow red facet shapes
over alternate corresponding areas on the right
side of the star.
Here is the completed star, ready to attach
to base and hanger.
FACET POINTS VARIATION
10. Cut the same main four shapes as for
the plain variation, then cut left and right facet shapes
from a pair of coordinated papers. 
Position and attach the facet shapes over
corresponding spaces as shown.
POINTS VARIATION
11. Cut the same main four shapes as for
the basic ornament. NOTE: there are two
ways to create the five different "patchwork"
points: 1) cut main star as one of the colors,
then cut four more points; OR 2) cut main star
from a non-showing foundation card stock,
then cut five points.
(This shapes layout shows the first version,
with the blue main star planned to show through
as one of the five point colors.)
Create the star ornament, then prepare the
add-on points by bending back on center
perforation line. Position and attach
in over one of the points, matching
the crest perforation bends.
This variation shows the kraft card main star base,
with five points being attached over the top.
FINISHING
12. Prepare the star ornaments for hanging
on the stars tree by cutting 9" lengths of baker's
twine, inserting through holes on hanger base
top and centering, then using a tool such as
this 3/4" diameter wooden dowel to knot and
tie bows with a consistent hanging loop at center.
Hang the loop over the arm tabs on the stars tree,
either from the front as is shown here . . .
. . . or from the back so that the bows
present on the front of the arm.