Saturday, October 30, 2021

Pumpkin Contours Rolled Flowers Decor

Oversized card that doubles as a festive decoration 
features pumpkin contours framework that allows 
puffy fabric panel (plus opt. batting shapes) 
to plump dimension from behind. 
Rolled paper flowers with leaf pairs accent the front, 
with ribbon, twine or raffia add a hint of autumn flair. 
Measures 8” tall x 6.85” wide when assembled.

ASSEMBLY: 1. Identify and cut the shapes:
A front "contours" shapes with contrast front layer
(4-5 shapes layered for thickness & rigidity)
B backing for front contour layers
C back panel
D template for cutting fabric panel
E retained shapes from A contour cut to
cut center and 2 side pieces of thin batting
F rolled flowers spirals with base containment circles
(3 sets for 3 flowers)
G leaf pairs (3)
2. Prepare the front contour "window" assembly by
layering the cut shapes, one at a time, and gluing
together. Take care to match up all outer and inner
cut edges as precisely as possible.
If using a contrast front layer like the sample project
does, position and attach that front layer to
previously-layered assembly.
Press the layered and glued-up shape on a flat
work surface with a flat weight on top, such as this
thick book. Consider using another heavy object placed
on top of the book for added weight. Allow pressed
shape to dry thoroughly - this could require several
hours or overnight, and will help minimize or
prevent warping and curling of the layered shape
due to the liquid adhesive used.
3. Prepare the back panel by bending forward 
along the perforation line near stem.
4. Use the "waste" cutouts from one of the contour
front panels as a template to trim the "puffy"
batting panels: one center, two sides.
5. Use the fabric template to cut a fabric panel.
NOTE 1: the template can be temporarily held in
position to assist with ease of trimming to size
with a few well-placed dots of glue, then peeled
free when cutting is complete.
NOTE 2: if preferred, substitute textured alternative
media such as burlap-fronted card stock,
corrugated card, etc.; eliminate batting shapes.
6. Center the fabric layer face-down over the backside
of the layered contour panel and use appropriate
adhesive to attach around outer perimeter margins.
NOTE don't stretch the fabric into place, but allow
some give so that it can puff forward over
the batting panels. The fabric edge should fall
approximately at the center of the contour margins,
as shown.
7. Position the batting sections exactly behind
their corresponding windows in the contour panel,
more easily accomplished by either feeling with
finger tips to compare panel edges to batting edges,
or holding the panel up to a light source
to enable seeing edges to make adjustments.
8. Apply glue to backside of backing panel at
outer margins to edges, then position over puffy
assembly to enclose fabric and batting edges inside.
Press under a flat weight until thoroughly dry.
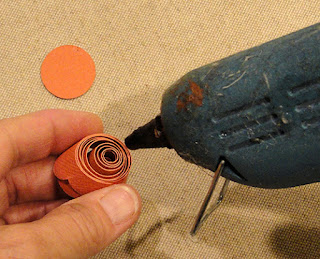
9. Prepare rolled flower spiral by carefully adding back
curl along the entire length, using a narrow dowel
or round pencil, and placing paper between tool
and thumb, then drawing it across tool, a bit like
curling ribbon and scissors.
10. Use large tweezers sewing tool or needle-nose
pliers to roll the flower. Grip the middle tip in tweezers,
then . . .
. . . tightly roll the center as shown (tip may curl
back on itself; this is acceptable).
Continue to tightly roll the spiral . . .
. . . keeping the bottom
"straight" edges stacked on tweezers as closely
as possible, with the curve of the spiral allowing
the upward layers to flare naturally.
Complete the rolling of the blossom, then . . . 
. . . relax the roll to allow tweezers to be removed.
re-tighten the spiral so that base size and shape
compares fairly closely to the bottom disc.
Apply a dab of glue at the final tip, then reposition
and attach in place.
11. Apply quick-grab adhesive such as hot melt glue
shown here to the entire base of rolled flower, then . . .
. . . quickly position and attach the base disc,
centered, under the flower's base. Hold in place
until secured.
12. Prepare the leaf shapes by adding back curl
to each leaf.
Also bend the attachment bridge back so that
the bottom tip of one leaf overlaps that of adjacent
leaf; secure with dabs of glue.
Repeat for the other two leaf pair units.
13. Position leaf base overlapped tips under the edge
of blossom, and attach in place. Repeat for two
remaining flowers.
14. Position the "card" back panel behind the front
contour assembly, with portion above the perforation
line aligned with matching edges of the front panel
along stem, and glue that portion ONLY in place.
Press with flat weight until secure.
15. Finish the decoration of the "card" by
adding a raffia cluster behind intended blossoms
position, then placing and attaching each of
the three blossoms with appropriate adhesive.
Trim excess raffia length artistically.
Here is the completed decoration,
with low-relief fabric puffiness showing through
the contour windows.
NOTE that the "card" can stand by itself.


Tuesday, October 19, 2021

Tag Maid Milking Large

This larger size tag with many details features 
a charming maid in country costume 
gracefully holding a milk pail. 
Details are created by layering cut shapes 
in sequence on base silhouette. 
Themed tag is perfect for Twelve Days of Christmas gifting, 
or other special occasions. Coordinates well with 
“Milk 3D Bottle Container” and “Tote 3D Gift Two Pint Jars”.

Offset design base layer includes top center hole punch 
for attaching twine or narrow ribbon loop. 
Tag measures approx. 3.8” wide x 6.25” tall when assembled. 
(The thumbnail below represents more accurately
the skirt and apron positioning.)

ASSEMBLY: 1. Identify and cut the shapes:
A tag base   B figure silhouette (shows thru as legs)
C shoes overlays   D skirt overlay   E apron
F dress bodice overlay  G blouse base & sleeve circles
H lace (tucks under dress hem edge)
I apron star accents and center circle accents
J hat   K hair/head base with ribbon accents
L hair base and half hair overlay
M face  N head/neck
O eyes and mouth show thru shapes
(fit into cut out of N)
P arms and hands overlay
Q bucket and bucket rim overlay
2. Position and attach in order, aligning
corresponding edges for all or some of the edges:
a. hat onto silhouette
b. hair onto hat and silhouette (pigtail extensions)
c. head/neck with cut out window
d. eyes and mouth show-thru shapes inside head
window
e. face onto head/neck base (use fine pencil to
trace over eye brows, nose)
f. hair base onto top of face
g. hair overlay onto right side of hair base
3. Position lace edge under skirt edge,
on lace with bottom corner/edge of skirt, and then
duplicating the margin established at that corner
between skirt edge and top of lace loops
across the full width of lace, and glue in place.
4. Position and attach apron over skirt
(NOTE refer to the drawn thumbnail at beginning
of this post for actual best apron positioning),
then position dress bodice over dress base
and top of apron.
5. Position and attach the bodice onto the body
silhouette, overlapping the bottom of neck slightly.
Also position ribbons over hair extension
near ends.
6. Position and attach the dress/apron assembly
onto the body silhouette assembly, then . . . 
. . . position and attach the arms pair unit
with top ends overlapping the lower edge
of blouse sleeve shapes. (Soon the hands
shape will be placed over the end of arms unit.)
7. Position and attach the sleeve circles over
the end of the arms ends and silhouette.
8. Position and attach the bucket rim over 
corresponding top curved edge of bucket base, 
then . . .
. . . position the bucket at figure front so that
handle overlaps about halfway up the hands
shape, and attach in place. Then position
and attach hands shape over handle where
shapes correspond.
9. Position and attach the star cut outs over
the circle cut outs of apron, then position and
attach center contrast circles at stars circles.
10. Position and attach the silhouette assembly
over tag base with narrow, even margin all around.
Here is the completed milk maid tag.
Attach ribbon or twine as desired
through top hang hole.

Tote 3D Gift Two Pint Jars

This presentation carrier is made dimensional 
with lower walls fold-over rim, 7/16” wooden dowel 
wrapped with card stock tube,
 layered thick uprights and cross wall partition. 
Overlaid grille panels and accent bands add style.
Designed to hold a gift pair of standard pint jars – 
take care that glue-up is secure; 
transporting may require some underneath hand support. 
Shorter uprights version scales best for pint jar contents; 
taller version (shown in thumbnail) is best as carrier 
for Milk Bottle 3D Bottle separate design. 
Short version measures approx. 6.25” tall x 6.5” long 
x 3.75” wide when fully assembled. 
Long version measures approx. 8” tall. 
Coordinates well with “Tag Maid Milking Large” and 
“Tag Milk Can” separate designs.

ASSEMBLY: 1. Identify and cut the shapes:
A base (interior layer; 5 layers to stack for thickness)
B base top layer offset accent shapes
C front and back interior walls with bottom flanges (2)
D interior wall layers to stack for thickness (4)
E tote wall sections (2)
F wall grille accent shapes (2 long, 2 med. 4 short)
G handle post wrap
H wall accent strips (2 long sides; 2 end wrapping)
I uprights interior layers with post hole tabs (2)
J uprights layers to stack for thickness (2 sets of 5 ea.)
Prepare the layered for thickness shapes first as shown
in the following steps so that
they can be glued up, pressed and drying while other
construction progresses:
2. INTERIOR CROSS WALL
Bend the bottom flanges of interior cross wall forward.
Layer and glue the interior plain wall rectangles into
a stack with ALL edges aligned as precisely as possible.
Position and attach the outer wall shapes with bottom
flange on top of the stack, with corresponding edges
(excluding flange) aligned as precisely as possible.
Press under a heavy flat weight such as the thick book
shown here - possibly with something else heavy on top -
until thoroughly dried (this may require hours) to
minimize curling or warping.
3. BOTTOM SUPPORT PANEL
Layer the base shapes - all except one that is
interior "top" layer - and glue into a stack.
Press under a heavy weight until dry.
4, INTERIOR BASE "FLOOR"
Position and attach the accent half shapes on top
of the interior floor panel, with even offset margin
all around, and approx. double the outer offset margin
down the side-to-side center.
5. UPRIGHTS
Layer each of two upright arms into a stack of 5
shapes with all cut edges aligned precisely.
On the inward upright shape, bend the two tabs
within the hexagon post opening outward, then . . . 
. . . position on the inward side of each stack
and glue into position as part of the unit.
Press under a heavy weight until thoroughly dry.
6. Prepare the wall units by bending back on all
perforation lines for panels, rim wrap panels,
and tabs, except . . . 
. . . at inside top wrap panels edge flanges, which
should be bended forward.
Arrange with two side edges together, then
overlap the straight side edge over the adjacent
flange tab to perforation line, adjust top to bottom,
then glue seam.
7. While joined walls section is in flat position, align
and attach each grill panel on the backside with 
the edge of "window" within grille aligned with walls window.
Press under heavy flat weight until glue is dry.
Preview where the wrap-over rim panels will be attached
once that point in assembly is reached:
Edge flange outer-most edge will line up at
the top panel window edge, as it is visible through
the grille.
8. Form the walls assembly into a ring to bring
the two side edges together and complete
the second side seam like the first one earlier.
9. Bend the bottom tabs inward at perpendicular
angle, then . . . 
. . . invert the tray top side up to insert the "floor"
panel (single layer with accents) into the interior . . .
. . . and press down into position against the tabs
which have had glue applied to the tabs backside.
Apply finger tip pressure all around to securely attach
tabs to floor backside.
10.  Position and attach the thickened floor base
assembly underneath the tray bottom, with tabs
that attached interior "floor" sandwiched in between.
11. Bend the tabs on the bottom portions of the first
upright thickened assembly, then . . . 
. . . with tabs face upward, insert upright under
the wrap-over rim and flanges and through the slot
at center side. Push inward as far as it can go,
then swing the upright back into position touching
the side wall, and . . . 
. . . with upright slot centered over base
(outer wall center partition also centered).
10. Hold the upright in position and lightly mark
with pencil the uprights edges above and below
the walls panel windows.
11. Remove upright and apply glue to the wall surfaces
between pencil markings. and also to upright tabs
backside surface. Then . . . 
. . . re-insert upright, press against wall and press 
bottom tabs against floor. 
Hold in place until secure. Repeat for second upright.
12. Apply glue to the underside of  wrap-over flanges,
then fold down inside the tray until the tab . . .
. . .  edge aligns with window, as noted in Step 7,
and press until secure. Complete both sides.
13. Repeat the process for the end wrap-over panels
and tabs, then . . .
. . . for the four corners
14. Prepare the handle post wrap shape by bending
back on all perforation lines for panels, end hex
panels and end tabs.
15. Use the 5/16" dowel as a wrapping form to
wrap shape around, overlapping straight long
side edge over adjacent flange to perf line,
adjust for ends alignment, and to ensure
it isn't twisted . . .
. . . and glue seam.
16. Bend back end tabs on both ends and push
dowel to be even with one end. . . 
. . . mark the other end
with pencil marks. Cut the dowel to length,
"losing" the line.
17. Insert the cut dowel, push to end . . .
. . . glue dowel to wrap length. Bend end tabs back,
apply glue to tabs, then bend hex "cap" into position,
adjust and glue in place. Repeat for both ends.
18. Position and attach the side accent bands
down the center of side "header" margin, and . . .
. . . bended end accent bands around end panels.
Add stud accents over the punch holes at ends.
19. Insert the handle through one side upright . . .
. . . across span and through the opposite side,
keeping mini tabs in upright hex opening bent
downward and out of the way.
Adjust to center handle as "dry fit", then move handle
slightly side to side to add a line of light glue around
handle where the upright opening thickness will
finally rest, then re-position for final fit.
Also glue the tabs in position on bottom of handle
on both ends.
That completes assembly of the tote.
Consider using companion designs with the tote.