Here is the "Christmas Measure Up" project image from the pattern cover. This post will provide additional construction details for anyone creating it. (See hearthsewnpatterns.com website for mailorder purchasing information.) Also check the Machine Foundation Piecing and Fusible Machine Applique tutorials on this blog which uses this project to illustrate technique steps.
APPLIQUE DETAIL: The face shapes are created for fusible machine applique methods. To reduce stiffness from fusing adhesive, trim away excess fusing in the interior of shapes (sometimes referred to as "hollowing out".) Special steps are needed around the eye sockets to ensure fusing remains around those edges. Leave a "bridge" of fusing paper to connect the large eye area to face silhouette. Faces in the image (t to b) show the separate face & eye applique pieces, the completed face piece with socket lining in place, and the same step from the backside. Pull away paper from fusing just around sockets to attach lining patch. Paper margin is left in place at face edges until ready to fuse the whole face.
To add over-edge and hand embroidered details to elf face, use tracing template with stencil cut sockets and smile. Temporary washout fine tip marker is shown transferring the eye baseline extension. Mark smile lines, too.
INKJET PRINTING ON FABRIC:
Step 1. Use rotary equipment to cut fabric to letter paper sheet size 8 1/2" x 11".
Step 2. Cut a matching size sheet of freezer paper and "fuse" to fabric sheet. Join the backside of fabric against the plastic side of the freezer paper. Use hot iron to make sure all edges and center areas are thoroughly connected.
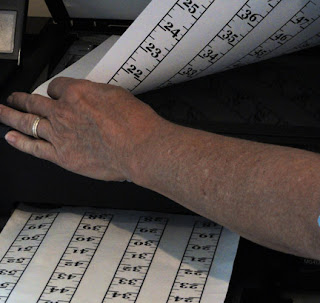
Step 3. Place Measure Tape artwork on printer glass. Place fused fabric sheet in the paper feed tray and make sure it is FACE UP/TOP UP or FACE DOWN to feed through so the inkjet print is applied to the fabric side, not the paper side. This may require a test, or reading your printer literature.
When print is complete, peel fabric from freezer paper.
Step 4. Prepare vinegar solution and spray on or soak printed sheet in a tray. Mix 2 Tablespoons of white distilled vinegar in 1/2 cup of water.
Allow to air dry flat. Press on a press cloth, face side down
Trim segments as directed in pattern.
MEASURE STICK PREP:
1. Fold back the bottom segment along the top printed line and crease.
2. Position fold exactly along and overlapping the bottom line of second segment.
3. Carefully fold bottom strip to make crease line visible. Pin as needed, then join the two strips with a seam, stitching from edge to edge. Press seam open. Trim seam allowances to 1/4".
Repeat this process to join all segments into one tape strip.
4. Fold, crease and press side edges under just beyond side line. Also press under ends.
5. Refer to pattern instructions to prepare backing (red) strip by pressing side edges under to meet at center back. Fold bottom edge under 1/2".
Center printed tape over backing strip. Position bottom tape edge so that a similar margin of red backing remains exposed. Pin in place. Measure and fold back top backing edge 1" beyond tape edge. Topstitch tape in place on backing next to outer printed lines.
6. When quilting is completed, position tape with bottom edge even with borders seam, and with side edge approximately 3/4" from side narrow border seam.
7. Neatly topstitch a scant 1/8" from red backing edge. Stitch all around and overlap stitching to lock.
DIMENSIONAL HOLLY SPRIG:
A. Layer two green fabric sections face sides together. Trace applique pattern edge onto top layer.
B. Stitch all around on traced line using shortened stitches. Cut away excess allowances. Trim excess at points. Clip slightly along curves.
C. Cut a tiny slit through back layer and turn face side out. Use a tube turning tool if available (shown, left). Use knitting needle or equiv. to work points out fully. Press flat.
D. Topstitch next to edge all around. Tie an overhand knot at the center. Tack center, points in place at top of measuring tape after it is stitching onto quilted project.


so cute!
ReplyDelete