
New from SnapDragon Snippets and
soon available from SVG Attic and Silhouette America online store,
a dimensional candy cup decoration.
Designed to hold a 2 oz. plastic cup, with punch holes for
adding a school colors tassel.
Create one for each place setting at your graduate's
celebration banquet!
Fill with candy, nuts, or other treats.
ASSEMBLY:

1. Identify and cut the shapes:
(clockwise from far left)
a. edge build up strips
b. tassel
c. upper brim square
d. base section "ring"
e. lower rim with attached edge build up strips

2. Fold the base section inward on perforations. Form a ring, then attach the tab end under the opposite edge.

3. Accordion-fold the attached edge strips of the lower brim shapeto form a stack at each edge of brim. (These will be stacking on the back side of the brim.) Glue inner and outer surfaces of the multi-folds so that the strip will remain stacked at the edge.
NOTE this rim build up will allow the spacing between the lower brim and the upper (face) brim so that the plastic cup will be held in place (lower rim circle cutout) but also have the top edge of rim to be flush with the upper surface of the upper brim.

4. In a similar process, accordion fold each and glue each of the edge build up strips.

5. Carefully align and glue a build up edge strip at each edge of the lower brim (at backside).

6. Insert the base upper tabs into the lower brim slots. NOTE: tabs insert from face side toward the under side or back side of lower brim.

7. Fold tabs outward and glue in place.

8. Tie the tassel in place by inserting ends into upper rim holes front to back and knotting on the backside.
OTHER ALTERNATIVES:
A. Wait until after Step 10, then tie tassel through upper and lower brims when both are joined.
B. Instead of tassel, cut several 8" or so lengths of narrow ribbons, fold in half, then insert loop end down thru the outer hole and back up through the inner hole; pass ends through loop and tighten.

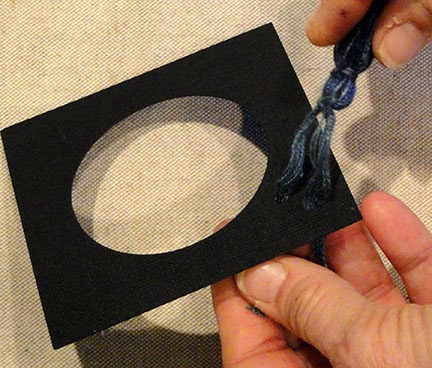
9. This image shows the tassel from the upper brim front side. Make sure that during the tying process you adjust the length of "hang" to be what you wish.

10. Position and glue the upper brim over the lower brim. Remember that there is an intentional depth space between the two brim layers. Also take care to rotate the brim layers so that the punch holes line up.
(To repeat, the tassel may be best left off until after the two brims are attached. This image shows the tassel already attached to the upper brim. In this case, the somewhat unsightly tassel knotting will be hidden between the brims.)

11. Place the plastic cup in the receptacle openings.
NOTE that you can see the variation in the hole opening sizes in this image, near the bottom right of the opening.
The lower brim hole opening is slightly narrower than the upper brim hole opening.
Here is the finished Cap Candy Cup, ready to be filled with your selected sweet or salty treat!
This is absolutely AWESOME! Buying immediately! Thanks for the comprehensive directions!
ReplyDeleteTwo years later I am earning my bachelor's degree and plan on using it at my own graduation party!!
ReplyDeleteWhat size paper was this cut out of? I can not get it separated to be able to move the pieces around to cut it on a 8.5x11.
ReplyDelete