Dimensional egg form for
Easter or spring decor
can stand alone or with
bottom stub post for
display on “Candle Stand Display”.
that create domes that fit together snugly.
Three diamond shapes (plus half diamond at bottom)
are
included to overlay across the ten seams.
Measures approx. 6” tall x 4”
across (diameter).
Candle Stand” and
“Butterfly 3D Accent” designs,
as well as the two other 3D Egg designs.
as well as the two other 3D Egg designs.
ASSEMBLY: 1. Identify and cut the shapes:
A & B top "dome" wedge main hull shapes
C & D bottom "dome" wedge main hull shapes
E bottom stub (for use with candle stand project)
F interior reinforcement disc
G top row split diamonds (10)
H middle row split diamonds (10)
I lower row split diamonds (10)
NOT SHOWN: bottom half diamonds (10)
J top circle accent (opt.)
K top "petals" accent (opt.)
aligning the edges to be joined in the same manner
as the wedge-to-wedge seams were aligned
and joined, beginning with the bottom segment,
and working upward toward top as before.
7. Repeat the process for the second half-to-half
side seam.
of the bottom or base dome, including
bending preparation, gluing seam segments,
joining side seams 1 and 2, and fitting bottom
decagon cover into place.
A & B top "dome" wedge main hull shapes
C & D bottom "dome" wedge main hull shapes
E bottom stub (for use with candle stand project)
F interior reinforcement disc
G top row split diamonds (10)
H middle row split diamonds (10)
I lower row split diamonds (10)
NOT SHOWN: bottom half diamonds (10)
J top circle accent (opt.)
K top "petals" accent (opt.)
2. Prepare dome wedge shapes by bending back
on each of the panel and tab perforation lines.
Complete the bending prep for both halves
of upper dome as shown here, taking special care
. . . at the narrow wedge tabs at the bottom of
each tabs sequence, pinching to continue
the fold crease all the way to the end where . . .
. . . it intersects the bottom segment panel.
3. Complete the first wedge-to-wedge seam:
bend the adjacent segments together, overlapping
the straight side edge over the adjacent wedge tab
to the perforation line, and gluing in place.
4. Continue to bend and adjust the two edges
being joined so that the edge and tab perf lines
line up as precisely as possible, and gluing each
segment of the seam, until all four of the seam
segments has been completed.
5. Complete each of the seams between
wedges in the same fashion.
6. Prepare the join the two dome halves byaligning the edges to be joined in the same manner
as the wedge-to-wedge seams were aligned
and joined, beginning with the bottom segment,
and working upward toward top as before.
7. Repeat the process for the second half-to-half
side seam.
8. Apply glue to the top opening tabs, then
bend the top decagon "lid" into position,
adjusting as much as possible the wedge top edges
to align with the edges of the lid, and glue in place.
NOTE: it may be helpful to invert the dome
top down on flat surface and reach fingertips
inside to apply pressure around tabs to attach
to lid.
9. Repeat steps 2-8 to complete the assemblyof the bottom or base dome, including
bending preparation, gluing seam segments,
joining side seams 1 and 2, and fitting bottom
decagon cover into place.
10. For use with candle stand, prepare the bottom
stub shape by bending back on all perforations,
except bend the top straight tabs forward.
11. Form the boxing portion into a tube to bringthe straight short side edge to overlap the side tab
to perforation line, and glue side seam.
12. Bend the wedge tabs inward, adjust the shape
so that . . .
. . . the lid hexagon edges line up with the tab
perforation lines, and glue each in place.
13. Insert the stub into the bottom dome so that . . .
. . . the stub extends through the bottom hex opening,
then glue . . .
. . . the stub tabs in place inside bottom
of the dome.
ALTERNATIVE DISPLAY:
if NOT using with the candle stand,
leave the stub off, and instead position and
attach the bottom decagon cover shape
to bottom panel of the dome, covering hex hole.
14. Place some weight into the bottom dome
to give it a little more stability.
Recommended: add approx. 1/4 Cup of doll
poly pellets to a small plastic bag, seal top of bag . . .
. . . then insert and glue the weight bag,
centered, at bottom of dome.
15. Prepare the reinforcement disc by bendingthe edge tabs upward.
16. Apply glue to the outer face of the disc, then
insert into the upper opening of the bottom dome
(this is a very snug fit) . . .
. . . and adjust into place at the top of the dome
so that the tab top edges align with the dome rim.
Apply pressure all around to each tab to secure.
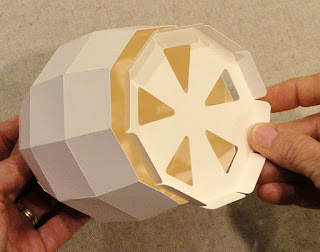
17. Position the top dome over the bottom dome . . .
. . . and fit the two halves together . . .
. . . pausing as they are closed to apply a beadof glue all around where the upper edge will
finally fit, then . . .
. . . pushing together and working all around
to ensure two halves are completely together,
and applying fingertip pressure to ensure the joint.
18. Prepare each of the diamonds and half
diamonds by bending back along the vertical
perforation lines, and at the horizontal cross
perf cuts. NOTE that when the diamonds are
attached across the "rib" seams, the split will close
as shown here.
NOTE: if the mid shapes (largest whole diamonds)get mixed up, they can be compared to
identify that the upper row are slightly shorter
than the bottom row.
19. Position the upper mid diamonds with non-split
point downward as shown, above dome-to-dome
seam, centered along one wedge-to-wedge seam,
with horizontal bends aligned at dome
segment-to-segment bend, and glue in place.
20. Repeat for the lower mid dome, with
non-split point upward, below the bottom edge
of upper dome, as shown, and attach in place.
21. Repeat for the smaller top diamond,non-split point downward as shown,
above upper mid diamond, and attach in place.
22. Position and attach the half diamonds in
similar manner at bottom edge.
23. Continue to attach all the diamonds around
egg shape until all rows are complete.
24. Position and attach the optional top circle accent, and . . .
. . . the top petal accent aligned as shown
with petals centered with alternate diamond
top tips.
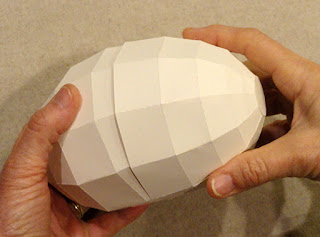
Here is the completed egg.
A view of top accents.25. To use egg with candle stand,
insert the stub end into the hexagon depression
on stand platform.
Completed diamonds egg on stand.


No comments:
Post a Comment