
Geometric columns pair and rectangle box
(with purchased attached wood ball heads)
present simple figures of Baby Jesus, Mary and Joseph.
Layered built-up star completes this minimalist
religious display
for the Christmas season.
Engineering allows this ensemble to go together
easily,
with guides and supports for baby’s “swaddling”
twine wrap and
wire-mounted star.
Ensemble measures approx. 3.5” x 3.5” base,
tallest figure
with head ball approx. 7.75”.
Star on wire as shown approx. 14” tall.
ASSEMBLY: 1. Identify and cut the shapes:
A Mary body box B Joseph body box
C & D lower body box reinforcement boxes
E & F body top head ball support layers (2 sets ea.)
G & H lower body top opening shape holders
I baby body box lid J baby body box base
K baby body base ball support layers
(NOTE that this shape has been modified in final design)
L baby body support strut ring
M stand lid N stand accent
O stand base
P stand base int. reinforcement (wall edge brace)
Q star interior layers (6-7 - see Step 2 for info)
R star front and back panels
S star front and back accents
T wire conduit for star wire (NOTE this shape
was converted from two strips to one in final design)

Obtain unfinished wood balls:
two 1.25" diameter for adult heads
one 1" diameter for baby head.
(These were purchased at Michael's Crafts
and Hobby Lobby.)

For a stronger color contrast, the sample project
balls were dipped in "natural" wood stain
and allowed to dry.

2. Prepare the layered shapes in order to allow
them to be pressed and thoroughly dried in advance
of when they are added to the assembly.
A. Layer the interior star stack and glue together,
taking care to align all cut edges as precisely
as possible.

NOTE that the quantity of layers of the interior star
needed will be determined by the thickness of
the holder wire selected. The sample project uses
approx. 12 gauge wire and used 7 interior layers.
To test for thickness, dry-stack the layers, then fit
a wire end into the straight slot and feel . . .

. . .for whether the wire is below the surface
of the top layer; add or subtract layers until
wire cannot be felt above.

Once the desired stack depth is determined,
layer and attach the layers, then press under a flat
weight such as this fabric-covered re-purposed
weight machine bar, until completely dry.

B. Position and attach the front and back star accents
centered within the star main (whole) front & back.

Layer the BACK only of the star with accent
onto the back of the interior stack, and press until dry.

C. Layer and attach the stand base int. reinforcement
(wall edge brace), taking care to align all cut edges,
and press under a flat weight until dry.

D. Identify the baby body and adult body top
head ball support layers with their cut-in letters
to indicate stacking order (T-top; M-middle;
B-bottom), then . . .

. . . layer and attach in order.

Press until dry. NOTE that the stack should
create a graduated recess to conform to
ball's spherical shape.

E. Repeat the process for the adult body
to identify layering order by letter symbols, then . . .

. . . stack in order. . .

. . . and attach together. Press until dry.

3. Prepare the body boxes for Mary and Joseph
by bending back on all perforation lines for panels
and tabs or flanges.

4. Form the shape into a column to position
and join the side seam.

NOTE that the symmetrical nature of this shape
will allow the column to be flattened so that
the side seam can have finger pressure applied
more easily along the entire length until secured.

5. At the top opening, bend the tabs inward . .

. . . then bend the 'lid' down into position,
square up and glue in place. NOTE that it may
be helpful to invert and stick a tool such as the new
eraser end of a pencil into the interior to press
against the tabs to assist adhesion.

6. Apply glue to the face, then turn the ball holder stack
face down and insert into the body bottom opening
and through the tube until it can rest against and
attach to the backside of the box 'lid'. Adjust to be
centered, then assist to attach in place.

7. Prepare the lower body box (base) by bending
back on all perforation lines.

8. Form the box into a tube to align and join
the side seam.

9. At the bottom of the box, bend the tabs inward
then bend the 'lid' down into position, square up
and attach in place.

11. To reinforce the center portion of the body,
a reinforcement panel is inserted into the column top.
Prepare the panel by bending the edge flanges forward.

12. Apply adhesive to the backside of the flanges,
then insert the panel into the top opening and . . .

. . . and push straight in until the flange outer edges
align with the top edges of the box.
Pinch edges to attach in place.

13. Complete the box assembly by inserting
the top (reinforcement end) into the column box . . .

. . . and pushing fully into place, pausing before
it is completely inside to apply glue to the insert
surfaces, then . . .

. . . pushing it in until it is flush with body box
bottom edges.

14. Prepare the baby body box 'lid' by bending back
on all perforations for side walls, end tabs.

15. Bend the walls back and overlap short ends
over adjacent end tabs to align with perforations
and join all four corner seams.
over adjacent end tabs to align with perforations
and join all four corner seams.

16. Prepare the baby body base shape in similar
manner, then . . .

. . . bend walls back to align and join four corner seams.

17. Position the ball support stack into the base,
centered and at the top, and glue in place.

18. Prepare the support ring shape by bending back
on each of the vertical panel perforation lines,
also bending forward the tabs at top and bottom.

19. Form the strip into a ring to align and join seam.

20. Adjust the ring to be a circular as possible,
then position on the underside of the 'lid' so that
the ring surrounds the head bead opening,
and glue top edge flanges in place.

21. Prepare the twine "swaddling" before the box
lid and base are joined together. Cut a length
of jute twine (approx. 1 yard), and insert from
lower left side through semi-circular opening . . .
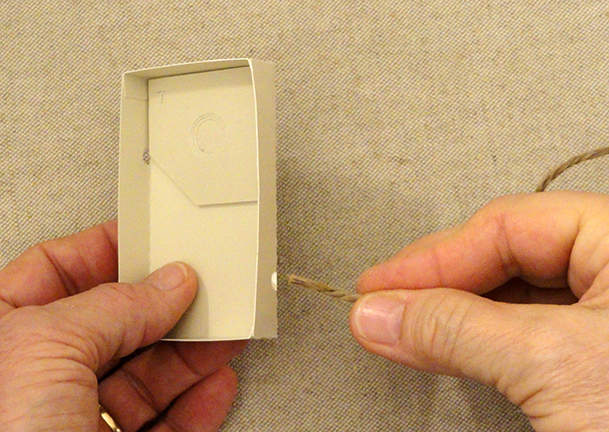
. . . pass across the inside of the base and out
the opposite upper opening. Bring the twine in a loop
over the top of the base to insert end again into
the lower right opening, across and through
opposite opening, keeping the two loops loose
enough to pass the lid through to position and
close the box.

22. Position the lid over the base, apply glue to base
side walls, then "close" the lid in place.
Twine loops are kept free.

23. Re-position the twine loops to diagonally cross
the body box, then work the twine through so that
it is eventually tight across the box with no slack
in the loops. Tie the ends in front in a neat square knot
and trim ends at about 1/2" each.
Apply quick-grab glue (such as Fabri-Tack or hot melt)
to the head support insert contour,
(inside the box) and also under the rim edge of
the circle opening, then position and attach the ball sphere
and hold in place until completely secure.

24. Prepare the platform 'stand' lid by bending back
on all side wall and tag perforations. Also bend back
on the center perforations - these flanges help support
the center of the platform so that it does not collapse
around the body boxes. Don't overlook the two tiny
triangles that will open the channel for the wire conduit.

25. Position the 'contrast' offset accent overlay
onto the front of the platform lid, matching up
the interior opening to fit around the perforations
that define the 'opening' of the lid, and attach.

26. Bend sides back and complete corner seams.

27. Repeat the bending at perforations step,
and corner seams for the platform base.

28. Insert, center and attach the platform interior
build up shape into the inside of the base.

29. Prepare to attach the platform lid to base by
working expeditiously to apply a bead of glue along
the cutout edge, also at outside surfaces of side walls,
then . . .

. . . place lid onto base (NOTE this should be
a fairly snug fit . . .

. . . and bend the lid interior flanges down into
position so that the bottom edges rest against
and attach along the insert cutout edges where
the glue was applied. Hold edges in place until secure.

30. Prepare to insert and attach the adult body boxes
by identifying the front surface of the Mary column
which has three small guide marks to help
position the baby body, as indicated here.

Insert the Mary column into the platform's
center opening, and attach bottom and
sides that will touch the platform.
This is a snug fit, so make sure it is tight
against the side.

31. Repeat to insert, position and attach Joseph,
also attaching the two columns to each other.

32. Prepare the wire conduit triangular column shape
(NOTE this shape has been modified in the final design
to be one longer shape) by bending back on all
perforations for wall panels, edge flange and top tabs.

33. Form the shape into a triangular tube to overlap
the straight edge over the opposite side flange to
perforation line, and glue in place.

NOTE it may be helpful to insert a rod-like tool
such as a knitting needle or bamboo skewer into
the tube under the seam edge to help with
applying pressure along the edge.

34. At top and bottom, bend the tiny tabs inward . . .

. . . then bend down and glue the 'lid' panel in place.

Here are the components needed to assemble
the star: wire that has been shaped to include
the lower straight portion with a sideways bend
and spirals, then a bend upward and a curl at the end
that will fit into the star's round recess. Compare
the wire length to the length of the conduit, Joseph
column height in place on the completed platform
assembly, and the height of star/interior channel
and circle channel, then use fingers or tools to
form and shape it. star build up with backside
in place,and star front with accent.

35. Prepare to insert the wire into conduit
first orienting the conduit so that the widest wall face
is forward (it will end up toward the body columns).
Apply a bead of quick-grab glue to the cut bottom end,
then insert into the top conduit hole, and slide
through to come out the opposite hole at bottom --
actually to be even with opening edges. Add
a dab of glue at the top opening to hold wire in place,
then secure in place until glue is secure.

36. Fill the star recess and channel with quick grab
glue, then insert the end and curl and . . .
glue, then insert the end and curl and . . .

. . . position and attach the star front shape.

37. Apply glue to the conduit bottom end,
and also on the forward face, then insert into
the platform triangular opening on backside
column assembly, push fully in, while at the same
time, adjusting to be in position overlapping
the join line between the two columns.
Hold in place until secure.

38. Apply quick-grab glue to the backside
of baby box only where it will overlap the
two columns, then position and attach.

39. Apply quick-grab glue to the ball support
contours, then position and attach the adult
head balls in place, and hold until secure.

Here is the completed ensemble.

No comments:
Post a Comment