
Seasonal action cards are surprisingly easy to
assemble,
with mirror-image front and back that either fold
or connect near the top.

Internal ‘arms’ mechanism holds
accordion-folded panel that provides the
open-up action.

Lift card front to open and see the panels spread wide,
with coordinated stencil panels mounted
(optional plain tile
included for using favorite coordinated
seasonal papers).

Offset interior panel
provides visual interest.
Each measures around the 5x5 to 5x6 inch size.
Coordinated envelope files are also available.
NOTE: The Santa design will be described first,
followed by the Christmas Cookie design (Step 20)
and then the Honey Boy (Step 29)
SANTA TWIST POP UP CARD
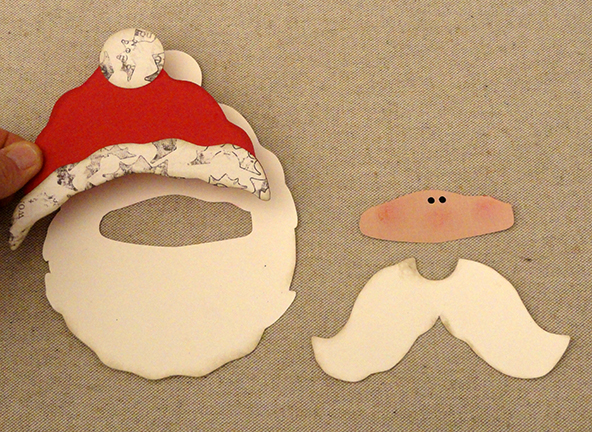
 ASSEMBLY: 1. Identify and cut the shapes:
A main card front B main card back
C pop up mechanism D interior accent shape
F arms panel G arms panel accents
H beard/hat base silhouette
I hat shapes: top tassel ball; hat body; fur trim
J face shape with eye contrast liner
K mustache

 . . . bending forward on the other diagonal line, then . . .
 . . . bending back on the side to side center perf line.
 3. Shape the mechanism by simultaneously bending
on the diagonal lines and pushing the arms inward
from each side as the center line also folds, until . . .
 . . . the arm extensions gradually . . .

 Apply pressure through the layers to thoroughly
crease all folds.


 8. Position the hat/head assembly on the card base front
with offset margin all around the outer edges.


 12. Apply glue to the area of ball tassel above
the perforation line, then . . .
 . . . position front card assembly over back card
with edges aligned, and attach the two where
the tassel shape touches above perforation line.
 13. With card base open and flat, locate the guide mark
on back upper card base (underside) at perforation line.
Position the tip of the mechanism at the line,
just a smidge below the perf line where . . .
 . . . it won't interfere with that the card closure.
Apply adhesive to the remaining 'top' panel
of the mechanism, then fold the card front
into place so that outer edges align, and attach
mechanism in place to backside of card front.
 Mechanism should fold out and fold in
without interference or restriction at full open
and full close (test to make sure and make adjustments
if possible before proceeding, if possible.)


 19. To close the card, help the strip and mechanism
function as designed by directing the arms inward,
right end down and inward, left end slightly up
and inward.
 Continue to close until the card is completely closed.
Apply finger-tip pressure to set creases and connections.
(Review the action video at the beginning of tutorial.)


 . . . the accent arms spreading wide.


 23. Refer to Steps 2-4 to prepare the mechanism
shape. Position the tip at the guide mark and
a smidge below the perforation fold . . .


 25. Position and attach the cookie assembly onto
the card base front panel.
 26. Assemble the holly decoration by attaching
the holly circles one by one to the berries base.
 Also position and attach the lower accent
half leaves over the silhouette shape.
Position and attach the berries assembly at
the top of the silhouette to complete the unit.
 27. Position and attach the holly assembly on front
of card near top.
 28. Refer to Steps 14-19, then fold the arms strip,
position and attach tiles . . .


 29. Identify and cut the shapes:
A card front panel B card back panel
C mechanism shape D interior accent panel
E arms strip F accent tiles
G honey boy front panel with icing squiggle accents
H scarf base with overlay
I face accents: eye circles pair; cheek circles; smile


 34. Apply adhesive to backside of tip above perforation.

 36. Refer to steps 13-19 to prepare the mechanism shape
by folding and creasing as directed.
37. With card base open and flat, locate the guide mark
on back upper card base (underside) at perforation line.
 Position the tip of the mechanism at the line,
just a smidge below the perf line and . . .
 . . . centered evenly side to side,
making sure that the card will still close
without pushing the mechanism out of place.

 Here is the completed Honey Boy design.

followed by the Christmas Cookie design (Step 20)
and then the Honey Boy (Step 29)
SANTA TWIST POP UP CARD

A main card front B main card back
C pop up mechanism D interior accent shape
F arms panel G arms panel accents
H beard/hat base silhouette
I hat shapes: top tassel ball; hat body; fur trim
J face shape with eye contrast liner
K mustache

2. Prepare the mechanism shape (shown here face down)
by bending forward on one diagonal perforation line, then . . .


on the diagonal lines and pushing the arms inward
from each side as the center line also folds, until . . .


. . . meet at the center inside, and the folded mechanism
has the appearance of a simply 'house' shape.

crease all folds.

4. Open the mechanism to position and attach
the accent shape at bottom extension, slightly
offset from sides and lower edge, as shown.

5. Begin Santa head assembly by positioning
and attaching the eye 'liner' contrast shape behind
the face panel so that it shows through eye holes.

6. Here are the head components. Assemble
the hat unit by positioning and attaching the tassel ball
circle shape at the top of the crown base shape and
the fur trim shape at lower edge where edges align.

7. Position and attach the hat unit at the top of
the beard/head base shape where edges align.
with offset margin all around the outer edges.

9. Position and attach the face shape in the face
cut out window.

10. Position and attach the mustache over
the beard, matching both side extensions where
edges align to achieve desired positioning,
as indicated by the pointing finger, right.

11. Bend forward (shape is shown face down)
at the top perforation on back card base.

the perforation line, then . . .

with edges aligned, and attach the two where
the tassel shape touches above perforation line.

on back upper card base (underside) at perforation line.
Position the tip of the mechanism at the line,
just a smidge below the perf line where . . .

Apply adhesive to the remaining 'top' panel
of the mechanism, then fold the card front
into place so that outer edges align, and attach
mechanism in place to backside of card front.

without interference or restriction at full open
and full close (test to make sure and make adjustments
if possible before proceeding, if possible.)

14. Prepare the arms strip by bending in 'W' form
as shown (NOTE it will be re-bent during assembly).

15. Position and attach the accent tiles in each
of the squares.

16. Prepare to attach the arm strip to the arms of
the mechanism by arranging strip over open card, then . . .

. . . fold in half and place center fold at the intersection of
the perforations lines, with strip also centered top to bottom.

17. Begin unfolding the strip, then apply adhesive
to the upper half portion ONLY, on the exposed
end as shown. Unbend the strip completely
and attach to the adhesive-applied area.

18. Repeat the process for the other end by
folding back the end segment, applying adhesive
to the LOWER half only, as shown.
Then unfold the strip completely and attach strip.
function as designed by directing the arms inward,
right end down and inward, left end slightly up
and inward.

Apply finger-tip pressure to set creases and connections.
(Review the action video at the beginning of tutorial.)

Here is the completed card in closed position.

Opening to reveal . . .


CHRISTMAS COOKIE TWIST POP UP CARD

20. Identify and cut the shapes:
A front & back (connected) card base
B mechanism C interior accent panel
D arms strip E accent panels
F holly and berry shapes
G cookie filling H cookie lattice front
I holly decoration base with accent lower leaves
J berries base with two accent berry overlay circles

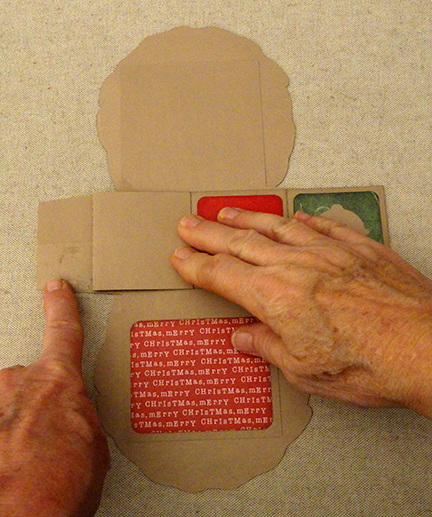
21. Bend the card base at the center perforation line.

22. Open the base shape backside up.
Locate the center hash mark on the inside of
card that will help position the mechanism.

shape. Position the tip at the guide mark and
a smidge below the perforation fold . . .

. . . so that the card front can still fold down into position.
Then apply adhesive to the front of the mechanism,
fold front down so that front and back edges align,
and attach in place.

24. Position and attach the 'filling' circle behind
the lattice cookie front.

the card base front panel.

the holly circles one by one to the berries base.

half leaves over the silhouette shape.
Position and attach the berries assembly at
the top of the silhouette to complete the unit.

of card near top.

position and attach tiles . . .

. . . then position and attach the holly half leaf and
berry accent shapes into the tile recesses.
Position and attach the arms strip onto mechanism,
assist the arms/mechanism to fold into position.

HONEY BOY TWIST POP UP CARD

A card front panel B card back panel
C mechanism shape D interior accent panel
E arms strip F accent tiles
G honey boy front panel with icing squiggle accents
H scarf base with overlay
I face accents: eye circles pair; cheek circles; smile

30. Position and attach the honey boy panel onto
the front card base, with narrow offset margin all around.

31. Prepare the scarf unit by positioning the overlay
shape where edges match, and attach in place.

32. Add the detail shapes including icing squiggles,
star buttons into recesses, scarf assembly, eye circles
and cheeks into recesses.

Position and attach the smile arc so that
ends overlap cheeks to centers.
Here is the assembly so far.

33. Bend the tip of back card base forward
at perforation line.


35. Position front over back card, align edges,
and attach together at the top section only.

by folding and creasing as directed.
37. With card base open and flat, locate the guide mark
on back upper card base (underside) at perforation line.

just a smidge below the perf line and . . .

making sure that the card will still close
without pushing the mechanism out of place.

38. Refer to steps 13-19 to prepare and attach
the accent tiles to arms strip, position and attach arms to
mechanism, assist the card to close, etc.


No comments:
Post a Comment