for floral embellishments, featuring picot edge base tag,
stitched inner tag plus accent tag, vintage style open-back frame,
double pointed “stamp sentiment” strip.
Add other ephemera or trinkets as desired.
Tag measures approx. 4.86” x 9”.
Combine
with “Flourish Arabesque with Butterflies Pair”
Optional tag backside base shape included
with fold-out easel stand.
with fold-out easel stand.
ASSEMBLY: 1. Identify and cut the shapes:
A picot edge tag base (2 layers for strength)
B stitching detail tag main shape
C tag front accent
D lacy oval frame (2 layers for strength)
E front label for stamped or print & cut phrase
F tag back layer (cut-in stand option) with stand wedge
overlays to add strength
2. Prepare the layered shapes by gluing together,
taking care to align all cut edges as carefully as possible.
When using liquid adhesive, press the glued-up shapes
under a heavy flat object such as this fabric covered
re-purposed free weight bar, a book, etc., and allow
to dry thoroughly for several hours. This will help prevent
warping or curling.
3. Layer and glue together the tag picot edge base shapes,
and the banner tag shapes, and press
under a flat weight until dray.
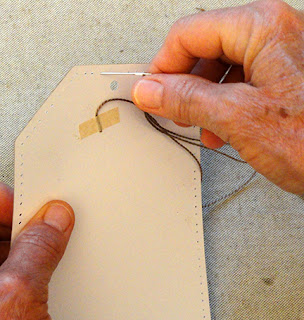
4. Add real stitch detail to the main tag shape by
cutting a 36" length of no. 5 perle cotton or soft twine
onto a blunt tapestry needle (check for needle gauge
that fits through holes).
Start with the free end behind the tag shape near top . . .
. . . and use a small piece of masking or other glue-able
tape to secure the end on the backside.
5. Insert the needle with perle cotton through the firsthole on one side of the punch hole, then . . .
. . . pull the thread through completely until anchor stops it.
6. Insert the needle into the second hole (front to back)
and pull the thread completely through to the backside.
This creates the stitch. Each stitch will be followed by
a shorted "space".
7. Continue the needle insertion and stitching routine
all the way around the tag front . . .
. . . in similar manner until the final hole has needleinserted front to back to carry the thread to the backside.
Trim a tail, then . . .
. . . anchor the thread on the backside with a small
piece of paper tape.
Here is the tag front main shape with stitching completed.
8. Position and attach the front accent tag shape
over the stitched tag panel, matching up punch hole,
and keeping outer edges offset evenly within stitching.
9. Position and attach the tag front assemblyonto the picot edge tag base, matching punch hole
and keeping outer edge of assembled tags
evenly offset within the picot edge.
(Consider pressing the layers under a flat weight
until dry if using liquid adhesive.)
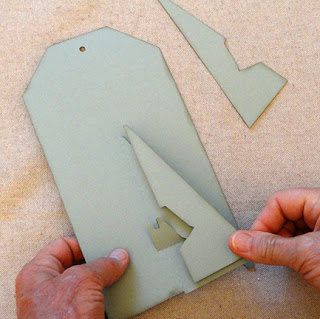
10. Prepare the tag back panel - if using the self-stand
variation - by bending the wedge back (to the left)
and the lock tab down.
11. Position and attach the optional left face and right face
reinforcement wedge shapes to corresponding
faces of the attached wedge stand.
12. Position and attach the tag back panel
onto the backside of the base picot edge shape,
keeping the wedge and lock tab portions un-attached,
13. To prepare the stand to function, bend
the reinforced wedge out at perpendicular angle,
and flex/bend the lock tab down into place so that . . .
. . . it slots into the notch to keep wedge in place.
For storing or sending, reverse the process
so that the self-stand will fold completely flat.
14. Here is the easel stand ready to function.
15. Add the lacy frame accent to the tag front,
spacing it approx. 1 5/8" above the bottom edge
of the front accent panel's bottom cut edge,
as indicated by pointing finger, and centered
from side to side.
If desired, also position and attach the arabesque
flourish combination over the top of the lacy frame . . .
. . . with the oval center in the middle of
the oval frame opening.
Find more information about the flourish design set HERE.
16. Position and attach other decorationsand embellishments, such as the butterflies
from the Arabesque Flourish design set.
Position and attach the phrase banner across
the bottom are of the tag.
Use print and cut methods, a stamp or other
means to personalize the banner.
Here is the tag standing.
17. Embellish or decorate the front of the tag,
oval, etc., as desired.
The sample tag project uses purchased flowers
from this set, and . . .
. . . this set, both purchased at Hobby Lobby.
Here is the completed decorated tag project.


Really beautiful tag. Thank you for the idea.
ReplyDelete