
Celebrate the “sweet” and “cool” with a classic
shape
hot weather treat in the form of an ice cream slider box
that slides open
to reveal a gift card
promising even more pleasure!

Layered stick shapes are
glued together for
thick realism.
Box project measures approx. 3.25” wide x
7.5” long (including stick) x .84” deep
when assembled and closed.
Plain liner
insert included as alternative for
treats or other appropriately sized gift.
ASSEMBLY: 1. Identify and cut the shapes:
A slider hull shape with bottom wrap over buffer
compartment
B slider top curved wall boxing strip
C curved wall rim strip
D interior wall stick tabs "cover"
E core stick shapes (6-7 determined by Step 2 test)
F front and back stick shapes with top tabs
G stick shape thickness test window and strips
H gift card holder insert (1-3 layers for thickness)
I optional securing interlocking arms
J main hull back panel K main hull front panel
L front accent panel base M icing N contrast underlay
O hull walls boxing strip

2. To determine how many stick "core" strips to cut
to fit snugly through the cutout windows in slider bottom,
conduct a test by layering . . .

. . . test strips into a stack, then inserting through
the test window. Selected card stock will affect how many
fit. Likely 8 strips will fit best; but 6 or 7 are also possible.
Once the quantity is determined, subtract 1 each for
stick front and back (2 total), then use that new total
for core quantity.

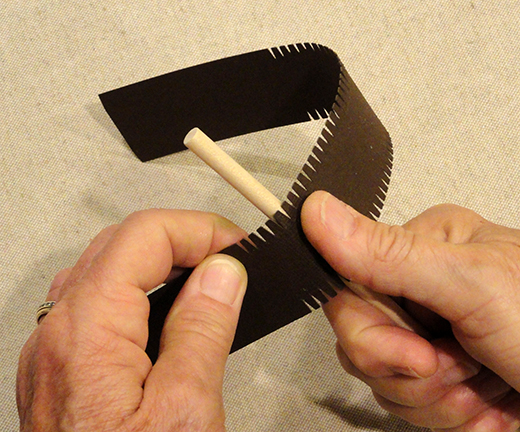
3. Prepare the side walls boxing strip for the main hull
by adding curl to the strip using a rod-like tool such as
this wooden dowel, applying fingertip or thumb pressure
as the card stock strip is drawn across the tool.
along perforations.
 5. Identify the small cut guide marks that identify

the center top and the side positions where
curved boxing ends.
 Identify coordinating guide marks on the boxing strip.
 Align the center and center top guide marks,


overlapping the plain panel edge over the mini tabs
and "tack-gluing" to hold in place.
 6. Align side guide marks in similar manner . . .


. . . adjust edges to align, and glue the first half of
curve.

 7. Apply glue then position and attach the long side

To help join the seam, invert the assembly face down
on flat work surface, then apply fingertip pressure.

flange.

8. Repeat the process to attach the second curve
and long side flange edges.

panel.
 10. Prepare the front panel insert by positioning

the contrast underlay behind the icing shape,
slightly inset from sides and bottom edges, and
glue in place.
 Position and attach icing assembly on top of

accent base panel.
 11. Position and attach accent panel to front

of hull assembly, matching outer cut edges.
 12. Prepare slider shape by bending back on all

perforation lines except for bottom long flange
and side rounded corner tabs, which bend forward.
 13. Create the coffered end by bending

the bottom panel upward into position, with side
angle tabs tucked under the corresponding edges . . .


into position and gluing to side tab extensions. Then . . .
 . . . bend interior slotted wall down into position.
 Apply adhesive to the end flange and the two


adjacent side tabs, then . . .
 . . . bend to perpendicular so that long flange edge

aligns dashed guide line on slider bottom, and
side tabs attach to side walls.
 One way to ensure that interior wall is positioned

at perpendicular angle is to use a squared block
to push the wall into position before flange is attached.
 15. Prepare slider top curved wall by adding curl

to the length using rod tool; refer to Step 3.
 Bend the multiple tiny tabs back to perpendicular.
 16. Refer to Steps 5-6 to position, tack, and shape


first half of boxing strip . . .
 . . . to slider base panel curved edge.
 17. At end, overlap adjacent tabs and attach.
 18. Repeat for the second half of curved edge.
 19. Bend side flanges inward and attach in place.
 20. Prepare curved edge rim strip by adding curl


with rod tool, then . . .


21. Stack the core stick shapes and glue together
into a unit, taking care to align ALL cut edges
as precisely as possible.

22. Bend top tabs forward on front and back
stick shapes, then . . .

. . . position and attach onto front, and . . .

. . . back of core stack, matching cut edges.

Press flat under a heavy weight to help avoid
warping and curling until stick can be thoroughly dry.

Here is the completed stick.

23. Insert the stick into interior wall slot
and through the compartment to exit the outer slot.

Push stick through until tabs touch wall.
Apply adhesive to attach tabs in place.

24. Apply double-stick adhesive to backside
of cover panel, then center and attach on inside wall.

25. Prepare gift card holder insert by layering
the insert shapes into a stack with ALL cut edges
aligned as precisely as possible, and gluing together
Press flat under heavy weight until dry.

Gift card insert can be inserted as is into
the slider compartment . . .

. . . with gift card inserted into the window
(consider securing with temp sticky dot
or 1" length of double sided tap).

Or, if preferred, position and attach the interlocked
and centered arms over the middle of the insert . . .

. . . wrap ends to backside and secure there;
or trim excess and attach at insert edges.

Place carrier with card into slider, then . . .

. . . insert slider into bottom of hull and push into
place. NOTE a small "vanilla" margin of slider
will remain visible even when fully inserted.

No comments:
Post a Comment