
Inspired by quill art, delicate edges and finely-detailed
swirls
holding curvy keyboard give this heart-shaped card pizzazz!
(Be sure to
use a cutting mat with nearly-new stick
and sharp blade.)
Makes an elegant and
unique Valentine or friendship card
for keyboard musician, or to accompany
wedding gift,
anniversary remembrance, and more.
Card base backside is composed
of asymmetrical “halves”
with edge portions that attach back to back with card
front.
Bend these “doors” open to reveal
interior “sentiment” space,
or close and latch with tab and slot.
Broadened
back halves “tips” provide
a way to stand the card for display.
Card measures approx.
6”x6”.
Guide marks on each layer assist positioning.
Custom-sized envelope
available as separate design:
Env Heart Swirl Paper Clip.

Consider adding one
of the “Tags Make Music Trio Large”,
using print & cut techniques and tools.

ASSEMBLY: 1. Identify and cut the shapes:
A card base front
B bottom accent layer
C second accent layer
D heart with swirls accent
E & F keyboard keys arches left & right
with black key overlays
G inner heart outline accent
H small heart solid accent
I small heart outline with swirls
J & K flat back panel halves with
tab and slot closure

by gluing specific keys within the key outlines
on each arch. To save confusion about which
key fits in each position, consider cutting the shapes
then hand-trimming a containing shape around them.
Remove the container plus key strips from cutting mat
without dislocation, then remove one by one and
attach in place in corresponding order.
 3. Position each key arch under the heart with swirls

outline, rotating slightly as needed to match up
the arch section outline with the heart's rounded
outline, until edges align.
 NOTE that the right arch's inner key will underlap

the center swirl as indicated here.
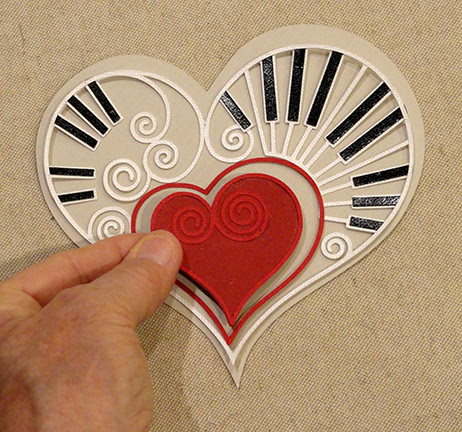
 4. Identify the alignment 'V' upper and lower cut guide

marks on the second heart base shape (indicated
by the barely-visible fingertip at lower center edge
of this image).

Position and attach in place the swirl heart
assembly with bottom point and upper "valley" at
the guide marks.

with the right upper arch aligned over keyboard lower
arch. NOTE that left shorter arch will fit very near or
abutted at left side swirl edges.

the whole heart, with outer edges aligned precisely.
 7. Position and attach the smallest heart roughly

centered within the heart outline.
 8. Position and attach the center assembly over
the bottom contrast heart accent, using cut-in
tip and valley guide marks to assist. Then position
and attach assembly onto the card front base.
 9. Prepare the back panels by bending the side

sections forward with a "valley" fold. Position each
half on the corresponding backside half of card
assembly, then with edges aligned, attach the outer
sections ONLY to card base backside.
 10. To close the card, the tab fits into the slot.

When opened, the broadened tips of back half tips
can assist in allowing heart to stand.
 Here is the completed heart card.


No comments:
Post a Comment